
User's Manual

© Bosch Connected Devices and Solutions GmbH 2021. All rights reserved, also regarding any disposal, exploitation, reproduction, editing,
distribution, as well as in the event of application for industrial property rights.
Parking Lot Sensor | PLS
11 | 18
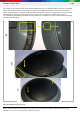
After the installation of the sensor, the sensor learns about parking changes, which happens in its vicinity. After
approx. 10 parking changes, the sensor is in its taught-in state.
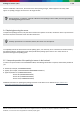
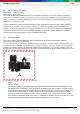
2.4 Replacing/removing the sensor
To replace the parking lot sensor, only the sensor needs to be replaced. To do this, remove the sensor cap and loosen
the T20 screw; then remove the sensor from the sensor base.
To completely remove the sensor base from the parking space, it is necessary to use a hammer and chisel to destroy
the adhesive effect by chiseling the sensor base parallel to the parking space surface. As a result, there is no
permanent damage to the parking space.
2.5 Setup and operation of the parking lot sensor in the backend
In order to set up the sensor in the LoRaWAN backend, the following information is required, which will be provided to
you:
devEUI (for example, FCD6BD0000190001)
appKey (for example, 00112233445566778899AABBCCDDEEFF)
appEUI (TPS110 EU (FCD6BD0000190000)
TPS110 IN (FCD6BD0000190003)
TPS110 JP (FCD6BD0000190002)
TPS110 US (FCD6BD0000190001)
Additional information on operating the parking lot sensor can be found on our website at https://www.bosch-
connectivity.com/parking-lot-sensor/downloads/.
INFORMATION:
A battery replacement is not intended; instead, the sensor must be replaced.
INFORMATION:
During operation, a continuous automatic calibration of the parking lot sensor takes place through "parking"
and "exiting parking space'' events.