
User Manual
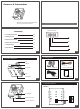

07 11
08 12
09 13
10 14
IV. FPVconnection illustration
V. Troubleshooting
VI. Specifications
●
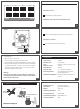
Control Plane
Remote
● TR1
● Wireless RC Receiver
(Schematic Diagram)
CH4
1 2 3 4
CH6
1 2 3 4
CH7
1 2 3 4
CH8
1 2 3 4
CH1
1 2 3 4
CH5
1 2 3 4
CH3
1 2 3 4
CH2
1 2 3 4
Adjust dial switch to a different channel
2、Video
Screen preview
Open to video
a. Install the fixing
b. Be sure to insert TF memory card
c. Connect the product and power with the built-in cables
d. It will switch itself after powered up (the default status will be in preview)
e. Open the receiver and adjust to the same channel, then the screen taken
by camera will be received. If you open to record a video, a red flashing
dot will be on the top left corner of screen. If you want to stop to video,
please turn the switch to preview model.
Warning:
When you are recording, the data will be lost or damaged if
turning off directly. Please turn the switch to preview model
before turning off the power.
1、Unable to power on
Check if the battery voltage is under 8V.
2、 Unable to video when turn the switched to record
3、 No image on receiver
Check if the dial switches are on same channel.
Check if TF card is damaged or format the card, then insert again.
Video sensor:
Effective pixel:
Lens:
Exposure control:
White balance:
Dynamic video:
Recording medium:
Multifunctional USB port:
1/3 CMOS
5.0 mega pixels
Fixed focus, f=2.6mm, angle of view=130°
Automatic;
Automatic;
4:3 1440×1080 (30 frames/s);
high-speed Micro SD card (TF card);
Max. 32GB supported, avi
USB2.0 high-speed communication port
DC input;
Multifunction port:
Dimensions:
Weight:
Operating temperature:
Transmitting Power:
Transmitting Frequency:
Antenna Connector:
DC12V input, AV output,
Approx. 36x47x45mm L/W/T
Approx. 42g
-10℃-60℃;
200mW/23dBm
5645-5945MHz, 8CH
SMA