INTERACTIVE OVENS Gebruiksaanwijzing NL O p e r at i n g EN Istruzioni Notice instructions per l’uso d’emploi Anweisungen zur I FR Verwendung DE BPO-45 BPO-60
INTERACTIVE OVENS BPO 45/60 NL Installatie - Gebruik - Onderhoud INTERACTIVE OVENS BPO 45/60 EN Installation - Use - Maintenance FORNO INTERACTIVE BPO 45/60 I Installazione - Uso - Manutenzione FOUR INTERACTIVE BPO 45/60 FR Installation - Emploi - Entretien INTERACTIVEOFEN PBO 45/60 Installation - Gebrauch - Wartung DE
Geachte klant, NL Wij willen u bedanken en u feliciteren met uw keuze. Dit nieuwe Boretti product is met zorg ontworpen en gebouwd met behulp van hoogwaardige materialen en zorgvuldig getest om ervoor te zorgen dat het aan al uw culinaire eisen voldoet. Lees en bekijk deze eenvoudige instructies aub aandachtig door, zodat u vanaf de eerste keer dat u het apparaat gebruikt, het optimale resultaat bereikt. Nederlands EN English I FR Italiano Français Boretti B.V. DE Deutsch APPARAAT SPELEN.
GB NL INHOUD Gebruiksaanwijzing, 5 Eerste gebruik, 5 Zelf reinigende wanden (indien aanwezig), 6 Respect voor het milieu, 6 Inleiding oven, 7 Installatie en inbedrijfstelling, 7 Voordat U de stekker in de wandcontactdoos steekt, 7 Demonstratie modus, 7 Het instellen van de klok, 8 Akties die mogelijk zijn als de oven uitgeschakeld is, 9 Aanzetten van de oven, 9 Blokkering of kinder beveiliging, 10 Primaire functies, 11 Wat zie ik op het bedienpaneel?, 11 Oven functies, 12 Gebruiksaanwijzing, 13 Temperatuu
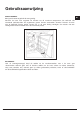
Gebruiksaanwijzing EERSTE GEBRUIK Reinig voor het eerste gebruik de oven grondig. Verwarm de oven voor ongeveer 30 minuten tot de maximum temperatuur; Dit verbrand alle resterende productie-oliën die ongewenste geuren kunnen veroorzaken. Verwarm hiervoor de oven met de hetelucht functie, zonder roosters e.d. in de oven. Reinig vervolgens de roosters met een vochtige doek en een ontvetter voor u ze in de kamer plaatst.
GB NL ZELF REINIGENDE KATALYTISCHE WANDEN (Indien aanwezig) ZELF REINIGENDE WANDEN. de CLEAN functie aktiveert de reactie die reiniging tot gevolg heeft. Onze gladde wanden kunnen bekleed worden met zelfreinignende panelen. Ze zijn bedekt met een speciaal, micro-poreuze katalytische email die oxideert en geleidelijk de spatten van vet en olie verdampt bij koken op temperaturen boven de 200 ° C.
INLEIDING OVEN U heeft een nieuwe oven gekocht, die is uitgerust met de een computer, welke voortdurend de werking volgt, om de prestaties te optimaliseren. De tiptoets bediening is van de beste in zijn soort, nauwkeurig en betrouwbaar. De interface is elegant, ordelijk en discreet, intuïtiever dan ooit.
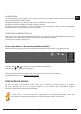
Om de demonstratie modus te beëindigen raakt u de licht toets 5 seconden aan: Het toetsenbord zal normaal werken en is klaar om ingeschakeld te worden. U kunt nu de tijd instellen, maar om de oven te kunnen gebruiken is dat niet noodzakelijk. GB NL HET INSTELLEN VAN DE KLOK De oven zal aangeven dat hij is aangesloten op de 230 volt door een dubbele piep. Om de tijd in te stellen, toetst u de “TIMER FUNCTIE” button minimaal 3 seconden in. Elke opdracht is bevestigd door een piep.
ACTIES DIE MOGELIJK ZIJN ALS DE OVEN UITGESCHAKELD IS. -Aanzetten van het ovenlicht Het ovenlicht wordt aan en uit gezet door het symbool aan te raken, zoals in de tekening. -De taal instelling veranderen Als de oven uit is, kunt u de taal van de display veranderen door tegelijk de rechter onder hoek minimaal 3 seconde in te drukken. Gebruik om de taal te selecteren, en bevestig dit met de toets. en de + toets in de Instellen van de kookwekker Zie de sectie op pagina 22.
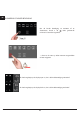
GB NL BLOKKERING OF KINDER BEVEILIGING Om de kinder beveiliging te activeren of te deactiveren, houdt u de toets gedurende minimaal 3 seconden ingedrukt. u kunt zo de oven op ieder moment vergrendelen of weer vrijgeven. Als het hangslotje op de display open is, dan is de kinderbeveiliging niet actief. Als het hangslotje op de display dicht is, dan is de kinderbeveiliging wel actief.
PRIMAIRE FUNCTIES GB NL Wat zie ik op het bedienpaneel ? De Kookprogramma’s: Uw oven heeft 11 speciale kookprogramma’s. Om een programma te kiezen, raakt u het bijbehorende symbool aan. Elk programma heeft een basisinstelling voor de temperatuur, die overeenkomt, met de meest gebruikte recepten. Deze temperatuur kunt u echter naar wens verhogen of verlagen. Let op: “Tijdens het gebruik kunnen de toegankelijke delen van de oven zeer heet worden.
GB NL Oven functies De oven lamp. Deze zal altijd branden als de deur open is. Om energie te sparen wordt de lamp tijdens het koken uitgeschakeld. Boven- en onder verwarmingselementen. Ingesteld op 190 ° C. Regulatie van de thermostaat van 50 ° C tot MAX Laat verwarmingselement. Pre-op 50 ° C. Regulatie van de thermostaat van 50 ° C tot MAX Boven verwarmingselement (grill oppervlak en verminderd vermogen). Vooraf ingesteld op MAX. Regulatie van de thermostaat van 50 ° C tot MAX.
GB NL GEBRUIKSAANWIJZING Conventioneel koken Een klassieke manier van koken, waarbij onder en/of boven elementen worden gebruikt voor het bereiden van uw gerecht. Het is aan te raden het gerecht pas in de oven te plaatsen nadat de op de ingestelde temperatuur is gekomen. U ziet dat als de C niet meer knippert, en u een pieptoon heeft gehoord. Als u tijdens het kookproces de temperatuur wilt verhogen of verlagen, dan kan dat met de + en – toetsen.
GB NL Geventileerd koken Bij deze wijze van koken draait er een ventilator achter in de oven, om de warme lucht door de kuip te circuleren. Hierdoor is de temperatuur overal in de kuip gelijkmatig, en zal uw gerecht sneller klaar zijn. Deze manier van koken leent zicht erg als u met meerdere roosters tegelijk werkt. U kunt zelfs meerdere typen eten tegelijk verwarmen (vis, vlees, etc.).
GB NL Temperatuur sonde. Sappigheid, smaak en aroma zijn het resultaat van het gebruik van onze temperatuursonde. De temperatuursonde is een thermometer die de temperatuur meet in de kern van uw gerecht. u kunt daarmee de mate van garing erg nauwkeurig bepalen. Vlees zal roze zijn aan de binnenkant en gaar aan de buitenkant! De temperatuur die het voedsel bereikt tijdens het koken houdt nauw verband met problemen met betrekking tot gezondheid en hygiëne.
GB NL Gebruik van de temperatuur sonde. De voeleringang is gelegen in de bovenhoek van de voorkant van de oven, beschermd door een metalen deksel (1). Til de metalen kap op. (2) Steek de stekker zo ver mogelijk naar binnen. Als deze goed is geplaatst, zal de besturing een dubbele pieptoon geven.(3) Schuif de sonde in het midden van het eten, vermijd daarbij het aanraken van botten of van vette gebieden.
GB NL Selecteer de beste functie voor u recept. Na 5 secenden zal de display de temperatuur weer gaan geven die de sonde meet. Na korte tijd zal de oven beginnen met het programma. De display laat de ingestelde kerntemperatuur zien (66 °C pre-set) van de sonde, die bij te stellen is met de toetsen tussen de 30 en 99 °C.
GB NL Wij adviseren u onderstaande tabel te gebruiken. eten MINIMUM INTERNE TEMP. Gehakt Hamburger 71°C Varken, koe, lam e.d. 74°C Kip kalkoen 74°C Rundvlees, lam Gebraden vlees Rauw De temperatuur wordt niet aangegeven, omwille van veiligheid.
GB NL Als de kerntemperatuur wordt bereikt, zal de oven uitschakelen, en geeft een pieptoon. Vergeet niet de sonde los te maken van de oven voor u het gerecht uitneemt.
GB NL Speciale functies Boost (snelle voorverwarming) BOOST – Om snel de oven op bedrijfs rtemperatuur te krijgen Deze speciale functie kan worden geactiveerd na selectie van een kookfunctie en wordt gebruikt om de tijd die nodig is om de ingestelde kooktemperatuur te berijken te verkorten.
GB NL Het reinigen vindt plaats bij een temperatuur van 250 ° C en duurt een uur. Gebruik deze functie niet voor het bereiden van voedsel! De panelen mogen alleen met kraan water worden schoongemaakt, en moeten na verzadiging worden vervangen. U kunt de panelen los kopen bij uw gespecialiceerde dealer, of bij Boretti. (zie www.boretti. nl). Oven licht besturing. De ovenlichtbesturing is actief in alle programma’s en werkt geheel onafhankelijk van de rest van de oven.
GB NL Indien u de temperatuur niet meer aanpast na het kiezen van het gewenste programma, zal de oven na enkele seconden vanzelf starten! Het instellen van de temperatuur. De oven gebruikt een temperatuursensor die voor een maximale betrouwbaarheid bij het koken een nauwkeurigheid garandeert van ± 5 °C. Kunt u de temperatuur op elk moment aanpassen aan uw wens. Na het selecteren van het gewenste programma raakt het symbool aan en de instelling varieert van +50 ° C tot MAX.
REST WARMTE Tijdens het gebruik van de oven zal de kuip warmte afgeven aan de mantel. Na gebruik zal daarom de koel ventilator nog blijven doordraaien tot de mantel een temperatuur van minder dan 50 graden heeft bereikt. Gebruik deze eigenschap om U eten rustig te laten garen. PROGRAMMEREN VAN DE OVEN Uw oven heeft drie programmas die maken dat u oven start en stopt wanneer het u past. De timer functies kunnen worden geselecteerd door om de beurt de toetsen van links naar rechts aan te raken.
GB NL Timer programmeren: kooktijd Raak het timer symbool één keer aan, en het symbool zal oplichten. Daarnaast zal de klok niet meer de actuele tijd aangeven maar op 00:00 springen. De scheidingspunten zullen knipperen om aan te geven dat u de kooktijd in kunt stellen. Zodra de stoptijd is ingesteld, zal de display weer de actuele tijd weergeven en licht het kooktijd symbool op. Het terugtellen begint nu.
Stel de stoptijd in door het aanraken van de “+” en “-” symbolen. Zodra de stoptijd is ingesteld, zal de display weer de actuele tijd weergeven en licht het stoptijd symbool op. Het terugtellen begint nu. Nadat de ingestelde tijd is verstreken, zal de oven piepen en worden verwarmingselementen uitgeschakeld. De volgende melding verschijnt in de display: “PROGRAMMA TEN EINDE GERECHT UITHALEN”. raak een willekeurige toets aan om het piepen te stoppen, of open de deur.
GB NL Stel nu de stoptijd in. De display zal initieel de actuele tijd + 2 uur laten zien, in dit voorbeeld 8:30 uur +2:00 = 10:30 uur.. Verander de stoptijd naar de gewenste tijd, in ons voorbeeld 13:00 uur. De oven gaat nu stand-by, en het licht gaat uit. De computer zal nu de oven automatisch inschakelen om 11:00 uur (13:00 – 2:00) en uitschakelen om 13:00 uur. Uw gerecht zal klaar zijn als u thuis komt! Timer programmeren: kookwekker.
AUTOMATISCHE FUNCTIES: RECEPTEN GB NL Volg deze procedure om toegang te krijgen tot de recepten functie. Toets AAN/UIT ( ); Selecteer de AUTOMATISCH ( ) functie; De display laat 2 opties zien: - persoonlijke recepten; - vooringestelde recepten Kies de gewenste optie met de toetsen; Gebruik de Toets, om uw keuze te bevestigen; Het volgende menu verschijnt; toets de knoppen om het gerecht te kiezen en de knop om de keuze te bevestigen. Toets de knoppen om het type te kiezen eb de de keuze te bevestigen.
Wanneer alles is ingesteld, laat de display zien welk recept is gekozen. De dubbele punt in de kooktijd (00:30) zal knipperen om aan te geven dat het kan worden aangepast. Om het te veranderen, gebruik de - + toetsen. GB NL Of selecteer de functie direct waarna het ingestelde programma direct start met terugtellen vanaf een preset tijd op de display.
GB NL Als het geheugen vol is, kunt u geen recept meer opslaan en krijgt u de melding “memory full unable to save” Voor dat u nu weer recepten kunt opslaan moet u eerst oude recepten verwijderen. • • - selecteer de functie; - ga dan, door het indrukken van de toets naar het “persoonlijke recepten” gedeelte, waar de opgeslagen recepten zijn te vinden; - gebruik de knoppen om door het menu te bladeren, en het recept te selecteren dat u wilt verwijderen OPMERKING: de namen worden door het menu bepaald.
GB NL Uitnemen van de ovendeur. De deur kan snel en eenvoudig worden verwijderd. Om dit te doen, gaat u als volgt te werk: - Open de deur. - Til de twee hendels zoals in in Fig. hieronder; - Sluit de deur op de eerste aanslag (veroorzaakt door het verhoogde hefbomen). - Til de deur naar boven en naar buiten om deze te verwijderen uit de bevestigingen. Voor het vervangen van de deur, hang de scharnieren in hun bevestigingen en verlaag de twee hendels.
GB NL HET VERVANGEN VAN DE OVEN LAMP. Belangrijk: Voor het vervangen van de lamp dient u de oven spanningsloos te maken. De lamp moet aan de volgende eisen voldoen: 300 graden, 230 volt, 25 Watt, G9 connector. - Gebruik een schroevendraaier om het glas dat voor de lamp zit los te wippen. - Neem de oude lamp uit. Let op dat u het glas niet breekt. - Plaats de nieuwe lamp op de plaats van de oude, zonder het glas met de vingers aan te raken! (U kunt bijvoorbeeld een latex handschoen dragen).
Installatie instructies GB NL De oven kan geïnstalleerd worden onder een kookplaat, in een meubel, of in combinatie met een borden warmer in een 60 cm gat. De afmetingen van de ruimtes worden vermeld in de tekening hieronder. Het materiaal waar de kast van gemaakt is, moet bestand zijn tegen de afgegeven hitte. De oven moet gecentreerd worden in de kast, en daarna vastgeschroefd worden met de meegeleverde schroeven en bussen.
GB NL 33
ELEKTRISCHE AANSLUITINGEN Voordat u de oven aansluit op het lichtnet, zorg dan dat: - De voedingsspanning overeenkomt met de gegevens op het plaatje op de voorzijde van de oven. - De netvoeding een efficiënte aarde (massa) verbinding heeft die voldoet aan alle van toepassing zijnde wet- en regelgeving. GB NL De juiste aarding (massa) is een wettelijke verplichting. De kabel mag een temperatuur van 50 ° C boven de omgevingstemperatuur niet bereiken op elk punt in de lengterichting.
Dear Customer, we would like to thank you and congratulate you on your choice. This new product has been carefully designed and built using top quality materials, and meticulously tested to ensure that it meets all your culinary requirements. Please read and observe these simple instructions, which will enable you to achieve excellent results from the very first time you use it. This state-of-the-art appliance comes to you with our very best wishes.
Contents User instructions, 37 EN The first time you use the oven, 37 Self-cleaning catalytic panels (Where present), 38 Respect for the environment, 38 Introduction to the oven, 39 Installation and hook-up, 39 Before hook-up, 39 Demonstration mode, 39 Setting the clock, 40 Actions that are possible with the oven off, 41 Turning on the oven, 41 Key (or child safety) function, 42 Main functions, 43 Overview of the command panel, 43 The cooking functions, 43 Control panel functions, 44 Instructions for use,
User instructions The first time you use the oven Clean the oven thoroughly with soapy water and rinse well. To remove the lateral frames from smooth-walled ovens, proceed as shown in the figure. Operate the oven for about 30 minutes at maximum temperature to burn off all traces of grease which might otherwise create unpleasant smells when cooking. Do not use rough abrasives or sharp metal scrapers to clean the glass door of the oven because they could scratch the surface and cause the glass to shatter.
Self-cleaning catalytic panels (Where present) EN SELF-CLEANING PANELS The CLEAN (where present) function activates the reaction that causes cleaning. Our smooth walled ovens can be fitted with selfcleaning panels to cover the inside walls. These special panels are simply hooked on to the walls before the side frames are fitted. They are coated in a special, micro-porous catalytic enamel which oxidises and gradually vaporises splashes of grease and oil at cooking temperatures above 200° C.
FOR ADDITIONAL INFORMATION about the treatment, recovery and recycling of this product, contact the local office of competence, the domestic waste collection service or the store where the product was purchased. BEFORE SCRAPPING, make it unusable by cutting the electrical cord. EN Introduction to the oven Dear Customer, your new oven is controlled by an electronic board that constantly monitors its operation to improve its performance. The touch controls are state-of-the-art, precise and reliable.
In this mode, the oven is never REALLY turned on, i.e., the heating elements are never powered! The control panel is INACTIVE and, so, the oven will not respond to commands! To disable the demonstration mode, touch the light symbol for five seconds: the control will go to normal operation and ready for turning on. Now you can set the time but it is not necessary for turning on the oven. EN Setting the clock The oven will signal that it is connected to the power mains with a double beep.
ACTIONS THAT ARE POSSIBLE WITH THE OVEN OFF - Turn on oven light The oven light is turned on/off by touching the symbol as shown in the figure. - Change the Language When the oven is off, you can change the language of the display by simultaneously selecting the + in the lower right for at least 3 seconds. Then use to select the language and confirm the choice with . and - Setting the “minute-counter” timer function See the appropriate section on page 58.
Key (or child safety) function EN The key function is activated/deactivated by pressing the button for at least 3 seconds. You can activate and deactivate the operating mode of the oven at any time. The padlock OPEN symbol means that the key function is not active. The padlock CLOSED symbol means that the key function is active.
MAIN FUNCTIONS Overview of the command panel EN The cooking functions The provides eleven specific cooking functions! To activate a function, just touch the corresponding symbol. Each function has a temperature setting selected on the basis of cooking tests of the recipes that are typically used, which can be easily changed based on your own experience. Attention: “During use, the accessible parts of the oven can become very hot.
Control panel functions The oven lamp always turns on when the door is opened and, to save energy, it is managed by the system in the other modes. EN Upper and lower heating elements. Preset to 190 °C. Regulation of the thermostat from 50° C to MAX Lower heating element. Pre-set to 50 °C. Regulation of the thermostat from 50° C to MAX Upper heating element (grill surface and reduced power). Preset to MAX. Regulation of the thermostat from 50 °C to MAX. Double heating element (large grill surface area).
EN Instructions for use Conventional cooking A classic system that uses upper and lower heat suitable for cooking a single dish. It is a good idea to insert the food when the oven has reached its preset temperature, i.e., when the °C is locked and you have heard the beep. If you need to lower or raise the temperature towards the end of cooking, press the most suitable cooking symbol and adjust the temperature as you see fit. We recommend opening the door as little as possible during cooking.
Fan cooking EN In this type of cooking, a fan located in the rear part circulates warm air inside the oven, distributing it uniformly. This cooks food faster than conventional cooking. This system is good for cooking on several shelves and even for different types of foods (fish, meat, etc. ). Defrosting When you select ventilated cooking and set the temperature to 0 °C, the fan will circulate cold air inside the oven, favouring the rapid defrosting of frozen foods.
Food probe (or probe thermometer) EN TEMPERATURE PROBE Tenderness, taste and flavour are the result of precise ad functional control. The food probe is a thermometer which, when inserted into the food, makes it possible to check the internal temperature and use it to establish the end of cooking. For example, meat may look like it is cooked on the outside, but still be pink on the inside! The temperature reached by food during cooking is closely linked to problems relating to health and hygiene.
EN to ensure that the minimum cooking temperatures are reached. The greatest hazards are posed by poorly cooked chicken, particularly at risk from Salmonella. • Avoid interrupting the cooking process, i.e., partially cooking food, storing it and completing the cooking process later. This sequence encourages the growth of bacteria due to the “warm” temperatures reached inside the food. • Roast meat and poultry in the oven at temperatures of at least 165°C.
EN Select the best cooking function for your recipe. After 5 sec. the temperature display switches to indicate the temperature of the food probe, i.e., the temperature which mustbe reached inside the food.
Remember that, if you want to change the temperature parameters of the food probe or the internal temperature of the oven, you must proceed as follows: • Select (white for the probe and red for the oven chamber) • with you can increase or decrease the temperatures at will EN FOOD MINIMUM INTERNAL TEMPERATURE Mince Hamburger Beef, veal, lamb, pork Chicken, turkey 71°C 74°C 74°C Beef, veal, lamb Roasts and steaks: The cooking temperature for rare meat is not indicated by Rare the NFSD as it is unsafe for
EN The end of cooking, established by reaching the internal temperature set for the food probe. All the oven programming functions (timer functions) are stopped, apart from the beeper (minute counter). When the food probe detects the temperature for which it was set, the oven is automatically turned off and you are notified by a beep and “Program finished remove the dish” on the display. When the cooking time is up, remember to disconnect the food probe and remove it from the oven.
Special functions Boost (quick preheat) EN BOOST – FAST TIMES To shorten cooking times with fast pre-heating This special function can be activated after selecting a cooking function and is used to reduce the time required to reach the set cooking temperature. It is possible to disconnect the turbo heat function “BOOST“ or change cooking function at any time.
EN The cleaning process takes place at a temperature of 250°C and lasts one hour. Do not use it for cooking food!! The oven light is activated and can be switched off and on again at any time. All the self-cleaning panels will perform effectively for thirty cleaning processes, after this limit the panels must be replaced. The panels should be cleaned exclusively with tap water and replacements can be ordered from your specialised dealer.
EN The control suggests a temperature for each function, which you can change at any time, but if you consider it suitable, you don’t need to do anything else, the oven will start by itself in just a few seconds! Setting the temperature The uses a temperature probe that is accurate to ±5 °C for the maximum reliability of the cooking temperatures requested. You can change the temperature at any time.
Residual heat While cooking food, the structure of the oven stores heat. This heat is kept isolated from the rest of the kitchen thanks to generous heat insulation and certain construction techniques. This heat is gradually dissipated over time and can still be a resource in the kitchen, if it is managed: the control shows the internal temperature after the oven is turned off until it falls to 50 °C.
Timer programming: cooking time Touch the timer symbol once and the relative symbol will light up. Plus, the clock display will replace the current time: EN The separator dots flash to indicate that you can program the cooking time. Once the cooking time is entered, the display will flash the current time again and the “cooking time” symbol will be lit. The countdown begins now. After the indicated time has elapsed, the oven will beep and the heating elements, and cooking, will be turned off.
Set the end-of-cooking time by touching the “+” and “-” symbols. EN Once the end-of-cooking time is entered, the display will flash the current time again and the “end-of-cooking time” symbol will be lit. The countdown starts now. When the set time has been reached, the oven will beep and the heating elements will turn off, ending cooking. The following words will appear on the display: “Program finished remove the dish”: press any button to stop the beeping or open the door.
Now, set the end-of-cooking time: the control normally adds the cooking time to the current time, so it proposes an end-of-cooking time, which in our case would be 10:30 (8:30+2:00). EN Change the end-of-cooking time to what you want, in our example 13:00 The oven goes to standby mode, turning off the oven light. The control automatically turns the oven on at 11:00 (13:00-2:00) and turns it off at 13:00.
Automatic functions: recipes To access the recipe function, proceed as follows: Turn on the oven with ; Select the AUTOMATIC function EN The display shows the 2 options: - personal recipes; - preset recipes Choose the desired setting with the buttons; using the button, confirm the choice; the following menu appears; press the buttons to select the type of dish and the to confirm the choice. button Press the the choice. buttons to select the type and the to confirm Press the the choice.
When finished with the settings, the display summarizes the recipe set. The colon in the cooking time (00:30) will be flashing to indicate that it can be changed. To change it, use the - + buttons. EN Or select the function directly and, in this way, the cooking program starts with a countdown of the preset time on the display.
If there is insufficient memory for saving your personal recipes, you will see this message displayed: “MEMORY FULL UNABLE TO SAVE”. EN Before saving your recipe, you must delete others from the menu in this way: - select the function ; - select the “PERSONAL RECIPES” section where you will find all the saved recipes; - with scroll the menu and select the recipe that you want to delete.
Removing the oven door EN The oven door can be removed quickly and easily. To do so, proceed as follows: - Open the door fully. - Lift the two levers shown in Fig. below; - Close the door as far as the first stop (caused by the raised levers). - Lift the door upwards and outwards to remove it from its mountings. To replace fit the door, fit the hinges in their mountings and lower the two levers.
- Use a screwdriver to detach the glass pressure fitted on the lamp holder; - Remove the old lamp by sliding it out of its seat and taking care not to break it; - Insert the new bulb taking care not to touch it with your hands (we recommend using a disposable latex glove); - Reattach the glass cover, pressing it firmly into the lamp holder until it is totally inserted in the joint; - Connect the power line to the appliance.
Installation instructions Installing the oven in a cabinet 45 EN The oven can be installed under a cook top, in a column, or combined with the relative food-warmer drawer. The dimensions of the cabinet must be as shown in the figures below. The cabinet material must be able to withstand the heat.
Flush fitting 60 The oven can be installed under a work top or in a cooking column. Figure shows the installation dimensions. Make sure that surrounding materials are heat resistant. Align the oven centrally with respect to the side walls of the units surrounding it and fix it in place with the screws and Allen screws provided. See the accompanying instructions for combining the oven with multi-functional gas or gas-electric cookers.
Electrical connections EN Before connecting the oven to the mains power supply, make sure that: - The supply voltage corresponds to the specifications on the data plate on the front of the oven. - The mains supply has an efficient earth (ground) connection complying with all applicable laws and regulations. Correct earthing (grounding) is a legal requirement. The power cable should never reach a temperature 50° C above ambient temperature at any point along its length.
Caro Cliente, sentitamente La ringraziamo e ci congratuliamo per la scelta da Lei fatta. Questo nuovo prodotto, accuratamente progettato e costruito con materiali di primissima qualità, e stato accuratamente collaudato per poter soddisfare tutte le Sue esigenze di una perfetta cottura. La preghiamo pertanto di leggere e rispettare le facili istruzioni che Le permetteranno di raggiungere eccellenti risultati sin dalla prima utilizzazione. Con questo moderno apparecchio Le formuliamo i nostri più vivi auguri.
Indice Istruzioni per l’utente, 69 I Primo utilizzo, 69 Pannelli autopulenti, 70 Rispetto dell’ambiente, 70 Presentazione del forno, 71 Installazione e allacciamento,71 Primo allacciamento, 71 Modalità di dimostrazione, 71 Regolazione dell’orologio, 72 Azioni possibili a forno spento, 73 Accensione del forno, 73 Funzione chiave, 74 Funzioni Principali, 75 Panoramica del frontalino comandi, 75 Le funzioni di cottura, 75 Funzionalità del forno, 76 Istruzioni di funzionamento, 77 Sonda cibo, 79 Funzioni spec
Istruzioni per l’utente Primo utilizzo Il forno va pulito a fondo con acqua e sapone e risciacquato accuratamente. Per togliere i telai laterali nei forni con pareti lisce procedere come illustrato in figura. Riscaldare il forno per circa 30 minuti alla massima temperatura; verranno così eliminati tutti i residui grassi di lavorazione che potrebbero causare sgradevoli odori in fase di cottura.
Pannelli autopulenti catalici (dove presenti) I PANNELLI AUTOPULENTI La funzione CLEAN (dove presente) attiva la reazione che provoca la pulizia. I nostri forni con pareti lisce hanno la possibilità di montare all’interno della muffola dei pannelli autopulenti che ricoprono le pareti.
LO SMALTIMENTO DEVE ESSERE EFFETTUATO seguendo le normative locali per lo smaltimento dei rifiuti. PER ULTERIORI INFORMAZIONI sul trattamento, recupero e riciclaggio di questo prodotto, contattare l’ufficio locale competente, il servizio di raccolta dei rifiuti domestici o il negozio presso il quale il prodotto è stato acquistato. PRIMA DELLA ROTTAMAZIONE, renderlo inservibile tagliando il cavo elettrico di alimentazione.
In questa modalità il forno non vieni MAI azionato realmente, cioè non vengono accese le resistenze termiche!! Il pannello di controllo è INATTIVO e quindi il forno non risponderà ai comandi! Per disabilitare la modalità dimostrazione toccare per cinque secondi il simbolo luce: il forno entrerà in funzionamento normale e pronto per l’accensione. Ora la regolazione dell’ora è possibile, ma non necessaria, per procedere all’accensione del forno.
AZIONI POSSIBILI A FORNO SPENTO - Accensione luce del forno La luce forno viene attivata/disattivata digitando il simbolo come in figura. I - Cambio della Lingua A forno spento è possibile cambiare la Lingua nel display selezionando contemporaneamente e il tasto + in basso a destra per almeno 3 secondi. Poi con scegliere la lingua e confermare la scelta con . - Impostazione funzione timer “contaminuti” Si consulti la sezione apposita a pag 26.
Funzione chiave (o sicurezza bambini) La funzione chiave viene attivata/disattivata digitando il tasto per almeno 3 secondi. Si può attivare e disattivare in qualsiasi momento e modo di funzionamento del forno. I Il simbolo lucchetto APERTO specifica che la funzione chiave non è attiva. Il simbolo lucchetto CHIUSO specifica che la funzione chiave è attiva.
FUNZIONI PRINCIPALI Panoramica del frontalino comandi I Le funzioni di cottura Il controllo mette a disposizione ben tredici funzioni specifiche di cottura (a seconda del modello)! Per attivare una funzione è sufficiente toccare il simbolo corrispondente. Ogni funzione ha una temperatura impostata scelta in base a prove di cottura su ricette che tipicamente la utilizzano e possono essere facilmente variate a seconda della propria esperienza.
Funzionalità del forno Lampada forno, si accende sempre quando si apre la porta e per risparmio energetico, viene gestita dal sistema, nelle altre modalità. Resistenza superiore ed inferiore. Preimpostata a 190°C. Regolazione del termostato, da 50° C a MAX. Resistenza inferiore. Preimpostata a 50°C. Regolazione del termostato da 50° C a MAX. I Resistenza superiore (grill superficie e potenza ridotta). Preimpostata a MAX. Regolazione del termostato da 50° a MAX.
I Istruzioni di funzionamento Cottura convenzionale Sistema classico che utilizza calore superiore ed inferiore adatto per la cottura di un solo piatto. E’ bene che il cibo venga inserito quando il forno ha raggiunto la temperatura prestabilita, cioè quando si e’ bloccato il °C e avete udito un bip sonoro. Se verso fine cottura si avesse necessità di incrementare la temperatura inferiore o superiore, digitare il simbolo la cottura più idonea e regolare la temperatura come meglio credete.
Cottura ventilato Con questo tipo di cottura, un ventilatore posto nella parte posteriore fa circolare l’aria calda all’interno del forno, distribuendola in modo uniforme. La cottura avviene più rapidamente rispetto alla cottura convenzionale. Il sistema risulta idoneo per la cottura su più ripiani ed anche per cibi di natura diversa (pesce, carne ecc. ).
Ventilatore di raffreddamento Il ventilatore è posto sulla parte superiore del forno e crea un circolo d’aria di raffreddamento all’interno del mobile e attraverso il frontale del forno stesso. Entra in funzione quando la cavità del forno raggiunge i 80°C ca. Lo spegnimento del ventilatore avviene quando la cavità del forno scende attorno i 60°C ca. Sonda cibo (o termometro a sonda) I SONDA TEMPERATURA La tenerezza, il gusto ed il sapore sono il risultato di un controllo preciso e funzionale.
I La temperatura raggiunta dai cibi, durante la cottura, è strettamente collegata con problemi di ordine igienico/salutistico, infatti i batteri possono essere presenti in qualunque carne, così come nel pollame nel pesce e nelle uova crude. Alcuni batteri fanno andare a male il cibo, altri, come la Salmonella, Campylobacter jejuni, Listeria monocytogenes, Escherichia coli e lo Staphylococcus aureus, possono nuocere, anche gravemente, alla salute. I batteri si moltiplicano molto rapidamente sopra i 4.
Inserire lo spinotto fino in fondo: se inserito correttamente, il controllo avviserà con un segnale acustico (3). I Inserire la sonda al centro del cibo, evitando di toccare ossa o parti grasse. Tenete presente che la sonda cibo non funziona se viene connessa a forno già acceso! Selezionate la funzione di cottura più idonea alla vostra ricetta.
I Dopo 5sec. il display temperature si commuta per visualizzare la temperatura della sonda cibo cioè quella che dovrà essere raggiunta all’interno della pietanza.
I Se lo spinotto viene tolto a cottura iniziata, il controllo blocca il forno e avvisa dell’errore con segnali acustici: reinserire lo spinotto per riprendere la cottura! Quando si cucina con l’ausilio della sonda cibo, tutte le temperature preimpostate vengono modificate, per coerenza con la filosofia di utilizzo, a 165°C: si potranno variare da un minimo di 120°C al massimo di 250°C. Per lo stesso motivo la funzione scongelamento viene disattivata.
Funzioni speciali Boost (rapido preriscaldo) BOOST - TEMPI RAPIDI Per abbreviare i tempi delle cotture con un preriscaldamento rapido. I Questa funzione speciale è attivabile dopo aver selezionato una funzione di cottura ed il suo utilizzo serve per diminuire il tempo necessario a raggiungere la temperatura impostata di cottura. In ogni momento è possibile disinserire la funzione “BOOST” o cambiare funzione di cottura.
I Il processo di pulizia avviene ad una temperatura di 250°C per la durata di un’ora, NON utilizzarla per la cottura dei cibi! La luce forno viene attivata, è possibile in ogni momento spegnerla e riaccenderla. Tutti i pannelli autopulenti hanno un’efficacia di rendimento pari a circa trenta utilizzi, dopo tale limite i pannelli dovrebbero essere sostituiti. I pannelli vanno puliti solamente con acqua corrente e possono essere richiesti al Vs. rivenditore specializzato.
I Il controllo propone una temperatura per ogni funzione, è possibile in qualsiasi momento modificarla, ma se la ritenete idonea non occorre fare altro, il forno si attiverà da solo in pochi secondi! Regolazione della temperatura Il controllo si avvale di una sonda temperatura con precisione di ± 5°C per la massima affidabilità delle temperature di cottura richieste.
Calore residuo Durante la cottura dei cibi la struttura del forno immagazzina calore, questo calore è mantenuto isolato dal resto della cucina grazie ad un isolamento termico generoso e ad alcuni accorgimenti di costruzione. Questo calore viene disperso gradualmente nel tempo e può rappresentare ancora una risorsa in cucina se viene gestito: il controllo indica la temperatura interna, dopo lo spegnimento del forno, fino al raggiungimento dei 50°C.
Programmazione timer: tempo di cottura Toccare una volta il simbolo timer, si accenderà il simbolo relativo. Inoltre il display dell’orologio sostituirà l’indicazione dell’ora corrente. I I puntini separatori lampeggiano ad indicare che è possibile programmare il tempo di cottura Una volta definito il tempo di cottura, il display visualizzerà ancora l’ora corrente, il simbolo “durata cottura” sarà acceso. A partire da ora inizia il conteggio.
Impostare l’ora di fine cottura toccando i simboli “+” e “-“. I Una volta definita l’ora di fine cottura, il display visualizzerà ancora l’ora corrente, il simbolo “fine cottura” sarà acceso. A partire da ora inizia il conteggio. Raggiunta l’ora impostata, il forno lo segnalerà acusticamente, le resistenze termiche verranno spente, terminando quindi la cottura.
Definite adesso l’ora di fine cottura : il controllo normalmente somma all’ora attuale il tempo di cottura e la propone come ora di fine cottura, nel nostro caso proporrà le ore 10:30 (8:30+2:00). I Modificate l’ora di fine cottura per farla coincidere con quella da Voi desiderata, nel nostro esempio le 13:00. Il forno si pone ora in attesa (stand-by) spegnendo la luce forno.
Funzioni automatiche: ricette Per accedere alla funzione ricette eseguire la seguente procedura: Accendo il forno col tasto ; Seleziono la funzione AUTOMATICO; I Il display visualizza le 2 opzioni: - ricette personali; - ricette impostate Scegliere l’impostazione desiderata con con il tasto confermo la scelta; ; Compare il seguente menù; agire sui tasti per scegliere la tipologia della pietanza e con il tasto confermo la scelta. agire sui tasti confermo la scelta.
Al termine delle impostazioni il display riassume la ricetta impostata. I due punti del tempo durata cottura (00:40) saranno lampeggianti ad indicare la possibilità di poterlo modificare. Per modificarlo agire sui tasti - + . Oppure seleziono direttamente la funzione che sta lampeggiando e così inizia il programma cottura con il countdown del tempo prestabilito sul display.
Se la memoria dedicata al salvataggio delle ricette personali dovesse essere insufficiente il display visualizza il messaggio: “MEMORIA PIENA IMPOSSIBILE SALVARE”. Prima di salvare la mia ricetta devo cancellarne altre dal menù in questo modo: - seleziono la funzione ; - digitando entro nella sezione “RICETTE PERSONALI” dove trovo tutte le ricette salvate; - con i tasti scorro il menù per andare a selezionare la ricetta che voglio eliminare.
Smontaggio della porta forno Lo smontaggio della porta forno può essere facilmente effettuato operando come segue: - aprire totalmente la porta; - sollevare le due leve tte indicate in fig.
- Con un cacciavite a taglio sganciare il vetro inserito a pressione sul portalampada; - Levare la vecchia lampada sfilandola dalla sede stando attenti che non si rompa; - Inserire la nuova lampadina avendo l’accortezza di non toccarla con le mani (consigliamo l’uso di un guanto in lattice da gettare poi); - Fissare nuovamente la calotta in vetro premendola forte nel portalampada fino al totale incastro; - Collegare nuovamente l’apparecchio alla linea di alimentazione.
Istruzioni per l’installatore Il forno può essere installato sotto un piano di cottura, in colonna, oppure abbinato al relativo cassetto scaldavivande. Le dimensioni dell’incasso devono essere come riportato nelle figure sotto. Il materiale del mobile deve essere in grado di resistere al calore.
Incasso del forno 60 Il forno può essere installato sotto un piano di cottura oppure in colonna. Le dimensioni dell’incasso devono essere come riportato in figura. Il materiale del mobile deve essere in grado di resistere al calore. Il forno deve essere centrato rispetto alle pareti del mobile e fissato con le viti e bussole che sono fornite in dotazione. Per l’abbinamento del forno con i piani di cottura polivalenti gas o combi elettrici vedere le istruzioni allegate.
Allacciamento elettrico I Prima di effettuare l’allacciamento elettrico accertarsi che: - le caratteristiche dell’impianto siano tali da soddisfare quanto indicato sulla targa matricola applicata sul fronte del forno; - l’impianto sia munito di un efficace collegamento di terra secondo le norme e le disposizioni di legge in vigore. La messa a terra è obbligatoria a termini di legge. Il cavo in nessun punto dovrà raggiungere una temperatura superiore di 50° C quella ambiente.
Cher Client, Vous venez d’acheter l’un de nos produits et nous vous en remercions vivement. Ce nouveau produit, minutieusement conçu et construit avec des matériaux de tout premier choix, a été soigneusement testé afin de satisfaire chacune de vos exigences en matière de cuisson. Nous vous prions de lire et de respecter ces instructions simples qui vous permettront d’obtenir d’excellents résultats dès la première utilisation. Nous vous souhaitons une bonne cuisine avec cet appareil moderne.
Indice Instructions pour l’utilisateur, 101 FR Première utilisation, 101 Panneaux autonettoyants, 102 Respect de l’environnement, 102 Présentation du four, 102 Installation et raccordement,103 Premier branchement, 103 La modalité « démontration, 103 Réglage de l’horloge, 104 Actions possibles lorsque le four est éteint, 105 Allumage du four, 105 Fonction clé, 106 Fonctions principales, 107 Vue d’ensemble du bandeau de commande, 107 Les fonctions de cuisson, 107 Fonctionnement du four, 108 Instructions pou
Instructions pour l’utilisateur Première utilisation Le four doit être nettoyé à fond à l’eau et au savon, puis rincé méticuleusement. Pour enlever les cadres latéraux dans les fours à parois lisses, procéder comme indiqué sur la figure. Il convient de n’insérer la nourriture que lorsque le four a atteint la température préétablie, c’est-à-dire quand s’éteint le voyant lumineux.
Panneaux autonettoyants (Lorsqu’ils sont présents) FR PANNEAUX AUTONETTOYANTS La fonction CLEAN active la réaction qui provoque le nettoyage. Nos fours à parois lisses peuvent être munis, à l’intérieur, de panneaux autonettoyants qui recouvrent les parois.
L’ELIMINATION DOIT AVOIR LIEU selon les règlementations locales pour l’élimination des déchets. POUR D’AUTRES INFORMATIONS sur le traitement, la récupération et le recyclage de ce produit, contacter le bureau local compétent, le service de collecte des déchets domestiques ou le magasin où le produit a été acheté. AVANT LA MISE A LA CASSE, il est nécessaire de le rendre inutilisable en coupant le câble électrique d’alimentation.
Dans cette modalité, le four n’est JAMAIS réellement mis en marche, c’est-à-dire que les résistances thermiques ne sont mises sous tension!! Le bandeau de commande est INACTIF et le four ne répond pas aux commandes! Pour désactiver la modalité «démonstration», appuyer pendant cinq secondes sur le symbole de l’éclairage: le contrôle fonctionne dans le mode normal: il est prêt pour la mise sous tension. À présent, il est possible (mais non nécessaire) de régler l’heure pour allumer le four.
ACTIONS POSSIBLES LORSQUE LE FOUR EST ÉTEINT - Tourner la lampe du four On allume/éteint l’éclairage du four en effleurant le symbole d’après la figure. - Changement de langue Lorsque le four est éteint, on peut sélectionner la langue sur l’afficheur en sélectionnant simultanément et la touche + en bas à droite pendant au moins 3 secondes. Ensuite, choisir la langue avec la touche et confirmer le choix avec la touche .
Fonction clé (ou sécurité enfants) On active/désactive la fonction clé en appuyant sur la touche pendant au moins 3 secondes. Le mode de fonctionnement du four peut être activé/désactivé à tout moment. FR Le symbole du cadenas OUVERT indique que la fonction clé n’est pas active. Le symbole du cadenas FERMÉ indique que la fonction clé est active.
FONCTIONS PRINCIPALES: Vue d’ensemble du bandeau de commande FR Les fonctions de cuisson Le contrôle met à disposition onze fonctions de cuisson spécifiques! Pour activer une fonction, il suffit d’effleurer le symbole correspondant. Chaque fonction prévoit une température programmée choisie en vertu d’essais de cuisson sur des recettes qui l’utilisent typiquement; toute modification est aisée en fonction de l’expérience de chacun.
Fonctionnement du four Lampe du four, elle s’allume toujours quand on ouvre la porte et pour l’épargne énergétique; dans les autres modalités elle est gérée par le système. Résistance supérieure et inférieure. Préréglée sur 190°C. Réglage du thermostat de 50° C au MAX Résistance inférieure. Préréglée sur 50°C. Réglage du thermostat de 50° C au MAX Résistance supérieure (gril surface et puissance réduite). Préréglée au MAX.
FR Instructions pour le fonctionnement Cuisson conventionnelle Système classique qui utilise la chaleur supérieure et inférieure indiquée pour la cuisson d’un seul plat. Il est bon que les aliments soient introduits quand le four a atteint la température préétablie, à savoir quand le °C s’est bloqué et un bip sonore s’est produit.
Cuisson ventilee Avec ce type de cuisson, un ventilateur placé dans la partie postérieure fait circuler l’air chaud à l’intérieur du four, en le distribuant de manière uniforme. La cuisson a lieu plus rapidement par rapport à la cuisson conventionnelle. Le système est indiqué pour la cuisson sur plusieurs niveaux et même pour des aliments de différente nature (poisson, viande etc.).
Sonde des aliments (ou thermomètre à sonde) FR SONDE DE TEMPERATURE La tendreté, le goût et la saveur sont le résultat d’un contrôle précis et fonctionnel. La sonde des aliments est un thermomètre qui, en étant inséré dans le plat, permet de contrôler sa température interne et de l’utiliser pour déterminer la fin de la cuisson.
minimales de cuisson sont atteintes. Les plus grands risques proviennent de la volaille mal cuite, qui est particulièrement dangereuse en raison de la Salmonellose. • éviter d’interrompre la cuisson – c’est-à-dire de cuire partiellement –, de conserver et donc de finir de cuisiner plus tard, car il est possible que de cette façon, l’aliment atteigne des températures “tièdes” favorables à la croissance des bactéries. • rôtir la viande et la volaille au four à une température d’au moins 165°C.
FR Sélectionnez la fonction de cuisson qui convient le mieux à votre recette. Au bout de 5 secondes, l’écran des températures commute pour afficher la température de la sonde des aliments, c’est-à-dire celle qui devra être atteinte à l’intérieur du plat.
Nous rappelons que si, durant la cuisson vous voulez changer les paramètres de la température aussi bien de la Sonde des aliments que de l’intérieur du four, vous devrez agir de la façon suivante: • Sélectionnez (blanc pour la sonde et rouge pour la cavité du four) • avec vous pouvez augmenter ou diminuer à discrétion les températures TEMPÉRATURE INTERNE MINIMALE ALIMENT Hachis Hamburger 71°C Bœuf. Veau. Agneau. Porc 74°C Poulet. Dinde 74°C Bœuf. Veau.
La fin de la cuisson est discriminée par l’obtention de la température interne programmée pour la sonde des aliments ; toutes les fonctions de programmation du four (fonctions de minuterie) sont bloquées, à l’exception de la fonction de l’avertisseur sonore (compte-minutes).
Fonctions spéciales Boost (préchauffage rapide) BOOST - TEMPS RAPIDES Pour réduire les temps des cuissons avec un préchauffage rapide. FR Cette fonction spéciale ne peut être activée qu’après avoir sélectionné une fonction de cuisson et son intervention sert à réduire le temps nécessaire pour atteindre la température de cuisson programmée. Ce laps de temps est appelé “préchauffage” et celui-ci est exigé dans presque toutes les recettes.
Le processus de nettoyage a lieu à une température de 250°C pendant une durée d’une heure. NE PAS l’utiliser pour la cuisson des aliments ! La lumière du four est activée ; il est possible de l’éteindre et de la rallumer à tout moment. Tous les panneaux autonettoyants ont un taux de rendement égal à environ trente utilisations. Au-delà de cette limite, les panneaux devront être changés. Les panneaux ne doivent être nettoyés qu’à l’eau courante et vous pouvez les demander à votre détaillant spécialisé.
FR Le contrôle propose une température pour chaque fonction; celle-ci est modifiable à tout moment; mais si vous estimez que le réglage est correct, le four s’allume automatiquement au bout de quelques secondes! Réglage de la température Le contrôle utilise une sonde de température d’une précision de ± 5° C pour la fiabilité maximale des températures de cuisson souhaitées.
Chaleur résiduelle Pendant la cuisson des aliments, la structure du four emmagasine de la chaleur qui est maintenue isolée du reste de la cuisine grâce à un isolement thermique généreux et certains détails de construction. Cette chaleur est graduellement dispersée dans le temps et peut représenter une ressource en cuisine si l’on parvient à la gérer : le contrôle indique la température interne, après l’extinction du four, jusqu’à 50° C.
Programmation temporisateur: temps de cuisson Effleurer une fois le symbole du temporisateur: le symbole correspondant s’allume. En outre, l’afficheur de l’horloge remplace l’indication de l’heure actuelle: Iles points de séparation clignotent, indiquant qu’il est possible de programmer le temps de cuisson. FR Une fois que le temps de cuisson a été défini, l’afficheur indique encore l’heure actuelle et le symbole «durée cuisson» s’allume. Dès maintenant, le décompte commence.
Programmer l’heure de fin de cuisson en effleurant les symboles « + » et « - ». Une fois que l’heure de fin de cuisson a été définie, l’afficheur indique encore l’heure actuelle et le symbole «fin cuisson» s’allume. FR À présent, le compte à rebours commence. Lorsque le temps sélectionné s’est écoulé, le four émet un signal sonore, les résistances thermiques sont désactivées, terminant ainsi la cuisson. L’afficheur indiquera “Programme terminé, enlever le plat”.
Définissez l’heure de fin de cuisson : le contrôle additionne normalement le temps de cuisson et l’heure actuelle et la propose comme l’heure de fin de cuisson; dans notre cas, il proposera les heures suivantes: 10h30 (8h30+2h00). Modifiez l’heure de fin de cuisson pour la faire coïncider avec l’heure souhaitée: 13h00; dans notre exemple 13:00. FR Le four se met en attente (stand-by) et la lumière s’éteint.
Fonctions automatiques: recettes Pour avoir accès à la fonction recettes, exécutez la procédure suivante: Allumez le four à l’aide de la touche ; Sélectionnez la fonction AUTOMATIQUE FR L’afficheur indique les 2 options: - recettes personnelles; - recettes programmées Choisir la sélection souhaitée avec les touches ; Avec la touche confirmer le choix; Le menu suivant s’affiche; Effleurer les touches pour choisir le type de mets et confirmer la sélection avec la touche .
Au terme de la programmation, l’afficheur récapitule la recette sélectionnée. Les deux points de durée de la cuisson (00 :30) clignoteront. Modifier en effleurant les touches - + . Ou bien sélectionner directement la fonction ; le programme et le compte à rebours du temps sélectionné sur l’afficheur démarrent.
Si la mémoire dédiée à l’enregistrement des recettes personnelles ne suffit pas, l’afficheur visualise le message: “MEMOIRE PLEINE IMPOSSIBLE SAUVER”. Avant d’enregistrer la recette, il faut en effacer d’autres du menu de la façon suivante: - sélectionnez la fonction ; - entrez dans la section “RECETTE PERSONNELLES” en tapant, où l’on trouve toutes les recettes enregistrées; - à l’aide des touches faites défiler le menu pour sélectionner la recette que vous voulez éliminer.
Demontage de la porte du four Le démontage de la porte du four peut être effectué facilement de la manière suivante : - ouvrir complètement la porte; - lever les deux manettes indiquées sur la fig.
- Avec un tournevis plat, décrochez la vitre introduite par pression sur la douille ; - Enlevez l’ampoule grillée en l’extrayant de son logement sans la casser ; - Insérer l’ampoule neuve sans la toucher avec les mains (nous conseillons d’utiliser un gant en latex jetable) ; - Fixez ze nouveau la calotte en verre en l’enfonçant avec force dans la douille jusqu’à son encastrement ; - Branchez correctement l’appareil sur la ligne d’alimentation.
Instructions pour l’installateur Encastrement du four Le four peut être installé sous un plan de cuisson, en colonne, ou bien associé au tiroir chauffe-plats correspondant. Les dimensions de l’encastrement doivent être celles indiquées sur les figures ci-dessous. Le matériau du meuble doit être en mesure de résister à la chaleur.
Encastrement du four 60 Le four peut être installé sous un plan de cuisson ou dans une colonne. Les dimensions de l’encastrement doivent correspondre à celles qui sont indiquées sur la figure. Le matériau avec lequel le meuble est réalisé doit être en mesure de résister à la chaleur. Le four doit être centré par rapport aux parois du meuble et fixé avec les vis et les douilles fournies à cet effet.
Branchement electrique FR Avant d’effectuer le branchement électrique, s’assurer que : - les caractéristiques de l’installation permettent de respecter ce qui est indiqué sur la plaque d’identification qui est appliquée sur le devant du four; - l’installation est munie d’un raccordement à la prise de terre conforme aux normes et aux dispositions prévues par la loi. La mise à la terre est obligatoire aux termes de la loi.
Sehr verehrte Kundin, sehr verehrter Kunde, wir danken Ihnen und beglückwünschen Sie zu Ihrer Wahl. Dieses neue, sorgfältig konzipierte und aus erstklassigen Materialien hergestellte Produkt wurde akkurat kontrolliert, um allen Ihren Bedürfnissen für das perfekte Kochen zu entsprechen. Wir bitten Sie deshalb, diese leichten Anleitungen zu lesen und einzuhalten, mit denen Sie schon ab dem ersten Gebrauch herausragende Resultate erzielen werden.
Index Anleitungen für den Anwender, 133 DE Erstmalige benutzung, 133 Selbstreinigende katalytische platten, 134 Umweltverträglichkeit, 134 Vorstellung des Ofens, 135 Installation und Anschluss,135 Erster Anschluss, 135 Die Vorführungsfunktion, 135 Einstellung der Uhrzeit, 136 Mögliche tätigkeiten bei abgeschaltetem ofen, 137 Einschalten des Ofens, 137 Sperrfunktion (oder Kindersicherung), 138 Hauptfunktionen, 139 Die Garfunktionen, 139 Bedientafelfunktionen, 140 Betriebsanleitung, 141 Kühlventilator, 143
Anleitungen für den Anwender Erstmalige benutzung Der Backofen muss gründlich mit Seifenwasser gesäubert werden. Wie auf der Abbildung dargestellt vorgehen, um bei den Öfen mit glatten Wänden die seitlichen Backbleche her-auszunehmen. Den Backofen für etwa 30 Minuten auf Höchsttemperatur aufheizen; auf diese Weise werden alle fett-haltigen Bearbeitungsrückstände eliminiert, die beim Backen unangenehme Gerüche verursachen könnten.
Selbstreinigende katalytische platten DE SELBSTREINIGENDE PANEELE Die Funktion CLEAN startet die Reaktion, die zur Reinigung führt Unsere Backöfen mit glat-ten Wänden bieten die Möglichkeit, in der Muffel selbstreinigende Platten zu montieren, mit denen die Wände verkleidet werden.
DIE ENTSORGUNG muss unter Einhaltung der örtlichen Auflagen zur Abfallentsorgung erfolgen. FÜR WEITERE INFORMATIONEN zur Behandlung, der Rückgewinnung und das Wiederverwerten dieses Produkts die zuständige lokale Behörde, die Müllabfuhr oder das Geschäft kontaktieren, bei dem Sie das Gerät gekauft haben. VOR DEM ABRÜSTEN unbrauchbar machen und dazu das Netzkabel abschneiden.
Zum Deaktivieren des Vorführungsmodus muss das Lichtsymbol fünf Sekunden betätigt werden, wonach die Steuerung in den Normalbetrieb übergeht und einschaltbereit ist. Nun kann auf Wunsch die Uhrzeit für die Einschaltung des Ofens eingestellt werden. Einstellung der Uhrzeit DE Der Ofen meldet den Anschluss an das Stromnetz mit einem zweifachen akustischen Signalton. Zum Einstellen der Systemuhrzeit muss die Taste „TIMERFUNKTIONEN” mindestens 3 Sekunden gedrückt werden.
MÖGLICHE TÄTIGKEITEN BEI ABGESCHALTETEM OFEN - Einschalten des Ofenlichtes Bei Betätigung des Symbols (siehe Abb.) wird das Ofenlicht ein- bzw. abgeschaltet. - Sprachenänderung Bei ausgeschaltetem Ofen können Sie die Display-Sprache ändern, wenn Sie gleichzeitig Taste + unten rechts mindestens 3 Sekunden lang drücken. Danach wird mit den Pfeiltasten Sprache gewählt und diese Wahl mit bestätigt. und die die - Einstellen der Timerfunktion „Minutenzähler“ Siehe diesbezüglich den Abschnitt auf S. 122.
Sperrfunktion (oder Kindersicherung) Die Sperrfunktion wird freigegeben/deaktiviert, wenn die Taste mindestens 3 Sekunden betätigt wird. Diese Funktion kann jederzeit und in jeder Betriebweise des Ofens aktiviert und deaktiviert werden. Das Symbol OFFENES Vorhängeschloss zeigt an, dass die Sperrfunktion nicht aktiv ist. DE Das Symbol GESCHLOSSENES Vorhängeschloss zeigt an, dass die Sperrfunktion aktiv ist.
HAUPTFUNKTIONEN Übersicht über das Bedienfeld DE Die Garfunktionen Die Steuerung hat elf verschiedene Garfunktionen! Zum Schalten einer Funktion genügt es, wenn man das betreffende Symbol berührt. Jede Funktion hat eine eingestellte Temperatur, die auf der Basis von Garproben für typische Rezepte gewählt wurde. Diese Temperatur kann auf einfache Weise nach der eigenen Erfahrung verändert werden. Achtung: “Während des Gebrauchs können die zugänglichen Ofenteile sehr heiß werden.
Bedientafelfunktionen Ofenbeleuchtung. Schaltet sich bei Öffnen der Tür ein und wird für Energieersparnis in den anderen Modalitäten vom System verwaltet. Oberer und unterer Heizwiderstand. Voreingestellt auf 190°C. Thermostateinstellung von 50°C bis MAX Unterer Heizwiderstand. Voreingestellt auf 50°C. Thermostateinstellung von 50°C bis MAX Oberer Heizwiderstand (Grillfläche und Leistung reduziert). Voreingestellt auf MAX. Thermostateinstellung von 50°C bis MAX.
DE Betriebsanleitung Konventionelles backen Klassisches System mit Ober- und Unterhitze, das für das Garen eines einzigen Gerichts geeignet ist. Es empfiehlt sich, das Gericht in den Ofen zu schieben, wenn dieser die vorbestimmt Temperatur erreicht hat, also wenn die Gradzahl fix leuchtet und ein Signalton erklungen ist. Wenn bei Ende des Garvorgangs die Unterhitze oder Oberhitze gesteigert werden soll, drücken Sie auf das passende Kochsymbol und stellen Sie die Temperatur nach Ihrem Dafürhalten ein.
Umluft backen Mit diesem Kochtyp lässt ein Gebläse im hinteren Teil die Warme Luft im Ofen zirkulieren und verteilt diese gleichmäßig. Der Garvorgang erfolgt schneller als beim herkömmlichen Backen. Dieses System eignet sich zum Garen auf mehreren Stufen und auch für unterschiedliche Gerichte (Fisch, Fleisch usw.).
Lebensmittelsonde (oder Bratenthermometer) TEMPERATURSONDEN Zarte und schmackhafte Gerichte sind das Resultat einer präzisen und praktischen Kontrolle. Die von den Gerichten während des Garens erreichte Temperatur ist eng mit hygienischen/ gesundheitlichen Problemen verbunden. Bakterien gibt es in jedem Fleisch, ebenso wie in Huhn, Fisch und in rohen Eiern.
Salmonellengefahr ist; • Unterbrechen Sie den Garvorgang nicht, d.h. kochen Sie nicht teilweise, um dann das Gericht aufzubewahren und später zu Ende zu kochen. Auf diese Weise kommt es zu „lauwarmen“ Temperaturen in den Lebensmitteln, die ein Bakterienwachstum fördern; • Braten Sie Fleisch und Geflügel im Ofen bei Temperaturen von mindestens 165°C.
DE Wählen Sie die Kochfunktion, die für Ihr Rezept am besten geeignet ist.
Nach 5 sec. wechselt das TemperaturDisplay auf die Temperaturanzeige des Bratenthermometers, also derjenigen, die im Gericht erreicht wurde. DE Mit können Sie den Wert der erforderlichen Mindestinnentemperatur in einem Bereich von +30°C bis +99°C einstellen. Wir empfehlen Ihnen, sich an die nachstehende Tabelle zu halten, die der “THE NATIONAL FOOD SAFETY DATABASE (USA)” entnommen wurde.
Huhn, ganz oder in Stücken 82°C Ente 82°C Ganzer Truthahn (nicht gefüllt) 82°C Putenbrust 77°C Wenn der Stecker bei begonnener Garzeit entfernt wird, dann blockiert die Steuerung den Ofen und weist mit Signaltönen auf den Fehler hin: Stecken Sie den Stecker wieder ein, um mit dem Kochen fortzufahren! Wenn mit Hilfe des Bratenthermometers Essen zubereitet wird, dann werden alle voreingestellten Temperaturen in Übereinstimmung mit der Nutzungsphilosophie auf 165°C verändert: Die Temperaturen können vo
Sonderfunktionen Boost (schnelles Vorheizen) BOOST – SCHNELLES GAREN Um die Garzeiten mit einem schnellen Vorheizen zu verhindern Diese Sonderfunktion kann aktiviert werden, nachdem Sie eine Kochfunktion ausgewählt haben und mit ihr können Sie die Zeit verringern, die zum Erreichen der eingestellten Gartemperatur erforderlich ist. DE Sie können die Funktion “BOOST” jederzeit ausschalten oder die Kochfunktion ändern.
Der Reinigungsprozess erfolgt bei einer Temperatur von 250°C und dauert eine Stunde. Diese Funktion NICHT zum Zubereiten von Gerichten verwenden! Die Ofenbeleuchtung wird eingeschaltet, kann aber jederzeit aus- und eingeschaltet werden. Alle selbstreinigenden Paneele haben eine Leistungseffizienz von rund dreißig Einsätzen. Nach dieser Zeit müssen die Paneele ausgewechselt werden. Die Paneele dürfen nur mit fließendem Wasser gesäubert werden und können bei Ihrem Fachhändler angefordert werden.
DE Die Steuerung schlägt eine Temperatur für jede Funktion vor. Diese Temperatur kann jederzeit verändert werden. Wenn keine Änderung der Temperatur erfolgt, schaltet sich der Mikrowellenherd nach wenigen Sekunden von selbst ein! Restwärme Beim Garen von Gerichten speichert die Ofenstruktur Wärme. Diese Wärme wird dank einer großzügigen Wärmeisolierung und einigen baulichen Maßnahmen vom Rest der Küche isoliert.
Restwärme Beim Garen von Gerichten speichert die Ofenstruktur Wärme. Diese Wärme wird dank einer großzügigen Wärmeisolierung und einigen baulichen Maßnahmen vom Rest der Küche isoliert. Die Wärme wird dann langsam abgegeben und kann noch in der Küche als Wärmequelle benutzt werden. Die Steuerung zeigt nach dem Abschalten die Innentemperatur des Ofens an bis 50°C erreicht wurden.
Timerprogrammierung: Garzeit Bei einmaligem Berühren des Symbols Timer leuchtet das betreffende Symbol auf. Außerdem löscht das Uhrzeitdisplay die Angabe der aktuellen Uhrzeit: Die Trennungspunkte blinken um anzuzeigen, dass die Garzeit programmiert werden kann. DE Nach Festlegung der Garzeit zeigt das Display wieder die aktuelle Uhrzeit an und das Symbol „Garzeit“ leuchtet auf. Das Zählen der Zeit beginnt ab diesem Moment.
Danach kann durch Berühren der Symbole “+” und “-” die Uhrzeit für das Garende eingestellt werden. Sobald das Garzeitende festgelegt wurde, zeigt das Display wieder die aktuelle Uhrzeit an und das Symbol „Garende“ leuchtet auf. Ab diesem Zeitpunkt beginnt die Zeitzählung. Nach Ablauf der angegebenen Zeit gibt der Ofen ein akustisches Signal ab und die Heizwiderstände schalten sich aus, wodurch der Garvorgang abgeschlossen wird.
Darauf wird das Garzeitende bestimmt: Die Steuerung summiert normalerweise die aktuelle Uhrzeit mit der Garzeit und schlägt das Ergebnis als Garzeitende vor. In diesem Fall also 10.30 (8.30 + 2 h). Nun muss das Garzeitende auf die gewünschte Uhrzeit abgeändert werden. In unserem Beispiel auf 13.00. Der Ofen stellt eine Stunde Wartezeit (Stand-by) ein und schaltet das Ofenlicht aus. DE Die Steuerung schaltet den Ofen automatisch um 11.00 (13.00 – 2 h) ein und um 13.00 aus.
Automatische funktionen: rezepte Für den Zugriff auf die Rezeptfunktion gehen Sie bitte folgendermaßen vor: Schalten Sie den Ofen ein mit der Taste Wählen Sie die Funktion AUTOMATIK ; Das Display zeigt die 2 Optionen Auf dem Display werden 2 Optionen angezeigt: - eigene Rezepte - eingestellte Rezepte Die gewünschte Einstellung mit den Tasten wählen. Mit der Taste die Wahl bestätigen. Es wird das folgende Menü angezeigt.
Nach den Einstellungen wird auf dem Display das eingestellte Rezept zusammengefasst. Die beiden Punkte der Garzeitdauer (00:30) blinken und weisen darauf hin, dass dieser Wert verändert werden kann. Für die Änderung die Tasten - + betätigen. Es kann aber auch direkt die Funktion gewählt werden, worauf das Garprogramm und der voreingestellte Zeitcountdown auf dem Display beginnt.
Vor dem Speichern des neuen Rezepts müssen Sie andere Rezepte folgendermaßen aus dem Menü löschen: - Wählen Sie die Funktion ; - Drücken Sie auf den Abschnitt “PERSÖNLICHE REZEPTE”, wo Sie die gespeicherte Rezepte finden>; - Mit den Tasten blättern Sie durch das Menü, um das zu löschende Rezept auszuwählen.
Ausbauen der ofentür Die Backofentür kann mühelos ausgebaut werden. Dazu folgendermaßen vor-gehen: - die Tür ganz öffnen; - die zwei auf Abb. dargestellten Hebel anheben; - die Tür wieder bis zur ersten, von den zwei zuvor angehobenen Hebeln bestimmten Einrastung schließen; - die Tür nach oben und nach außen anheben und herausnehmen; Um die Tür wieder einzubauen, die Scharniere wieder einsetzen und dann die zwei Hebel in Schließstellung bringen.
- Mit einem Schlitzschraubenzieher lösen Sie das auf den Lampenträger aufgesetzte Glas; - Nehmen Sie die alte Lampe aus ihrem Sitz und achten Sie darauf, dass diese nicht bricht; - Setzen Sie die neue Lampe ein und achten Sie darauf, diese nicht mit der Hand zu berühren (wir empfehlen die Verwendung von Einweghandschuhen aus Latex); - Setzen Sie die Glashaube wieder auf den Lampenträger, bis diese ganz einrastet; - Das Gerät wieder an das Stromnetz anschließen.
FÜR DEN INSTALLATEUR Ofen einbauen Der Ofen kann unter der Kochmulde, in einer Säule oder i Kombination mit dem entsprechenden Warmhaltefach eingebaut werden. Die Einbaumaße müssen den nachstehenden Abbildungen entsprechen. Das Material des Möbels muss hitzefest sein.
Einbau des Backofens 60 Der Ofen kann unter einem Kochfeld oder in einen Schrank eingebaut werden. Die Einbaumaße müssen den auf der Abbildung dargestellten entsprechen. Das Möbelmaterial muss hitzebeständig sein. Der Backofen muss zu den Möbelwänden zentriert, und mit den mitgelieferten Schrauben und Buchsen befestigt werden. Für die Kombination des Backofens mit den Gasoder Gas/Elektrokombi-kochfeldern siehe beiliegende Anleitungen.
ELEKTRISCHER ANSCHLUSS DE Vor dem elektrischen Anschluss muss sichergestellt werden, dass - die Merkmale der Elektroanlage mit den Vorgaben auf dem Typenschild an der Frontseite des Ofens übereinstimmen. - die Anlage über eine effiziente Erdung gemäß den geltenden Richtlinien und Gesetzesbestimmungen verfügt. Die Erdung ist gesetzlich vorgeschrieben. Das Kabel darf an keinem Punkt die Raumtemperatur um 50°C überschreiten.
Cod. 2.002.94.
B O R E T T I B.V. N.V. B O R E T T I S. A . De Dollard 17 Rupelweg 16 1454 AT 2850 Boom Watergang T +31(0)20-4363439 T +32(0)3-4508180 F +31(0)20-4361326 F +32(0)3-4586847 S +31(0)20-4363525 (service) E info.be@boret ti.com E info@boret ti.