
Setup Instruction Manual
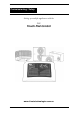

Multi-Appliance Touch Pad
Multi
p
le Unit Setu
p
CODE / ZONE ALLOCATION OF ADDITIONAL UNITS
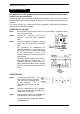
Step 1 Turn the power on to the next
appliance being coded. Check
the green LED is visible.
Step 2 Press and hold the RESET
button in the control box (EAC)
or on the control board (Gas
Central Heating) for 25 seconds.
At the 25 second mark, the
green LED will start to flicker.
Do not release the button at this
point.
Step 3 The LEDs will now be flickering
in sequence 1 through to 4
flickers for EAC and 1 through to
8 flickers for central heating with
a pause in between each set of
flickers. To allocate the unit to
the correct code / zone, release
the reset button immediately
after the required number of
flickers has completed.
See the tables below for the number of flickers to allocate a unit.
Step 4 Move to the next unit and perform the same procedure as in Step 2 and
Step 3, to allocate a code number to each unit. Once the unit is coded,
the power can remain turned on to the unit.
Each unit can be assigned to a different code number for
switching through the zone control panel OR each unit can
be assigned to the same unit allocation number for a non
zoned (single) switching operation.
Step 5 Once all the units have been assigned an allocation / code
number, a forced scan at the touchpad control will need to
conducted so the touchpad can find all the units.
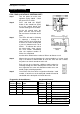
Gas Central Heaters.
LED
Flickers
Unit
Code
Unit Allocation Code
1 0021 H01
2 0022 H02
3 0023 H03
4 0024 H04
5 0025 HC01 (with add on cooling)
6 0026 HC02 (with add on cooling)
7 0027 HC03 (with add on cooling)
8 0028 HC04 (with add on cooling)
Evaporative Air Conditioners
LED
Flickers
Unit
Code
Unit Identification
Code
1 0017 E01
2 0018 E02
3 0019 E03
4 0020 E04
Evaporative Cooler
Board
Central Heater
Board