
Instruction Manual


19
To get to the “5 button” display mode push the “other displays” button (lower right) repeatedly
until the adjacent yellow lamp goes off. Figure 2 has instructions for the switches in this
mode.
The four other less used display modes are accessed by pushing the “other displays” button.
Figure 3 has instructions for these. For the following four modes the “other displays” light is on.
They are identified by the first letters in the LCD display as follows:
SH:........ System History display: gives access to the “periodic log data” described in section 6.C.1.
BH:........Battery % History, or Battery discharge profile data gives access to logged data described
in section 6.C.2.
P:..........Program view and change. Allows you to observe and change all programmed parameters
described in section 6A.
AD:........Display All Data Allows access to all of the data measured by the PentaMetric (listed in
Section 6B) at the cost of a lot of button pushing
The lights by each switch will blink to show you which ones operate when not in the “5 switch”
mode. The ones that don’t blink will have no effect (except for the “extra data” switch). Usually the
up/down/left/right arrows on the switches will suggest their function.
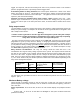
4.A.1: Description of “5 data switch” mode (most common mode).
This mode is illustrated in figure 2. The row of 5 data select switches allow selection of data
listed above them: Each of these 5 buttons may be assigned several display functions, of your
choice depending to your application. See programming section 6A under P1-P5 for how to
assign each
switch to your choice of up to 5 display functions. Up to 25 display items can be
accessed by these 5 switches. A label can be made for the clear pocket just above the switches
which describes the function or functions assigned to each switch. Use the template file available at
the www.bogartengineering.com website to make this label. Push the switch to select a display
item assigned to it--this will also light the green lamp above it. If more than one item is assigned to
a switch, push the switch repeatedly to access each one. Up to two displays may be viewed
simultaneously (from different switches) in the LCD window. .
It may be useful to know that while two items, (from two different switches) are showing in the
display--you can then (perhaps just momentarily) view another item from a third switch. After that
item has been viewed and turned off, (with its switch) the former two displays will revert back in the
display.
Alarms: While in the “5 data switch” mode, if an “alarm” occurs the “alarms active” lamp will flash,
and, if the alarm is enabled to be a “audible” alarm it will sound the (fairly quiet) alarm tone
sequence corresponding to that alarm. (Alarms are enabled or disabled by program modes P22-
P25). To identify the alarm, push the “alarm off/view” switch, which will also silence the
audible alarm and show in the display what the alarm is. In the event of several simultaneous
alarms they will alternate in sequence in the display. Pushing the “alarm off/view” again will cause
the alarm displays to disappear--however the red alarms active lamp will continue to flash as long
as the alarm is still valid. The audible alarm will not sound again until another alarm event begins.
For more information about specific alarms, see section 6.E:
RESET functions:
Some display items can be manually reset. For example, “amp hours” or
“watt hours”, “days since charged”, “days since equalized” can be manually reset to 0 if desired, to
begin a new measurement of these quantities. If the yellow RESET lamp is lighted, that means
that one (or more) items showing in the display can be reset. While that item is in the LCD
display you may RESET that function by pushing the RESET switch--but carefully watch the
display--which will identify the item it will soon reset. This is particularly important if there are two
items in the display that can be reset. If the wrong one, release the button quickly and push again
to show the other one. Meanwhile numbers in the display will count down from 9 to 0. If you hold
the RESET down until the count reaches “0” then the RESET will actually be accomplished--but not
before.