
TM-2030 Installation & User Guide
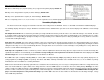

Primary System Information
Volts: The voltage of your main battery (if the B1 lamp is on) or the voltage of the secondary battery (if the B2 lamp is on). Use volts to:
Check whether the batteries are nearing a low state of charge. This would be (for 12V system) when volts are somewhat less
than 12.0 volts. Between 12.0 and 14.0 volts the display is a poor indicator of state of charge in a working system. Use % full
instead.
Amps (or watts): Positive when the battery is being charged or negative when the battery is being discharged. This display mode
can be reconfigured (using program P4) to show power (in Watts) instead of showing current (in Amps).
% Full: This display shows the state of charge (how much energy is left) based on voltage and amps. Use this display to:
Minimize generator run time when charging batteries by running it when “% FULL” is low and thus charging amps are higher.
When % FULL is high, finish charging with solar at lower amps and longer charge times.
IMPORTANT! After installation, the voltage set-point and amps set-point (P1 and P3) must be programmed in order to display %
Full
. Once programmed, a full charge must occur (parameters must be met) once before the % Full display will show a value.
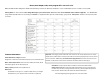
Basic Programmable Parameters required to properly use the TriMetric
P1: Charged voltage set point: The battery is signaled as “charged” when volts exceeds the P1 value, and charging amps is less than as described in P2
(below). P1 is also the “absorb voltage” set point for the SC-2030 charger when used. The default and recommended value for a 12 volt system is “14.3”
P2: Charged amps set point: The charged set-point amps (mentioned in P1 above) is a percentage of the value set in P3. If P2 is set to 2.0, and P3 is 220,
then the set-point amps value = 4.4. It also signals the SC-2030 to go into “finish charge” mode. The default and recommended value is “2.0”%
P3: Battery system capacity (20 Hr. rate) in Amp-Hours (10 to 9990 A-hr). Default “220”. Above 1000 amp hours will display with a decimal value Example
1.2 = 1200.
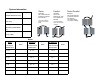
Note: Review shunt type information under P11.
To Program the TriMetric:
Press and hold Select until P1 appears, then press Select to toggle through the different programmable data (P1-P22). To change the
data, briefly press Select and Reset at the same time and let go. The green lights will flash to indicate that you are in Change Mode.
Press the Reset button to change the value, then press Select to get out of change mode.