
TM-2030 Technical Manual


13
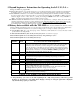
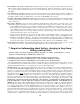
5. Summary of Programming instructions Program functions applicable for Operating
Level L1 are summarized in Table 2 below. As mentioned above, it is most important that items P1, P2
and P3 (below in Table 1) be correctly programmed for the Battery%Full data to be correct. A step by
step procedure for doing this is described in the “Installer’s Instructions for TriMetric 2030. The additional
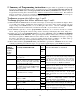
functions applicable to level L3 are summarized in Table 3 below. If you need more information than given
in Tables 2 or 3, look at references in section 6.4 of these instructions.
To observe program data follow steps 1 and 2.
To change program data follow additional steps 3 and 4.
(1) HOLD DOWN the SELECT button and watch as the display cycles through several different displays. When
you see P1 in the display, immediately release SELECT. If you don’t release quickly enough, just wait
longer holding down SELECT until you see the P1 again, then release. Then the “Charged” setpoint
voltage (first item shown in table below) will alternate with “P1”, so you can observe its value.
(2) Push SELECT repeatedly to observe programmable data P2, P3, etc, as shown in the left two columns
below. After going through all of these it will go back to observing normal display data. (Volts, Amps, etc.)
(3) If during step 2 you see programmable data that you wish to CHANGE, push both SELECT and RESET
briefly, but firmly at the same time. Three green lamps will flash to indicate that you can now change the
data. Successive pushes to RESET will increase the numbers slowly. Hold RESET down longer to speed up
the change—this will cause data to cycle more quickly through all the possibilities. To make values go
down, you will need to keep increasing until it finally jumps to its lowest value again.
(4) When satisfied with the programmable data, push SELECT to get back into OBSERVE mode. Now either
continue programming as described in step 2, or to get back to regular displays, push SELECT repeatedly.
PROGRAM
MODE
NUMBER
*Used by
SC-2030
charger
PROGRAMMABLE DATA
and ADJUSTMENT RANGE
Factory
value
WHAT IT IS FOR (SUMMARY)
For more information, see Section 6.4
Your
value
*P1
"Charged" setpoint voltage.
10.0 to 65.0 volts
14.3
The TriMetric determines that battery is charged when
actual volts is greater than setpoint voltage, and amps is
less than setpoint amps. When this is true the “charging”
lamp flashes to indicate a full battery. This resets “amp
hours from full” to 0 and “battery % full” to 100%, and the
“Days since charged” to 0 Details see section 6.4
*P2
"Charged" setpoint amps multiplier, in %
0.1 to 10 percent of the value of “battery
capacity,” P3. If P2 value is 02.0, and P3=400,
setpoint amps=2% of 400 =8 amps.
02.0
*P3
"Battery capacity" amp-hours
10 to 10,000 amp hours. Note: flashing decimal
point means “multiply number by 1000”; so 1.02
means 1020 amp hours
220
Enter the battery capacity in amp hours. This setting
influences only the “Battery % full” display numbers and
uses this information to display this % value correctly for
your batteries. Also see section 6.4
P4
WATTS or AMPS choice
Pr= WATTS (“Power”), A=Amps
A
Chooses whether AMPS or WATTS shows up on the
Primary display, just after “B1 volts”. If you choose
AMPS, then WATTS shows on the secondary display. And
vice versa.
P5
Days before "time to recharge" reminder
1-100 days, or OFF
OFF
When "Days since charged" equals or exceeds this number,
the "time to recharge"(Ch.F) reminder will flash
periodically in display. See section 2.2
P6
Days before "time to equalize" reminder.
1-100 days, or OFF.
OFF
When "Days since equalized" exceeds this, the "time to
equalize” (Ch.E) reminder will display. See section 2.2
P7
Chooses Operational level; Choose L1, L2,L3
or L4.
L1
L1 is simplest level. L2=next level: shows historical data
L3 Shows all of L1 and L2 plus additional programming
options. See section 3 for meaning of L4
TABLE 2. Program modes for Operating level “L1” (simplest)