
Installation Guide


4
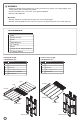
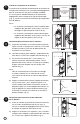
(Step 3 Continued)
c.) Using a
9
⁄
9
⁄
9
32
⁄32⁄
" drill bit, drill all the way through the
post. Be sure to hold the drill straight and level
so the back plate will be properly aligned when
mounted.
NOTE:
When installing the standard center mount hinge on
a 2" post, you will need to use the included spacers.
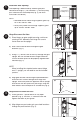
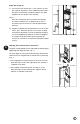
d.) Align post-side bracket to pre-drilled holes and
insert four screws through each hinge and post.
Af x back plates on opposite side of post and
secure with four plate nuts per hinge using the Allen
Wrench and a Phillips bit or screwdriver (Fig. 6).
Adjusting Hinge Tension
The gate swing speed can be adjusted by loosening or
tightening the hinge tension (Fig. 7).
• To increase tension/speed, turn the set screw
clockwise with the Allen Wrench.
• To decrease the tension/speed, turn the set screw
counterclockwise with the Allen Wrench.
4
Fig. 6
Fig. 7
Back
Plate
Post
Plate
Nut
Increase
Increase
Increase
Increase
Increase
Increase
Increase
(Clockwise)
(Clockwise)
(Clockwise)
(Clockwise)
(Clockwise)
(Clockwise)
(Clockwise)
(Clockwise)
(Clockwise)
(Clockwise)
(Clockwise)
(Clockwise)
Decrease
Decrease
(Counter-clockwise
(Counter-clockwise
(Counter-clockwise
(Counter-clockwise
(Counter-clockwise
(Counter-clockwise
(Counter-clockwise
(Counter-clockwise
(Counter-clockwise
(Counter-clockwise
(Counter-clockwise
(Counter-clockwise
(Counter-clockwise
(Counter-clockwise
(Counter-clockwise
(Counter-clockwise
(Counter-clockwise
(Counter-clockwise
(Counter-clockwise
(Counter-clockwise
(Counter-clockwise
(Counter-clockwise
(Counter-clockwise
(Counter-clockwise
(Counter-clockwise