
Installation Guide


3
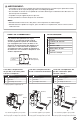
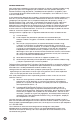
Determine
location and gate
opening before
installing fence.
Fig. 1
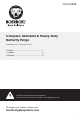
Determine Gate Opening:
Gate opening is determined by width of gate plus
clearance for hinge plus clearance for latch/drop rod
(Fig. 1) (see latch instructions for details).
1
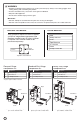
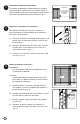
Mount Hinges on Gate:
For best results, work on at, stable surface when
mounting hinges to gate.
a.) Place hinges at desired position on gate with a
minimum spacing of 32" between each hinge.
b.) Mark pilot holes through screw holes then pre-drill
using
3
⁄
3
⁄
3
32
⁄32⁄
" bit (Fig. 2).
c.) Secure hinges to gate with 1" screws (Fig. 2).
2
Fig. 2
3
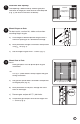
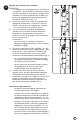
Mount Gate to Post:
NOTE:
Both gate posts must be plumb prior to gate
installation.
TIP:
Cut (2) 2" spacer blocks to help support the gate
during installation
a.) Set gate on spacer blocks and hold it level/plumb
to the gate post (Fig. 3).
b.) Mark pilot holes on the post, through the screw
holes in the hinges.
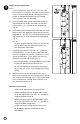
c.) Remove gate and pre-drill
3
⁄
3
⁄
3
32
⁄32⁄
" pilot holes.
d.) Re-position gate on post and secure hinges with
1" screws (Fig. 4).
Gate
Gate
Gate
Gate
Gate
Panel
Panel
Panel
Panel
Panel
2" Spacer Blocks
1" Screws1" Screws
Fig. 3
Fig. 4