
Installation Manual
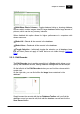


Table Of Contents
- Chapter 1. About Bodno
- Chapter 2. Installation and Support
- Chapter 3. Getting Started
- Chapter 4. Design
- 4.1 - Workspace
- 4.2 - Document Properties
- 4.3 - Document Objects
- 4.4 - Object Properties
- Chapter 5. Database
- Chapter 6. Printing
- Chapter 7. Encoding
- Chapter 8. Users
- Appendix A - DIAMOND Net License
- Appendix B - Advanced Print Operations
- Appendix C - Encoding
- Appendix D - Barcodes
- Appendix E - Link Image to DB Field

Bodno Manual154
© 2018 Bodno
5.6 - Managing Records
Adding, deleting and editing records are core tasks when managing a database
and when working with large databases, it can become a time costly task.
With all the tools provided by Bodno, managing databases becomes simple and
intuitive.
5.6.1 - Adding Records
Adding records in Bodno is quick and simple:
1 - Make sure you are connected to a database (see more on chapter 5.1 -
Connection)
2 - Open the Database sidebar when working on the Card Design view (see
more on chapter 5.3 Database).
Alternatively open the Browse Records window on the Database View (see
more on chapter 5.5.2 Edit Records).
3 - Click the Insert Record button on either the Database Toolbar or through
the Bodno menu Database > Add Record.
4 - The Database Items will now be empty and ready to be written.
Finally, fill the items with the required data and click the Save Record button to
save the changes.
Prior to saving you can cancel any changes with the Revert Record Changes
buton:
5.6.2 - Editing Records
Editing existing records is also a quick and simple task:
1 - Make sure you are connected to a database (see more on chapter 5.1 -
Connection)