
Installation Manual


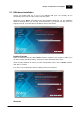


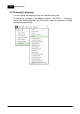


Table Of Contents
- Chapter 1. About Bodno
- Chapter 2. Installation and Support
- Chapter 3. Getting Started
- Chapter 4. Design
- 4.1 - Workspace
- 4.2 - Document Properties
- 4.3 - Document Objects
- 4.4 - Object Properties
- Chapter 5. Database
- Chapter 6. Printing
- Chapter 7. Encoding
- Chapter 8. Users
- Appendix A - DIAMOND Net License
- Appendix B - Advanced Print Operations
- Appendix C - Encoding
- Appendix D - Barcodes
- Appendix E - Link Image to DB Field

Chapter 2. Installation and Support 15
© 2018 Bodno
2.1.1 Windows Installation
Connect the provided USB key on one of your available USB ports. The AutoPlay will run
automatically and choose the 'Open Folder to view files' option.
Double-click on the Bodno executable file and the Installation Wizard will run. The Installation
Wizard is displayed where you can verify the Serial Number of your product and also select the
language to install. To proceed with the installation click the 'Next' button.
Install or Evaluate
Select the installation folder. By default Bodno software is installed on the Programs Folder but you
can select another destination folder by selecting the 'Select Destination folder' option.
Check the option 'Install for all users' if you want other Windows users to also run Bodno software.
Click 'Next' to continue.
If you want to run the application without installing it please click 'Evaluate'.
Shortcuts