
Product guide


MAINTENANCE TASKS
XEROX DOCUPRINT 180 LPS OPERATOR GUIDE 11-5
Replacing the dry ink waste container
To replace the dry ink waste container:
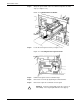
Step 1. Open the right and left doors of the printer and locate the dry ink
waste container (see figure 11-5).
Figure 11-5. Dry ink waste container
Step 2. Place a drop cloth on the floor under the dry ink waste container area.
Caution: To prevent dry ink spills, do not tip or tilt the waste
container.
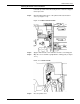
Step 3. Pull the full waste container out of the printer (see figure 11-6).
Figure 11-6. Removing the full waste container
Step 4. Remove the cap from the top of the full waste container.