
User guide


USING THE PC UI
1-8 XEROX DOCUPRINT 180 LPS PC UI REFERENCE
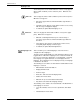
PC UI desktop
The PC UI desktop is the basic display screen.
Figure 1-8. PC UI desktop
1. Status area. This area contains the date and time fields, the
Hint and Fault icons, and the Menu icons. Opening the Menu
icons allows you to access task windows.
Note: The icons you see depend on the level to which you are
signed on. Certain tasks are restricted to certain log-on levels.
You need a special password to access those tasks.
When changing log levels, the desktop is cleared of any open
windows, except for the Command Line/Message window. The
desktop is then reset according to the specified log level.
2. Command Line/Message window. This window displays
system messages and allows you to enter commands for
performing LPS tasks. You can scroll through the messages in
this window (refer to the “Using the scrollbars” section later in
this chapter), and the window can be resized or moved (refer to
the “Resizing the windows” and “Moving the windows” sections
later in this chapter for instructions). This window cannot be
closed. The Command Line/Message window contains the
following header buttons:
• Clear faults. Select this button to clear printer software
faults (when directed by a message in the Command Line/
Message window or on the printer control console).
Selecting this button also causes any outstanding printer
faults to be displayed in the window.
Note: Entering CLEAR has the same effect as selecting
the Clear Faults button or touching the Clear button on the
printer control console.