
User guide


JOB CONTROL WINDOWS
XEROX DOCUPRINT 180 LPS PC UI REFERENCE 7-5
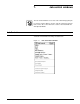
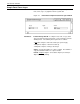
Align
Use the Align window to align the printer’s laser image with the paper.
The Align window displays the current alignment.
Figure 7-4. Job Control>Align window
The paper icons displayed underneath the Lines and Dots fields
show the direction the image moves on the paper if you change the
numeric value in the Lines and Dots fields.
• ’-’ is the direction the image moves if you decrease the number
in the field.
• ’+’ is the direction the image moves if you increase the number
in the field.
Header buttons Test: Select this header button to print a sample with the new
alignment applied. If a job is currently printing, a page from the job
with the new alignment applied is delivered to the sample tray. If a
print job is not running, the test form is delivered to the sample tray.
Redisplay: Select this header option in the auxiliary menu to return
the alignment to the values displayed when you first opened the Align
window.
Sample: Select this header option in the auxiliary menu to print a
sample of the new alignment. If a job is currently printing, a page
from the job with the new alignment applied is delivered to the sample
tray. If a print job is not running, the test form is delivered to the
sample tray.
Parameters Scan Lines: Enter a new scan line position value. The scan line
position can be 1 through 296.
Dots: Enter a new dot position value. The dot position can be 0
through 1499.
Note: Once the alignment values for one paper size are set, the
system extrapolates the alignment values for the other paper sizes
supported on the system.