
User guide


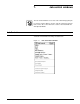


JOB CONTROL WINDOWS
7-2 XEROX DOCUPRINT 180 LPS PC UI REFERENCE
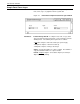
Abort
The Abort window can perform many functions.
Figure 7-2. Job Control>Abort window
Use the Abort window to do any of the following:
• Remove a specific job or report from the system
• Remove all job/report information currently being processed
• Cause the current print job to stop printing (printing continues
with the next report)
• Cause the currently active non-print task (such as FDL or PDL)
to abort (there must be no active print jobs when this command
is entered).
After applying your selection, a message appears asking you to
confirm the abort command.
Parameters Output
: Select the Output button to cause the current job to stop
printing.
Input: Select the Input button to remove only the print job currently
being input into the system. The next job begins processing.
Job Number: Enter the job number of a specific print job you want
to remove from the system.
Non-Print Task: Select this button to abort a non-print task, such as
FDL or PDL.
Note: This feature is available only when there is a print or non-
print task active.
When aborting input:
Input processing stops, but output processing continues.
Any data already processed by the input processor, but not yet
received by the output processor is deleted.
If an aborted job had already begun printing, the output is
appended with an accounting sheet which indicates that the job
was aborted and that the printed job is incomplete.