® BOB Trailers, Inc. (800) 893-2447 www.bobgear.com 13501 South Ridge Drive, Charlotte, North Carolina 28273 SPORT UTILITY STROLLER IRONMAN ENGLISH Owner’s Instruction Manual TAKE TIME READ AND UNDERSTAND THESE INSTRUCTIONS COMPLETELY! Before attempting to assemble or use your new stroller, read and understand these assembly and use instructions completely, as well as the warnings at the beginning and throughout this document, to ensure proper assembly and operation.
WARNINGS FAILURE TO FOLLOW THESE WARNINGS AND ASSEMBLY INSTRUCTIONS COULD RESULT IN SERIOUS INJURY OR DEATH. • Please save owner’s manual for future use and reference. • For safe operation, all users must read and understand instructions and warnings completely before use. • Never leave child unattended in the stroller. Always keep child in view while in stroller. • Avoid serious injury from falling or sliding out. Always use seat harness. • Never allow occupant to stand in stroller. Stroller can tip over.
TABLE OF CONTENTS WARNINGS Page 2 TABLE OF CONTENTS Page 3 STROLLER ANATOMY Page 4 AGE RECOMMENDATIONS Page 5 STROLLER ASSEMBLY Page 5 Unpack Stroller Page 5 Fender Installation Page 5 Wheels Page 5 Adjust Quick Release Page 6 Rear Wheel Installation Page 6 Removing Rear Wheel Page 8 Front Wheel Secondary Retention Devices Page 8 Front Wheel Installation Page 9 Removing Front Wheel Page 10 Hand Brake Page 10 Unfold Stroller Page 12 Fold Stroller Page 12 STROLLER ADJUSTMENTS
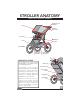
STROLLER ANATOMY SPORT UTILITY STROLLER, IRONMAN Hand Brake Lever Handlebar Canopy Handlebar Release Lever Seat Harness Shock Release Knob Fender Swing Arm Quick Release Lever Brake Caliper Assembly Low Boy Cargo Basket CONGRATULATIONS Congratulations on your purchase of the BOB® Sport Utility Stroller or IRONMAN® Stroller. Wrist Strap Seat Back Pocket For updates to this manual, warranty and other recent product notifications, please visit www. bobgear.
AGE RECOMMENDATIONS BOB recommends that children should be at least 8 weeks old before riding in a BOB stroller without a BOB Infant Car Seat Adapter and compatible infant car seat. Please note that babies incapable of holding their head up must have additional head and neck support to ride safely and comfortably. For jogging or offroad stroller use, children should be at least 8 months old.
quick release can allow the wheel to vibrate, wobble or become detached from the stroller. This can result in serious injury or death. Accordingly, it is critical that you: • Ask your dealer to instruct you on the proper technique for safely installing and removing your wheels. • Understand and use the proper method for securely clamping a wheel to the stroller using a quick release. • Check to make sure the wheels are securely clamped before each use of the stroller.
Tension Adjusting Nut Quick Release Lever 3. Insert Rear Wheel Stub Axle Insert the rear wheel’s stub axle into the hole in the rear dropout. If the axle does not slide in easily, loosen the quick release tension adjusting nut by hand. Re-insert the axle fully into the rear dropout until the axle shoulder or snap ring on the axle comes in contact with the dropout. Stub Axle Dropout 4.
To LOOSEN tension adjusting nut, turn counterclockwise. FULLY CLOSED the quick release has not been properly tightened and adjusted. The secondary retention devices are backup systems and are not intended as a substitute for a properly adjusted quick release. The secondary retention devices on your stroller are the integral type that are formed into the outer faces of the fork dropouts. REMOVING REAR WHEEL 1.
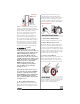
1. Install Front Wheel Quick Release Lever Remove Tension Adjusting Nut from quick release rod and take off first spring. Slide quick release rod through front wheel axle, place spring back on quick release rod, small side toward axle, and thread tension adjusting nut back on. Tension Adjusting Nut Spring Quick Release Lever FULLY OPEN FULLY CLOSED O P EN FRONT WHEEL INSTALLATION 4.
Fork Blade FULLY CLOSED FULLY OPEN the brake quick release lever by squeezing the brake pads against the wheel with one hand, then rotate the brake quick release lever in the counter clockwise direction with your other hand until it points downward. Brake Quick Release Dropouts While maintaining the wheel in this position, rotate the quick release upward and into the FULLY CLOSED position.
1. Align Brake Pads If brakes are misaligned, use a 10mm wrench to loosen brake pad nuts, slide pads into correct position and tighten securely. Brake Caliper Mounting Nut Barrel Adjuster OS E Lock Ring Brake Caliper To tighten the cable, loosen the lock ring and turn the barrel adjuster in the counter clockwise direction. Secure the barrel adjuster in the new position by tightening the lock ring against the caliper or brake lever body.
UNFOLD STROLLER Care must be taken when folding and unfolding the stroller to prevent finger entrapment or injury. SNAP To avoid injuries, never fold or unfold stroller with other individuals within reach of stroller. 1. Lift Red Frame Release Handle Keep tires on ground as stroller swing arm begins to swing open. FOLD STROLLER 1. Lock Parking Brake Set parking brake in locked position. 2. Remove Child From Seat 3. Empty Stroller Remove contents from low boy cargo basket and pockets.
STROLLER ADJUSTMENTS CHECK TIRE PRESSURE Plastic wheels are rated to a maximum tire inflation pressure of 30 pounds per square inch (psi). The maximum inflation pressure is embossed on the wheel next to the valve stem. Inflating tires above 30 psi can damage the wheel and/ or tire resulting in loss of control and injury. 6. Lay Stroller Flat Aluminum wheels can have the tires inflated to the pressure embossed on the tire. However, we recommend 30 psi for a comfortable ride.
Position 1: Child 40 pounds or less 5. Test Alignment Push stroller straight forward and release to see if stroller veers right or left. Repeat push test several times. 40 lbs SNAP Position 2: Child 41 to 70 pounds 70 lbs SNAP 41 lbs NOTE: Every time stroller is folded, stroller shocks default to 40 lb position. ADJUST TRACKING If stroller pulls left or right when the stroller is on flat terrain, adjust the tracking as outlined in the following steps.
wheel and flip it around so the quick release lever is on the opposite side. Reinstall the front wheel, secure the wheel and brake quick release levers. See Removing Front Wheel and Front Wheel Installation sections. RIGHT Knob 3. Perform Roll Test Repeat Roll test. If stroller still pulls to the right, repeat steps 1 and 2. Wheel Reoriented With Quick Release Lever On Opposite Side 9.
used to slow or stop the stroller because doing so could cause the stroller to stop abruptly, resulting in loss of control. is 44 inches or (112 cm). Do not exceed the maximum weight or height, as stroller will become unstable. Do not park on inclines. The parking brake is intended to park the stroller on flat surfaces only. Parking on inclines may result in tip over or runaway stroller. Avoid serious injury from falling or sliding out. Always use seat harness.
4. Adjust Shoulder Strap Height Adjust height of shoulder strap to fit just above child shoulder height. Secure Wrist Strap Slip loop of strap securely onto wrist. 5. Adjust Shoulder Straps Open Velcro pads. Slide buckle up or down to adjust straps. Seat harness should fit snug and be comfortable. RECLINE SEAT Set parking brake before making any seat adjustments. 6. Tighten Lap Straps Adjust lap straps to fit snug and be comfortable. 1. Recline Seat Pull up on seat recline buckle to loosen recline straps.
2. Retract Canopy Push canopy toward handlebar. When seat is fully reclined, backward tip over is more likely to occur and may result in an accident or injury, as seat and/or passenger may contact ground before handlebar. Always jog with the stroller seat in the fully upright position. Jogging with the seat in reclined positions may result in a loss of stability and injury.
CARE AND MAINTENANCE Check tire pressure before every use. CLEANING The fabric has a stain resistant treatment that makes most cleanups easy. Use a sponge with a solution of mild soap and cold water (maximum temperature of 100 deg. F / 38 deg. C). Rinse thoroughly with clean water to remove soap then air dry. Do not use detergent. REGULAR INSPECTIONS We recommend inspecting your stroller before every use. Verify tire pressure. Verify all screws, attachment points and fasteners are tight.
SUN SHIELD The Sun Shield’s specially designed mesh screen reduces the sun’s harmful ultraviolet UVA/UVB rays and helps to provide a barrier to wind and flying insects. DIAPER BAG Clips directly to all BOB single and Duallie® strollers. Shoulder strap, changing pad and removable waterproof insert included. SNACK TRAY The Snack Tray easily inserts into any BOB Stroller utilizing the BOB Accessory Adapter feature, placing snacks and sippy cups at your child’s fingertips. LIMITED WARRANTY BOB Trailers Inc.