OWNER’S MANUAL SwayControl TEAMBMPRO.
Designed and Engineered in the USA by Tuson RV Brakes, LLC MANUAL PART 033536 REV 1.0 Copyright © 2019 The BMPRO product range represent a high-quality product that will provide years of service. DISCLAIMER BMPRO accepts no liability for any loss or damage which may occur from the improper or unsafe use of its products. Warranty is only valid if the unit has not been modified or misused by the customer.
powering your adventures With over 50 years’ experience in power solutions combined with manufacturing and design facilities in Melbourne, Australia, we are the leading experts in RV power management. Inspired by the great outdoors, we have created a range of rugged, smart and reliable products to power your adventures.
About the SwayControl BMPRO SwayControl is a proactive electronic stability control that can automatically stabilise a caravan/trailer in the event of a sway. It automatically corrects caravan/trailer sway which can be caused by changing road conditions, driver error, lateral winds or a passing truck, keeping drivers safe on the road. The SwayControl is mounted on the underside of the caravan/trailer chassis, wires directly to the trailer braking system and continuously monitors the trailer to detect sway.
Contents ABOUT THE SWAYCONTROL .........................................4 WHAT’S INCLUDED .........................................4 COMPATIBLE BRAKE CONTROLLERS .........................................4 INSTALLATION INSTRUCTIONS .........................................6 PERSONNEL .........................................6 MOUNTING LOCATION CONSIDERATIONS .........................................6 ORIENTATION .........................................6 MOUNTING ...............
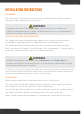
Installation Instructions PERSONNEL The SwayControl is a safety device which is required to be installed in the caravan/ trailer by suitably qualified service personnel. WARNING For proper operation of the SwayControl, ensure that the electric brakes are adjusted and maintained in accordance with the manufacturer’s recommendations in the electric brakes owner’s manual.
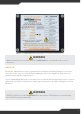
Figure 1:The SwayControl label with guidance on orientation and mounting. WARNING When installed, it is essential that the SwayControl is orientated in the correct direction. MOUNTING Mount the SwayControl to the caravan/trailer using the mounting flanges located on the sides of the unit. Use four #10 self-tapping screws (not supplied) with star lock washers to mount the SwayControl.
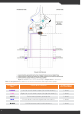
Figure 2: Guidance for correct mounting of SwayControl to the trailer. Table 1: SwayControl wire harness electrical connections and required wire gauge. 8 SwayControl Wire Trailer Wire Function Required Wire Size (Minimum) PURPLE Left side electric brake output (all left side brakes) 1.8mm2 PINK Right side electric brake output (all right side brakes) 1.8mm2 WHITE Trailer battery/frame ground point 1.8mm2 BLUE Electric brake controller signal from tow vehicle 1.
Wiring Instructions SWAYCONTROL WIRING HARNESS The SwayControl wire harness has five wires requiring electrical connection (table 1) and one cable for the status LED light. When making connections to the caravan/trailer’s wiring harness, the desired termination is a solder joint. If the connection is not soldered, use the appropriate size and type of “crimp-type” weather sealed heat-shrink connectors, using the manufacturer’s recommended crimping tools in accordance with their crimping instructions.
WIRING DIAGRAMS Caravan/Trailer Battery The caravan/trailer must be equipped with a 12V battery system of greater or equal to 50Ahr. Ground Connections Figure 3: Trailer Battery Wiring The caravan/trailer battery ground, the SwayControl ground and the electric brake ground wires must all be securely connected a 1.8 mm2 (minimum) wire in order for the SwayControl to function properly. These must be all fully grounded to a common point on the caravan/trailer.
12 Volt Connections The tow vehicle 12V charge line, the 12V trailer battery terminal and the SwayControl 12V (black wire) must be securely connected together with a 1.8 mm2 (minimum) wire in order for the SwayControl to function properly. The “hot” wire from the breakaway switch must be connected to the +12V terminal of the trailer battery. Figure 5: 12V Connections Wiring.
Left and Right Side Brake Wires The SwayControl operates the left and right side trailer brakes independently in order to control caravan/trailer sway. Therefore, it is very important the correct SwayControl wires are connected to the correct side of the brakes. The SwayControl PURPLE wire must be connected to all left side brakes. The SwayControl PINK wire must be connected to all right side brakes. Failure to properly connect these wires will prevent the SwayControl from controlling trailer sway.
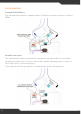
Caravan/Trailer Wiring Overview The wiring diagram in figure 8 shows the SwayControl installed in a in a caravan/trailer. Figure 8: Wire connection to trailer plug and system overview.
Status Light Module Installation Once wiring is completed, route the Status Light cable to the front of the caravan/ trailer. Then mount the Status Light module onto a flat surface on the drawbar of the caravan/trailer using self-tapping screws. Select a location that makes it easy to see the Status Light when looking at the front of the caravan/trailer.
Final Brake Wiring Check and Start Up To check that the SwayControl is wired correctly: 1. Refer to figure 10 to verify correct wiring on the left-hand side of the trailer. Ensure that ONLY the PURPLE and WHITE wires from the SwayControl are connected to the left side trailer brakes and are wired in parallel and not in series. 2. Refer to figure 10 on the following page and verify correct brake wiring on the right-hand side of the trailer.
WARNING When inspecting trailer wiring, it is very important that the trailer brake controller wire from the tow vehicle (blue wire) is ONLY connected to the BLUE wire on the SwayControl AND NOT connected directly to the trailer brakes. Figure 10:Verifying correct installation of the left and right side brake wires. SERVICING Do not attempt to service the SwayControl yourself, OR dismantle, modify or repair the SwayControl yourself; this will void your warranty.
Troubleshooting with the Status Light Need more help troubleshooting your SwayControl? Contact our customer service team on line at https://teambmpro.com/technical-support/ or give us a call on (03) 9763 0962. Status Light Flash Sequence Condition or Fault Solid GREEN pulsing Normal operation. 1 GREEN flash Module reset to manufacturer default values. Keep trailer still for 30 seconds (minimum) then drive normally.
Warranty Terms and Conditions Registering your BMPRO product is an important step to ensure that you receive all of the benefits you are entitled to. Please visit https://teambmpro.com to complete the online registration form for your new product today. 1. BMPRO goods come with guarantees that cannot be excluded under Australian Consumer Law. You are entitled to a replacement or refund for major failure and for compensation for any reasonably foreseeable loss or damage.
POWERING YOUR ADVENTURES. team bmpro .com BMPRO +61 3 9763 0962 | sales@teambmpro.com 19 Henderson Rd, Knoxfield VIC 3180 Australia teambmpro.