
Operation Manual
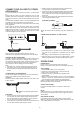
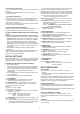

A/V cable
AUDIO R
AUDIO L
VIDEO IN
S-VIDEO
YUV INPUT
AVAUDIO/VIDEO INPUT
TV SET
After connection is firmed and securely done, plug AC
ADAPTER to an applicable wall outlet and turn on the player.
CONNECT DVD PLAYER TO OTHER
APPLIANCES
It is recommended you connect the player to a multi-system
TV.
Ensure that this player and other appliances (TV set and
amplifier) that will be connected to the player are set to OFF
mode and that the AC cords are disconnected from the wall
outlet.
Avoid blocking ventilation holes of the connected appliances
and make sure air around there can circulate freely.
Read carefully and follow the instructions before connecting
other appliances.
Ensure that you observe the color coding when connecting
audio, video cables. If the RCA adapter is supplied only, the
audio/video RCA cable is required. Plug one end of the RCA
adapter to the unit. Then connect the audio/video RCA cable
to the RCA adapter and the television.
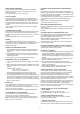
CONNECTING TO A CAR ADAPTOR
The car power adaptor is designed for use with vehicles that
have a 12V, negative ground electrical system.
WARNING:
Disconnect the car power adaptor when not in use. Not in use
in 24V vehicles.
CAUTIONS:
! Use the unit only with the recommended car power adaptor,
use with other car power adaptor might damage the unit.
!
!
The recommended car power adaptor is for use with this
unit only. Do not use it with other equipment.
In the interests of road traffic safety, do not operate the unit
or view video software while driving a vehicle.
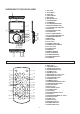
OPERATIONS
PREPARATION
Power on the TV set and select video input mode.
Power on the audio system which is connected to the player.
1. Slide POWER switch to turn on the player.
2. Press disc cover Open button to open the disc tray.
3. Place a disc onto the disc tray.
4. Close the disc tray by hand and the playback starts
automatically.
5. When a menu screen appears on the TV, move the navigation
buttons or press the numeric buttons to select a preferred
track number, then press OK button to start playback.
NOTE: If at DVB-T mode, pressing FUNCTION button for
switching to DVD mode is necessary.
GET STARTED
ADJUST THE VOLUME
MUTE
SKIP AHEAD OR BACK
Press the VOLUME buttons to increase or reduce the
volume.
While the power is on, the audio output of the main unit is to
be shut off by pressing the button. Press it again to resume
sound output.
Press PREV button during play to skip previous chapter
(DVD) or a track (CD), Press NEXT button during play to skip
next chapter (DVD) or a track (CD).
2
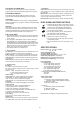
FUSE REPLACEMENT
NOTE: Don't throw out the positive(+) cap when replace the
fuse.
FUSE
POSITIVE(+) CAP
CHARGE THE BUILT-IN BATTERY
The player is with a rechargeable lithium battery. Before using
the battery, please make sure it is charged. If not, charge it
first. Slide the power switch to OFF position and then connect
one end of the supplied adapter to the wall outlet and the
other end to the unit for charging the built-in battery.
Note:
1. The battery only could be charged at powering off mode.
2. If the unit is not in use for a prolonged period of time, it is
recommendable to charge the built-in battery each three
months.
!
!
!
Make sure the unit is fastened securely to prevent from
moving outside of the vehicle in an accident
When the inside of the cigarette lighter socket is dirty with
ashes or dust, the plug section may become hot due to
poor contact. Be sure to clean the cigarette lighter socket
before use.
After use, disconnect the car power adaptor from both the
unit and cigarette lighter socket.
1. When this player is connect to the outdoor aerial, make
sure that the TV programme is available from the signal
tower.
2. The quality of video is depend on the signal strength.
3. When this player is connect to the outdoor aerial, in avoid
that the huge buildings or obstacle would block the signal.
Aerial input
CATV
CONNECTING THE AERIAL TO THE PLAYER
To the cigarette lighter socket