
BMKH MCC User Manual


24
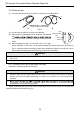
5.4 Installation of the Drain Pipe
(1). Keep piping as short as possible and slope it downwards at a gradient of at least 1/100 so
that air may not remain trapped inside the pipe.
(2). Keep pipe size equal to or greater than that of the connecting pipe.
(3). Install the drain piping as shown and take measures against condensation. Improperly
rigged piping could lead to leaks and eventually wet furniture and belongings.
Extension drain piping
(commercially available)
Insulating tube
(commercially
available)
Indoor unit
drain hose
Insulating tape
(accessory)
Fig.19
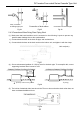
5.4.2 Installing the Drain Pipe
(1). Insert the drain pipe to the drain outlet of the unit and then tighten the clamp securely with
tape.
(2). Connect the extension drain pipe to the drain pipe and then tighten the clamp with tape.
Indoor Unit A
BMKH12MCC
10±2mm(2/5±2/25inch)
BMKH18MCC
DC Inverter Free match Series Cassette Type Unit
5 .4.1 Installation of Drain Pipe
corrupt the unit.
(2). It is not allowed to connect the condensate drain pipe into rain pipe to prevent rain water from
(1). It is not allowed to connect the condensate drain pipe into waste pipe or other pipelines which
are likely to produce corrosive or peculiar smell to prevent the smell from entering indoors or
pouring in and cause property loss or personal injury.
(3). Condensate drain pipe should be connected into special drain system for air conditioner.
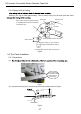
①
②
Metal clamp
③
Drain hose
Insulate the pipe clamp and the drain hose using
heat insulation sponge.
Small sponge
①
②
Metal clamp
Large sponge
During the installation, distance from soft drain
pipe to the gasket is 15±3mm when the bolt is
tightened. It is not allowed to apply PVC or other
related glue in the joints of two ends of drain
pipe.