
Concealed Duct Installation Instructions

BEFORE PERFORMING ANY ELECTRICAL WORK, READ THESE
REGULATIONS
1. All wiring must comply with local and national electrical codes, regulations and must be
installed by a licensed electrician.
2. All electrical connections must be made according to the Electrical Connection Diagram located
on the panels of the indoor and outdoor units.
3. If there is a serious safety issue with the power supply, stop work immediately. Explain your
reasoning to the client, and refuse to install the unit until the safety issue is properly resolved.
4. Power voltage should be within 90-110% of rated voltage. Insucient power supply can cause
malfunction, electrical shock, or re.
5. If connecting power to xed wiring, install a surge protector and main power switch with
a capacity of 1.5 times the maximum current of the unit.
6. If connecting power to xed wiring, a switch or circuit breaker that disconnects all poles and
has a contact separation of at least 1/8in (3mm) must be incorporated in the xed wiring. The
qualied technician must use an approved circuit breaker or switch.
7. Only connect the unit to an individual branch circuit outlet. Do not connect another appliance
to that outlet.
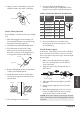
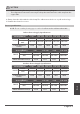
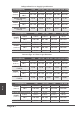
Wiring
Wiring
Page 32
CAUTION
•
Ensure to wrap insulation around the piping.
Direct contact with the bare piping may
result in burns or frostbite.
•
Make sure the pipe is properly connected.
Over tightening may damage the bell mouth
and under tightening may lead to leakage.
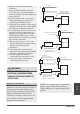
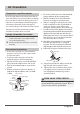
NOTE ON MINIMUM BEND RADIUS
Carefully bend the tubing in the middle
according to the diagram below. DO NOT bend
the tubing more than 90° or more than 3 times.
Bend the pipe with thumb
min-radius 10cm (3.9”)
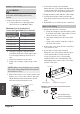
6.
After connecting the copper pipes to the indoor
unit, wrap the power cable, signal cable and the
piping together with binding tape.
NOTE: DO NOT intertwine signal cable with
other wires. While bundling these items
together, do not intertwine or cross the signal
cable with any other wiring.
7. Thread this pipeline through the wall and
connect it to the outdoor unit.
8. Insulate all the piping, including the valves of
the outdoor unit.
9. Open the stop valves of the outdoor unit to
start the ow of the refrigerant between the
indoor and outdoor unit.
CAUTION
Check to make sure there is no refrigerant leak
after completing the installation work. If there is
a refrigerant leak, ventilate the area immediately
and evacuate the system (refer to the Air
Evacuation section of this manual).