
DIY Single Zone Installation Manual 2020


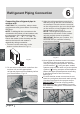


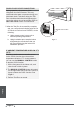


Table Of Contents

Page 23
Refrigerant Piping Connection
Refrigerant
Piping
Connection
6
4. Now tighten the bottom screw connector
first and then the top screw connector
u
sing the open-ended spanner. Hold the
p
oints marked using an open-ended
s
panner and turn the nuts only at the points
m
arked using an open-ended spanner
(
Select the appropriate spanner according
t
o the dimensions of the connector),
s
ee Fig.6.4
Ensure that the screw connectors do not
s
kew as you tighten them and work quickly.
S
ee the next page for the proper torque.
IMPORTANT: Since the coupling work
s
w
ith tapping rings, it may leak if you undo
a
nd reconnect the pipes. This will also void
t
he warranty.
CAUTION: For your safety, always wear
goggles and work gloves when connecting
the pipes.
Fig.6.1
1
2
1
2
Fig.6.2
Fig.6.3
Fig.6.4
NOTE: To distinguish the connectors to be
connected to the indoor unit and outdoor unit,
the connectors of the refrigerant pipe has
been labelled “A”,“B”,“C”and “D”.
Ensure the marks on the connector are the
same to the indoor s and outdoor s
respectively during connection.
,
,
,
,,
,,
Connecting the refrigerant pipe to
outdoor unit
1. First remove the water tray on the
outdoor unit as shown in Fig.6.1.
2. Do not remove the plastic seals from the
outdoor unit and the appropriate
refrigerant pipes until immediately before
you connect them, Fig.6.2
3. Align the refrigerant pipes correctly so
that they line up with the valves and are
not stressed. Place the screw connector
on the refrigerant line just on to the thread
on the outdoor unit and tighten the first
few threads by hand, Fig.6.3.
NOTE: The refrigerant pipes must be
connected to the valves on the outdoor
unit with as little stress as possible.
IMPORTANT: Before you continue, it is
essential that you read the following
instructions carefully.