
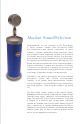
User's Manual


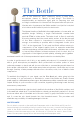


When you’re used to dealing with an assortment of tube microphones (each with
its o
wn mounting system and power supply, not to mention additional voltage
transformers, fragile parts, and other quirks), you’ll really appreciate the simplicity
and ease of the Bottle capsule system. Switching capsules is a painless 30-second
operation which eliminates downtime and warm-up time, and will never interrupt the
flow of a session.
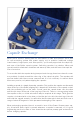
To secure the delicate capsule during transport and storage, three brass transit screws
are provided (located around the outer ring of the spherical grille). The capsules will
perform better with these screws removed and it is not necessary to reinsert them
after every session, only when shipping the capsules.
Installing a capsule is a simple, three-step operation. First, position the capsule over the metal
stem at the top of the Bottle, aligning the J-shaped slot at the back of the capsule socket
with the protruding pin on the stem. Second, push the capsule down onto the stem
until the pin stops at the end of the long leg of the slot. There is a strong spring inside
the capsule socket, so a little extra effort may be required at this stage. Third, give the
capsule a clockwise twist on the stem, so that the pin locks into the short leg of the slot
and holds the capsule securely. You will notice that the stem pivots back and forth over a
range of about 45 degrees to aid in placement and angling of the capsule.
When exchanging capsules, there is no need to turn off the Power Stream power sup-
ply. A low-level audio signal is present whenever a capsule is removed, so it is good
engineering practice to mute or turn down the microphone preamp gain and monitors
before changing capsules.
Capsule Exchange