
User's Manual


O
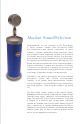
ne of the questions most commonly asked of Blue Bottle
microphone owners is, “What’s in that thing?” The Bottle is
unquestionably an impressive sight, with its imposing size and
nostalgic resemblance to the earliest European tube microphones.
Like the mics of yesteryear, the Bottle canister is not just for looks, but
also holds a small fortune in precision electronics.
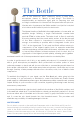
The internal circuitry of the Bottle is thoroughly modern, of course, with an
amplifier design utilizing a single hand-selected vacuum tube
pentode EF86 in triode mode. The tube circuit is Class A and fully
discrete, meaning that the sound which arrives at the dia-phragm
of the Blue capsule is transduced (converted to electrical
energy) as accurately as possible, with no integrated circuits (a.k.a
“IC’s”) in the signal path. To this end, the Bottle utilizes electronic
components of the highest quality (such as expensive metal-film
resistors and alarge custom-built transformer), and there are no pad
or low-cut filter switches in the microphone circuit. In short, this is a
signal path of the highest possible quality, allowing you to get the
m
aximum benefit out of the unprecedented capsule selection created by Blue.
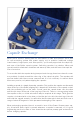
In order to get the most out of this, or any quality microphone, it is essential to pair it
with a good m
icrophone pre-amplifier. Most professional recordists prefer to have
outboard preamps on hand, and will choose solid-state or vacuum tube models based on
their unique characteristics. And unlike many tube microphones, the Bottle can be run
through a variety of tube preamps without excess coloration, noise, loss of detail or tube
compression.
To maintain the integrity of your signal, use the Blue Quad mic cable going into the
mic preamp. It is not necessary or advisable to connect the Bottle mic Power Stream
power supply to a 48V phantom power source. And, whenever possible, connect the mic preamp
o
utput directly to your recorder or A/D converter, bypassing the mixing board and any
unnecessary components.
A recessed, threaded mic stand socket is built into the bottom of the Bottle canister, next
t
o the multi-pin output jack. To put the Bottle on a stand, you may find it easiest to 1) loosen
the boom stand arm or threaded end of the mic stand, 2) grasp the Bottle in one hand,
and 3) screw the mic stand threads into the threaded mount. This procedure will
eli
minate any possibility of handling damage to the mic.
SAFETY NOTE
Do not attach a capsule or the multi-pin Champagne cable to the Bottle until it has first
been attached to a stand. Once the microphone body is secure, connect the Champagne
cable to the Bottle and the Power Stream power supply, and then turn on the Power
Stream to start the warm-up process. At the end of a session, be sure to turn off the
Power Stream power supply before disconnecting the Champagne cable.
The Bottle