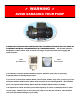
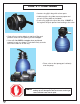
WARNING AVOID DAMAGING YOUR PUMP PUMPS NOT EQUIPPED WITH HAIR AND LINT STRAINERS SHOULD ONLY BE USED IN CONJUNCTION WITH A SKIMMER WITH A STRAINER BASKET. The strainer basket is designed to collect debris, such as leaves and twigs, and prevent them from clogging the pump chamber. Typical Thru Wall Skimmer Typical Skimmer Basket Your skimmer’s strainer basket should be in place whenever your pump is operating, especially when vacuuming the pool floor.
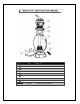
KEY # 1 ITEM # NEP6371 DESCRIPTION 4-WAY VALVE 2 NEP2165 FLANGE CLAMP 3 NEP2166 O-RING 4 NEP2167 FILTER TANK 5 NEP2168 STAND PIPE 6 NEP2169 DRAIN PLUG 7 NEP2170 FILTER BASE 8 NEP2154 SCREW M6 x 25 and NUT M6 Not pictured NEP6368 1.
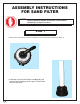
PARTS FOR SAND FILTER NOTE See breakdown on following page for model specific part lists.
NE6145 FILTER PARTS BY MODEL 1 2 3 4 5 6 8 7 REF # MODEL DESCRIPTION 1 AC 83321 4 Way Valve 2 AC 83364 Flange Clamp 3 AC 83348 O-Ring 4 AC 83399 Filter Tank 5 AC 83380 Stand Pipe 6 AC 83402 Drain Plug 7 AC 85685 Filter Base 8 AC 84514 Screw M6 x 25 and Nut M6 3
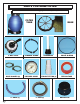
ASSEMBLY INSTRUCTIONS FOR SAND FILTER NOTE Filter may be partially assembled; however, nothing has been properly tightened. DO NOT operate filter system without completing assembly instructions. STEP 1 • Remove the valve (1) from the box and place it to the side until instructed to attach it. • Inside the tank you will find the standpipe (5) and a plastic bag containing various parts, remove from tank and set aside.
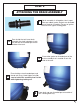
STEP 2 ATTACHING THE DRAIN ASSEMBLY 1 2 From inside the tank insert drain assembly thru hole in bottom of tank, you will see the threaded part on the outside of the tank. 3 4 If drain assembly is all together, take it apart. Take one rubber gasket and put over threaded part of the drain assembly. Flat part of gasket must be flush against sealing plate. Place other gasket on threaded part of the drain assembly that is outside of tank flat side to the tank.
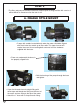
STEP 3 • The filter and pump should be attached to the base prior to filling the filter with sand as it will be difficult to maneuver after the tank is full. A. CRADLE STYLE MOUNT • Pumps with cradles located directly under the motor should be aligned with the 4 holes that match up to the cradle. This type of mount will require the use of four mounting bolts and nuts from the hardware supplied with the base.
STEP 4 • Before filling tank with sand, place nub on bottom of tank into notched out piece of the base, twist to the right till snug. • Place standpipe inside the filter, cover standpipe with the round plastic standpipe protector to prevent sand from entering standpipe. NOTE Sand should be filled no less than 1/2 way up the tank and no more than 3/4. Over-filling will result in permanent damage to your Filter System. • Add filter grade sand (sold separately) to filter tank around standpipe. 12” Tank ...
STEP 4 — CONTINUED • Locate o-ring (3) in bag with various parts. • Lubricate with o-ring lube to ensure proper seal on tank.(O-Ring lube not included) • Push o-ring against the lip of the valve. It MUST sit flat against the lip to protect from leaking at the valve. • Clean off any sand or debris on top lip of filter and position valve over the opening of the standpipe. • Valve will slide ONTO standpipe when positioned properly in tank (as shown). Push down firmly to make sure valve slides on all the way.
STEP 4 — CONTINUED • Once valve is in place, hold clamp (2) as shown and position clamp around lip of filter and over edge of valve. 2 long screws and nuts are provided to put clamp together. • The clamp should sit flat around the lip of the tank and valve. If it is not sitting flat the clamp will leak. • Make sure that the screws of the clamp are lined up with the seams of the tank. Tighten two screws on clamp a little at a time. Alternating from side to side so that both sides are tightened equally.
OPERATING YOUR FILTER NOTE Your filter cannot be run if the water is not at the proper level in the pool. Running the filter without water can cause serious damage to your pump and filter. • Prime filter prior to starting up filter system. DO NOT turn motor on until system has been primed, you can damage your pump. • Make sure water in pool is up to middle of skimmer(s) and that there is nothing blocking water flow from return(s) and skimmer(s) (i.e. plug, plate).
TROUBLESHOOTING LOW WATER FLOW SHORT FILTER CYCLES 1. Check skimmer and pump strainer baskets for debris. 1. Check for algae in pool and superchlorinate as required. 2. Check for restrictions in intake and discharge lines. 2. Be sure chlorine and pH levels are in proper range. Adjust as required. 3. Check for air leak in intake line (indicated by bubbles returning to pool). 4. Backwash filter. 5. Bring sand level in filter down to 1/2 full. 3. Check surface of filter sand for crusting or caking.