
Instructions / Assembly


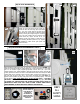
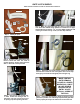

GATE LATCH SHIELD
MAKE CERTAIN TO READ & FOLLOW ALL INSTRUCTIONS CAREFULLY
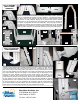
Step 1: Identify all parts
Step 2: Position latch shield above gate
latch & check that latch has room to
operate properly. Center shield & secure
with 2 - #10 x 3/4 screws provided
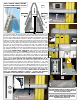
Step 3: Pass end of rope through slot
in latch shield and through hole in
gate latch. Tie end of rope into a knot
so pulling rope will operate gate latch
Step 4: Make sure gate latch catch is in down / locked position
over striker bar. Extend string upwards to outside face of upper
handrail & fold end approx. 1.5 - 2 inches. Mark handrail at fold
in string for location of eye screw (see also Step 5 below)
1.5 - 2
Inches
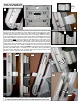
Step 5: Screw the eye screw into the outside of the upper
handrail at the mark. Do not over-tighten. Pass end of rope
through eye screw & tie knot tightly around finger ring
Step 6: Pull finger ring numerous times to check for proper
gate latch operation. It is extremely important that gate latch
closes properly & freely over striker bar. Secure with lock
MAKE CERTAIN
GATE REMAINS
CLOSED & LOCKED
WHEN POOL IS NOT
IN USE. REVIEW
PROPER USE OF
ENTRY & GATE
WITH ALL USERS OF
THE POOL
ROPE
EYE
SCREW
#10 x 3/4
SCREWS
LATCH SHIELD
FINGER RING