HEAVY DUTY IN-POOL LADDER NE1175 TOOLS REQUIRED • • • • • Drill with 1/8” drill bit Small rubber mallet or hammer w/piece of wood Phillips head screwdriver Pliers Spray lubricant or liquid soap • 40 Lbs.
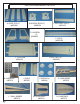
PARTS & HARDWARE FOR STEP A. UPPER STEP (4) B. MOUNTING BLOCKS (2) (NEP2028) C. ADJUSTABLE TUBE (2) (NEP2023) (NEP2177) D. HANDRAIL (2) (NEP6369) E. LEG (2) (NEP2178) F. PLATFORM G. BOTTOM STEP (NEP2025) H. HARDWARE (NEP2173) L. SMALL BARRIER (NEP2173) 2 (NEP2020) I. SHIELD (NEP2027) J. LOCKING CAP (4) (NEP2014) M. UPPER BRACE (NEP2174) K. LARGE BARRIER (NEP2172) N.
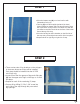
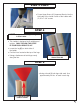
STEP 1 • Place the bottom step (G) on a level surface with indentations facing up. • Take leg (E) and stand upright (pointed side down). When installed on bottom step, the leg will need to have the raised areas facing inward. The raised area with the pre-drilled screw hole should be at the front of the ladder toward the top of the leg. • Place the left leg into the indentation on the left side of the step and push straight down until it clicks into place.
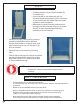
STEP 3 • Place the Lower Base (N) on a level surface. • Snap Large Barrier (K) into the groove on the lower base facing round edge. • Snap Small Barrier (L) into the groove on the lower base facing the straight side. • Slide Upper Brace (M) over Small Barrier as shown. • Slide Upper Brace (M) through the groove in the Large Barrier and push down lightly to secure. • Screw Lower Base of Entrapment Barrier into bottom step of the Inside Portion of the Ladder with (2) 10 x 1-1/4” screws.
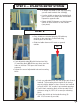
STEP 3 CONT. • Screw Upper Brace of Entrapment Barrier into the third step of the Inside Portion of the Ladder with (2) 10 x 1-1/4” screws STEP 4 NOTE Only follow this step if using as an In Pool Ladder • This Ladder is designed to fit multiple pool heights. ONLY FOLLOW THIS STEP IF YOUR POOL HEIGHT IS 48”. • Locate the leg (E) on both sides of the ladder. • Find the lines located at the top of the legs.
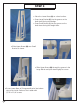
STEP 6 • Put ladder aside for now and install handrails (D) onto platform (F) . • Lay one handrail on flat surface and push the connected dowels of the platform into the openings on the handrail until fully seated. Make sure treads of platform are facing upward. • Before attaching second handrail, make sure that the longer part of the handrail is facing in the same direction on both handrails. Repeat above for installation of second handrail.
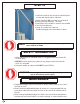
STEP 8 — ATLANTIS ENTRY SYSTEM • To attach the ladder to the step assembly, you will need to attach the shield (I). • Line the shield up above the handrail and push it down so it slides onto the handrail. Repeat for opposite side. • Rotate shield 90 degrees, so that the open sleeve of each shield is on the outside (see photo). STEP 9 • Once shields are situated properly, lift ladder up and line up the openings of shield with long handrail posts of the step.
STEP 10 • Lubricate inside of long and short handrail posts on step with liquid soap or lubricant. • Attach handrails (D) from step box to handrail posts by pushing into posts. The more curved part of the handrail is meant to be installed in the long handrail post. • Using (4) screws from step box hardware bag (J), secure handrails in place. NOTE If attaching Gate System.