
Instructions / Assembly
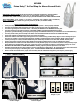

RIGHT
IN
LINE
Measure depth of pool (inside pool) to the height of the pool
deck (see 7.1 & 7.2). Transfer this measurement to the upper
handrails to connect to deck surface (see 7.3). Cut excess
upper handrails if required. Slide rear flanges (see 7.4) onto
handrails and position step system into the pool. Make certain
the step rests firmly on pool floor & is pulled tight against the
pool deck or pool top rail to minimize the gap between step &
pool wall (see 7.2). Secure all flanges to deck surface using
the 1" screws provided (see 7.4-7.6). Drill through the center
of rear flanges & handrail and secure using a 3/4" bolt,
washer both sides and nut (see 7.5). Repeat for both flanges.
Make certain step is secure before using. Step is to be
removed when winterizing your pool. Review all instructions
for proper use with all individuals using this product
x"
7.1
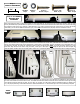
Step 5: ASSEMBLE
UPPER HANDRAILS
LEFT
Identify the upper RIGHT (R) & LEFT (L) handrails (small stamp in parts - see Detail
5.1 & 5.2). Fit handrail pair together as shown in Detail 5.3-5.5 aligning bolt holes at
top. Secure using 1-1/8" bolts, washers both sides and nuts. Tighten hardware.
Repeat for both sets of upper handrails. Slide front deck flanges over upper handrails
before fitting handrails into assembled step (see Detail 5.6 & 5.7). Make certain
flanges face proper direction (inward). One flange goes over a RIGHT handrail and
one over a LEFT. Fit handrail ends (with flanges on) into openings at the top of
stringers as shown in Detail 5.7. Make certain location is correct (R & L as per 5.7)
5.1
5.2
5.3 5.4
5.5
R
R
L
5.7
L R
5.6
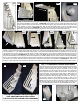
Step 6: ASSEMBLE LOWER HANDRAILS
6.1
6.2
6.3
6.4 6.5 6.6
Identify the lower RIGHT & LEFT handrails (small stamp in parts - Detail 6.1). Facing
step as if the climb, position right handrail on the right side and left on the left side. Align
the bolt flanges on the handrails with the bolt flanges on the stringers and upper hand-
rails (see Detail 6.2-6.5). It is important to start with the connection point with the upper
handrail (Detail 6.3). Align bolt holes by sliding upper handrail up or down. Once aligned,
make certain the upper and lower handrails are perfectly aligned (Detail 6.4). Secure
connection using 3/4" bolt, washer both sides and nut. Repeat for all connection points
on both handrails. After handrails secured, secure upper handrails with stringers using
same hardware (Detail 6.6). Drill a 5/16" hole if bolt holes don’t perfectly align
Step 7: POSITION
STEP & SECURE
TO DECK SURFACE
DECK
x"
7.3
7.5 7.4
7.6
7.2
Blue Wave Products, Inc.
1745 Wallace Ave, Suite B
Saint Charles, IL 60174