V35010 INSTALLATION MANUAL - YARDMORE OVAL POOLS POOL MODEL - L IB E RT Y- E L IX I R - L EG END 2.
Above Ground Pool Safety Please read before installation warning Failure to heed these warnings can result in permanent injury, paralysis from a broken neck, electrocution or drowning. This pool is not designed for diving or jumping! Dangerous injury can result, shallow water! Your pool contains a large quantity of water, and is deep enough to present inherent dangers to life and health unless the following safety rules are strictly observed. First-time users run the highest risk of injury.
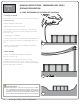
GENERAL INSTRUCTIONS - YARDMORE OVAL POOLS GROUND PREPARATION Section 1 Read all instructions completely before you begin. A. DETERMINE THE LOCATION OF YOUR POOL 1. The Terrain Pay special attention to choosing the right location for your pool: • Choose a large area, as flat and level as possible and well drained. (Image 1) • Choose a spot on dry, firm earth (stabilizer or other)—do not install the pool on asphalt, tar or oil based surfaces, gravel, peat moss, wood or chemically treated soil.
Section 1 GENERAL INSTRUCTIONS - YARDMORE OVAL POOLS GROUND PREPARATION A. CONT. DETERMINE THE LOCATION OF YOUR POOL 2. Things to Avoid Do not locate your pool near or on any of the following (Images 3a to 3c): • Overhanging tree branches. • Overhead wires and clotheslines. • Buried pipes and wires. Contact your gas, electric and telephone utilities to find buried pipes and wires before you dig. • Areas with poor drainage. • Grass, stones and roots.
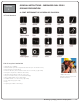
Section 1 GENERAL INSTRUCTIONS - YARDMORE OVAL POOLS GROUND PREPARATION A. CONT. DETERMINE THE LOCATION OF YOUR POOL 4. Tools Needed List of required materials • Straight wood plank • Material that provides a permanent base (ex.
Section 1 GENERAL INSTRUCTIONS - YARDMORE OVAL POOLS GROUND PREPARATION PARTS LISTING PLEASE BE SURE TO FOLLOW THE CORRECT PARTS LISTING FOR YOUR POOL THAT MAY HAVE THE NAME; LIBERTY OR; ELIXIR OR; LEGEND 1-4 No Diving or Jumping.
Section 1 GENERAL INSTRUCTIONS - YARDMORE OVAL POOLS GROUND PREPARATION PARTS LISTING - EXPLODED VIEW Important Note: Make sure you have all the parts necessary before you start installation. No Diving or Jumping.
Section 1 GENERAL INSTRUCTIONS - YARDMORE OVAL POOLS GROUND PREPARATION PARTS LISTING - EXPLODED VIEW 1-6 No Diving or Jumping.
Section 1 GENERAL INSTRUCTIONS - YARDMORE OVAL POOLS GROUND PREPARATION PARTS LISTING - CONTENTS No Diving or Jumping.
Section 1 GENERAL INSTRUCTIONS - YARDMORE OVAL POOLS GROUND PREPARATION PARTS LISTING - EXPLODED VIEW Important Note: Do not throw away the extruded polystyrene sections. 1-8 No Diving or Jumping.
Section 1 GENERAL INSTRUCTIONS - YARDMORE OVAL POOLS GROUND PREPARATION PARTS LISTING - EXPLODED VIEW Important Note: Make sure you have all the parts necessary before you start installation. No Diving or Jumping.
Section 1 GENERAL INSTRUCTIONS - YARDMORE OVAL POOLS GROUND PREPARATION PARTS LISTING - CONTENTS 1-10 No Diving or Jumping.
Section 1 GENERAL INSTRUCTIONS - YARDMORE OVAL POOLS GROUND PREPARATION PARTS LISTING - EXPLODED VIEW Important Note: Do not throw away the extruded polystyrene sections. No Diving or Jumping.
Section 1 GENERAL INSTRUCTIONS - YARDMORE OVAL POOLS GROUND PREPARATION PARTS LISTING - EXPLODED VIEW Important Note: Make sure you have all the parts necessary before you start installation. 1-12 No Diving or Jumping.
Section 1 GENERAL INSTRUCTIONS - YARDMORE OVAL POOLS GROUND PREPARATION PARTS LISTING - CONTENTS No Diving or Jumping.
Section 1 GENERAL INSTRUCTIONS - YARDMORE OVAL POOLS GROUND PREPARATION PARTS LISTING -EXPLODED VIEW Important Note: Do not throw away the extruded polystyrene sections. 1-14 No Diving or Jumping.
Section 1 GENERAL INSTRUCTIONS - YARDMORE OVAL POOLS GROUND PREPARATION PARTS LISTING - EXPLODED VIEW Important Note: Make sure you have all the parts necessary before you start installation. No Diving or Jumping.
Section 1 GENERAL INSTRUCTIONS - YARDMORE OVAL POOLS GROUND PREPARATION PARTS LISTING - CONTENTS 1-16 No Diving or Jumping.
Section 1 GENERAL INSTRUCTIONS - YARDMORE OVAL POOLS GROUND PREPARATION B. PREPARE THE FOUNDATION OF YOUR POOL 1. Mark out the Area a. The next following steps will show you how to mark out the area you need for the oval pool. This marked area will be larger than the pool size itself, but this space is needed. Find a site where the ground is stable, level and well drained. Once you have selected your site, determine where the middle of your pool will be.
Section 1 GENERAL INSTRUCTIONS - YARDMORE OVAL POOLS GROUND PREPARATION B. CONT. PREPARE THE FOUNDATION OF YOUR POOL f. Mark areas along both straight sides of your oval. Use pegs and string as a guide for the can of spray paint to mark straight lines. (Image 5) 5 g. You now have the space marked out that is needed for your oval pool. (Image 6) 6 2. Remove the sod a. Remove the sod from the area you have just outlined. (Image 7) b. Remove all debris (rocks, roots, etc) using a rake.
Section 1 GENERAL INSTRUCTIONS - YARDMORE OVAL POOLS GROUND PREPARATION B. CONT. PREPARE THE FOUNDATION OF YOUR POOL Example on how to mark out pool area for an 18 x 33 Please be sure to use your pool’s footprint for your pool size on the last pages of this Section1. No Diving or Jumping.
Section 1 GENERAL INSTRUCTIONS - YARDMORE OVAL POOLS GROUND PREPARATION B. CONT. PREPARE THE FOUNDATION OF YOUR POOL 3. Make the area flat and level a. Remove all the high spots with a shovel, hoe or rake. To make sure your pool is stable, compact the ground well before adding the sand. Be prepared to hire earth moving equipment if you need to level a large area. Remember, your pool must be level across the diameter of the pool. (Image 8) b.
Section 1 GENERAL INSTRUCTIONS - YARDMORE OVAL POOLS GROUND PREPARATION C. PRE-ASSEMBLY OF THE STRAIGHT SECTION 1. Assembling the strap end channel a. Overlay the strap en channel over the underbox channel (under box channel is belly-up). (Image 10) 10 b. Align the holes of the strap end channel with those of the underbox channel, but do not secure them with the bolts at this time. (Image 11) 11 c. Slide the steel upright over the strap end channel making sure that the holes line up.
Section 1 GENERAL INSTRUCTIONS - YARDMORE OVAL POOLS GROUND PREPARATION C. CONT. PRE-ASSEMBLY OF THE STRAIGHT SECTION d. Insert the left and right gussets. the pieces are marked "L" and "R". Ensure that the holes are aligned. Slide the steel upright over the strap end channel. (Image 13) 13 e. All holes should be lined up at this point. Use the 5/16” x 5” bolts and 5/16” nuts for the channels and the 5/16” x 4 1/2” stainless steel bolts for connecting the gussets to the steel uprights.
Section 1 GENERAL INSTRUCTIONS - YARDMORE OVAL POOLS GROUND PREPARATION C. CONT. PRE-ASSEMBLY OF THE STRAIGHT SECTION f. Once these pieces are in place, screw the left and right gussets to each other using three #10 screws. (Image 16) 16 g. In order to ensure that the steel upright and the channels are at right angles during the assembly, push the ends of the steel upright and the channels and tighten the bolts at the same time. First, tighten the bolts of the channels by maintaining a good pressure.
Section 1 GENERAL INSTRUCTIONS - YARDMORE OVAL POOLS GROUND PREPARATION C. CONT. PRE-ASSEMBLY OF THE STRAIGHT SECTION h. Place a steel top plate on the top of each of the pool steel structures. The holes of the steel top plate and steel structure must be aligned and screwed on the side using a #10 screw. i. Before bolting the strap sections to the strap end channels, add these end channel caps with foam blocks to the underside of the straps at each end. 19 j.
Section 1 GENERAL INSTRUCTIONS - YARDMORE OVAL POOLS GROUND PREPARATION C. CONT. PRE-ASSEMBLY OF THE STRAIGHT SECTION k. Slide a strap under the front part of a channel, the two holes in these End Channel Caps will line up with the two holes in the straps, as well as, the corresponding holes in the strap end channels themselves. (Image 21) 21 l.
Section 1 GENERAL INSTRUCTIONS - YARDMORE OVAL POOLS GROUND PREPARATION D. GROUND PREPARATION FOR THE BUTTRESS 1. Measuring for the buttress trenches a. In order to measure where trenches need to be dug for the placement of the buttress, you must first draw a perpendicular line in order to create a perfect 90 degree angle. From the pool center, trace a straight line to the oval perimeter. (Image 13) 13 b.
Section 1 GENERAL INSTRUCTIONS - YARDMORE OVAL POOLS GROUND PREPARATION D. CONT. GROUND PREPARATION FOR THE BUTTRESS 2. Digging the buttress trenches Odd number of trenches; a. If your oval pool contains an even number of buttresses, please proceed with next step. If your oval pool contains an odd number, position the buttress temporarily on the straight center line from the middle. (Image 16) b. Trace around the buttress and dig a trench.
Section 1 GENERAL INSTRUCTIONS - YARDMORE OVAL POOLS GROUND PREPARATION D. CONT. GROUND PREPARATION FOR THE BUTTRESS Even number of buttresses: a. If your oval pool contains an even number of buttresses, measure from the center line out 21”. Position the buttress temporarily off the straight center line from the middle. (Image 19) b. Trace around the buttress and dig a trench. Dig the trench 3 to 5 inches deep by 10 inches wide and the length of 52 1/2 inches long. (Image 20) 19 c.
Section 1 GENERAL INSTRUCTIONS - BRACELESS OVAL POOLS GROUND PREPARATION D. CONT. GROUND PREPARATION FOR THE BUTTRESS 4. Finish trenches & patio stone installation a. Continue to finish one by one the remaining trenches with patio blocks for the buttress installation. It is important to finish one side of the oval only. b. Once all the trenches are dug and buttresses with patio stones are installed, on the one side only.
Section 1 GENERAL INSTRUCTIONS - YARDMORE OVAL POOLS GROUND PREPARATION E. ASSEMBLING THE BUTTRESS STRAPS AND PRESSURE PLATES 1. Assemble the buttress straps and brace a. Place crushed stone or soil where the pressure plates are located. This will have the effect of supporting the pressure plate. b. Put pressure plates on the tip of the strap end channel to 20 1/2“ from the steel upright. The side that is corrugated must be facing up and the flat side facing the ground. (Images 24 & 25) c.
Section 1 GENERAL INSTRUCTIONS - YARDMORE OVAL POOLS GROUND PREPARATION E. ASSEMBLING THE BUTTRESS STRAPS AND PRESSURE PLATES f. Once both sides of the buttresses have been installed perfectly, check that all is measured perfectly. g. Add the remaining straps that join across to other straps. Make sure the screw heads are facing upward. Remeasure and tighten screws. Recheck measurement again.
Section 1 GENERAL INSTRUCTIONS - YARDMORE OVAL POOLS GROUND PREPARATION OVAL FOOTPRINT - 12 x 16 1-32 No Diving or Jumping.
Section 1 GENERAL INSTRUCTIONS - YARDMORE OVAL POOLS GROUND PREPARATION OVAL FOOTPRINT - 12 x 20 No Diving or Jumping.
Section 1 GENERAL INSTRUCTIONS - YARDMORE OVAL POOLS GROUND PREPARATION OVAL FOOTPRINT - 12 x 24 1-34 No Diving or Jumping.
Section 1 GENERAL INSTRUCTIONS - YARDMORE OVAL POOLS GROUND PREPARATION OVAL FOOTPRINT - 15 x 26 No Diving or Jumping.
Section 1 GENERAL INSTRUCTIONS - YARDMORE OVAL POOLS GROUND PREPARATION OVAL FOOTPRINT - 15 X 30 1-36 No Diving or Jumping.
Section 1 GENERAL INSTRUCTIONS - YARDMORE OVAL POOLS GROUND PREPARATION OVAL FOOTPRINT - 18 X 33 No Diving or Jumping.
Section 1 GENERAL INSTRUCTIONS - YARDMORE OVAL POOLS GROUND PREPARATION OVAL FOOTPRINT - 18 X 40 1-38 No Diving or Jumping.
Section 2 GENERAL INSTRUCTIONS - YARDMORE OVAL POOLS ASSEMBLING THE POOL BASE A. INSTALLATION OF BOTTOM PLATES AND BOTTOM RAILS 1. Bottom plates & rails - straight section a. Screw the bottom plate on the strap end channel. The bottom plate has to sit on the edge of the strap end channel and the steel upright. (Images 1 & 2) b. Remove dust and dirt between the bottom plate and the strap end channel. c. Install the straight bottom rail between the steel structures.
Section 2 GENERAL INSTRUCTIONS - YARDMORE OVAL POOLS ASSEMBLING THE POOL BASE A. CONT. INSTALLATION OF BOTTOM PLATES AND BOTTOM RAILS e. The uprights on the straight section will now be finished. (Image 4) Earth 4 2. Bottom plates & rails - round section a. Continue the installation of the bottom plates of the round sections. Insert the end of each bottom rail into the bottom plate. Leave a gap between the ends of the bottom rails.
Section 2 GENERAL INSTRUCTIONS - YARDMORE OVAL POOLS ASSEMBLING THE POOL BASE A. CONT. INSTALLATION OF BOTTOM PLATES AND BOTTOM RAILS 3. Patio Stones (Optional) Contact your Dealer: Please contact your dealer for more information about using patio stones. a. Concrete patio stones may be placed at the base of each upright of your pool. (Image 6) b. Each bottom plate will show the location for a patio stone. Make a mark in the ground at each base plate. c.
Section 2 GENERAL INSTRUCTIONS - YARDMORE OVAL POOLS ASSEMBLING THE POOL BASE A. CONT. INSTALLATION OF OF BOTTOM PLATES AND BOTTOM RAILS 4. Measure the perimeter of your pool a. Measure the perimeter of your pool and hammer nails into the ground to keep the bottom rails into place. These nails are to be removed only at the last step-when filling up the pool. (Image 8) Important Note: Use a soft measuring tape to meaure around the perimeter of the pool.
Section 3 GENERAL INSTRUCTIONS - YARDMORE OVAL POOLS ASSEMBLING THE POOL WALL A. SETTING UP THE POOL WALL Do not attempt to install the pool wall in the wind, wait for a calm day. It takes at least 3 people to install the pool wall. 1. Preparing for the wall installation a. Bring the following items into the middle of the pool foundation before you start uncoiling the pool wall: plywood, some extra sand or fine dirt to make the cove and a ladder to climb out after the wall is assembled. b.
Section 3 GENERAL INSTRUCTIONS - YARDMORE OVAL POOLS ASSEMBLING THE POOL WALL A. CONT. SETTING UP THE POOL WALL 3. Join the ends of the pool wall a. Line up the holes in the two ends of the pool wall. (Image 4) b. Now that you have installed the wall you can be faced with three scenarios. 1) The wall joints align perfectly, if so, move on to the next step (c). 2) Your wall appears to be too short. It is not.
Section 3 GENERAL INSTRUCTIONS - YARDMORE OVAL POOLS ASSEMBLING THE POOL WALL A. CONT. SETTING UP THE POOL WALL d. To fasten the wall joint, overlap the two steel bars, one on the inside and the other on the outside. Tighten the mechanical screws on the inside and the nuts on the outside. Ensure that all bolts and all the holes are used. (Image 7) When tightening the screws start from either the top and go down or vice versa.
Section 3 GENERAL INSTRUCTIONS - YARDMORE OVAL POOLS ASSEMBLING THE POOL WALL B. ASSEMBLING THE COVE 1. Make the cove a. If you are using sand, bank the sand against the wall to form a cove of 3” to 6” (7.5cm to 15cm) high and 8” to 12” (20cm to 30cm) wide at ground level. This will prevent the liner from creeping under the wall, and it will also protect the liner from any metal edges of the pool framework. THIS STEP IS NOT OPTIONAL, IT MUST BE DONE. (Image 9) b.
Section 3 GENERAL INSTRUCTIONS - YARDMORE OVAL POOLS ASSEMBLING THE POOL WALL B. CONT. ASSEMBLING THE COVE e. A vacuum cleaner can later be used to remove the air from between the liner and the wall. This technique enables you to remove folds in the liner. However the following precautions should be taken: Do not use an industrial vacuum cleaner which could be too powerful. Tape the end of the vacuum hose before inserting it into the wall so as not to damage the liner.
Section 3 GENERAL INSTRUCTIONS - YARDMORE OVAL POOLS ASSEMBLING THE POOL WALL C. INSTALL THE POOL LINER 1. Set the liner in place a. Open the carton. Do not use anything sharp to open the carton. b. Unpack and unfold the liner and spread it out in the sun to warm it up. Inspect all the seams and surfaces for holes. c. Remove your shoes to avoid damaging the base or tearing the liner. d. Spread out the liner, smooth side down. Unfold the liner from the centre of the pool toward the sides.
Section 3 GENERAL INSTRUCTIONS - YARDMORE OVAL POOLS ASSEMBLING THE POOL WALL C. CONT. INSTALL THE POOL LINER Please ensure to follow instructions that match the type of liner you may have. 2. Fasten the liner place (OVERLAP ONLY) a. Starting at the liner wall seam, hang the liner over the wall making sure that the seam is straight up and down, perpendicular to the floor. (Remove stabilizers gradually as you fold the liner over the top of the wall.
Section 3 GENERAL INSTRUCTIONS - YARDMORE OVAL POOLS ASSEMBLING THE POOL WALL C. CONT. INSTALL THE POOL LINER f. After all the wrinkles in the liner are removed, trim any extra length of plastic coping so there is no overlap. (Image 19) g. Roll up any excess liner hanging below the plastic coping and tape it in place near the top of the pool wall. Important: Do not trim off the excess liner. (Image 20) 19 Important Note: Do not trim off the excess liner.
Section 3 GENERAL INSTRUCTIONS - YARDMORE OVAL POOLS ASSEMBLING THE POOL WALL C. CONT. INSTALL THE POOL LINER 4. Fasten the liner in place (HUNG/J or V-BEAD LINER ONLY) a. With a V-Bead liner you will not use the plastic coping strips that are packed in the parts carton of your pool. You can discard those pieces, if they are included, as they only apply to pools with overlap liners. b. The top of the wall of the liner has what is called a “V-Bead” welded onto it.
Section 3 GENERAL INSTRUCTIONS - YARDMORE OVAL POOLS ASSEMBLING THE POOL WALL C. CONT. INSTALL THE POOL LINER 3. Fasten the liner place (BEADLOCK/SNAPBEAD LINER ONLY) a. With a snap bead liner you will not use the plastic coping strips that are packed in the parts carton of many pools. You can discard those pieces (if they are included). Instead, you should have received a beaded liner track (referred to as a “coping bead receiver” in Image 22). b.
Section 4 GENERAL INSTRUCTIONS - YARDMORE OVAL POOLS ASSEMBLING THE POOL FRAME A. INSTALLATION OF THE UPRIGHTS - Round Section 1. Install the uprights a. The wall joint is hidden behind the upright on most pools. This assures that the skimmer and skimmer return holes are not obstructed. b. Insert the bottom of the upright into the bottom plate until the hooks snap. (Image 1) 1 Important Note: Use the ridges in the pool wall to make sure the upright column is straight up and down.
Section 4 GENERAL INSTRUCTIONS - YARDMORE OVAL POOLS ASSEMBLING THE POOL FRAME B. INSTALLATION OF TOP LEDGES AND LEDGE COVERS 1. Install stabilizers a. Install the stabilizers on the wall while ensuring to leave a gap between each end. (Image 2) 2. Install top plates and top ledges a. Install the top plate on the upright and secure with three screws. (Images 3 & 4) b. Secure the top plate with 3/4 inch screws. (Image 6) c. Insertpartially with 3/4 inch screws on top.
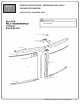
Section 4 GENERAL INSTRUCTIONS - YARDMORE OVAL POOLS ASSEMBLING THE POOL FRAME B. CONT. INSTALLATION OF TOP LEDGES AND LEDGE COVERS c. Place yourself behind the upright and install the top ledge to right, then place another top ledge on your left. There is a tab on the left top ledge that leans on the right top ledge. Attach screws lightly. (Images 5 & 6) Important Note: We suggest that you install all the top ledges on the wall before attaching them. 5 d.
Section 4 GENERAL INSTRUCTIONS - YARDMORE OVAL POOLS ASSEMBLING THE POOL FRAME B. CONT. INSTALLATION OF TOP LEDGES AND LEDGE COVERS d. Partially insert the 1 inch screws on top. (Image 8) e. Distribute evenly the space between the top ledges to center them between the uprights. f. Make sure to level the two axes of the uprights by pushing slightly inwards before tightening the screws permanently. 8 3. Install the ledge covers a. Insert the rear part of the ledge cover on the top of the upright.
Section 4 GENERAL INSTRUCTIONS - YARDMORE OVAL POOLS ASSEMBLING THE POOL FRAME B. CONT. INSTALLATION OF TOP LEDGES AND LEDGE COVERS b. Slide the front part of the ledge cover into the grooves of the rear part of the ledge cover. (Image 10) c. When everything is in place, insert a screw in the hole on the top of the front of the ledge cover. (Image 11) d. Place and press firmly the cover. (Image 12) 10 11 12 No Diving or Jumping.
Section 4 GENERAL INSTRUCTIONS - YARDMORE OVAL POOLS ASSEMBLING THE POOL FRAME D. FILL YOUR POOL WITH WATER 1. Finish filling the pool a. Turn off the vacuum and carefully remove it from the pool. b. Fill the pool with water to 2” (5cm) below the lowest opening. Make sure you remove any creases from the liner in the bottom of the pool before the water level gets too high. c. While the pool is filling, remvoe the nails that were holding the bottom rails in place. d. Your pool is now installed.