97-0737 Aboveground Pool Installation Manual This manual must be left with the pool owner www.wilbargroup.
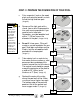
Section 1 GENERAL INSTRUCTIONS – ROUND POOL GROUND PREPARATION Safety Rules for Pool Owners Your pool contains a large quantity of water, and is deep enough to present inherent dangers to life and health unless the following safety rules are strictly observed. First-time users run the highest risk of injury. Make sure everyone understands all safety rules before entering the pool. Post no diving and no jumping signs beside the pool. For additional safety information please consult Section 3. 1.
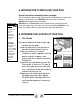
A. INTRODUCTION TO INSTALLING YOUR POOL Read all instructions completely before you begin. Important Note: Ground preparation is one of the most important steps in the installation process. A proper foundation will ensure the rest of the pool assembly goes smoothly and that no problems will occur when the pool is filled with water. These instructions explain how to install your pool. Simply follow the step-by-step directions.
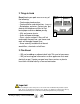
2. Things to Avoid Do not locate your pool near or on any of the following: • Overhanging tree branches. • Overhead wires and clotheslines. (Image 3) • Buried pipes and wires. Contact your gas, electric and telephone utilities to find buried pipes and wires before you dig. • Hilly and uneven terrain. • Areas with poor drainage. • Grass, stones and roots. Grass will rot underneath the pool liner, and stones and roots will damage the pool liner.
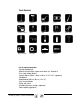
Tools Needed Compactor Hammer Water hose Level File Vacuum cleaner Pliers Rake Lawn roller Metal snips Screwdriver Wheelbarrow Shovel Spray paint Mallet Measuring tape Duct tape Trowel Wrench List of required materials: •Straight wood plank •Material that provides a permanent base (ex.
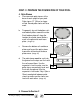
C. PREPARE THE FOUNDATION OF YOUR POOL 1. Mark out the Area a. Drive a peg into the ground at the centre of the area where you want your pool. (Image 4) Important Note: Your pool must be perfectly levelled. Take the time you need to be sure your foundation is perfectly levelled. b. Use a length of string tied between the peg and a can of spray paint, and mark a circle on the ground (a tape measure can also be used). The circle will be 8” (20 cm) bigger all round than the pool. (Image 5) 2.
CONT. C. PREPARE THE FOUNDATION OF YOUR POOL c. Put a carpenter’s level on the wood plank and swing the board in a circle to find the high and low spots. (Image 8) Important Note: The outer 24” (60cm) of the circle must be perfectly flat. The bottom edge of the pool must rest flat on the ground and have no gaps under it. Take the time you need to be sure this area is perfectly flat and levelled. d. e. Remove all the high spots with a shovel, hoe or rake.
CONT. C. PREPARE THE FOUNDATION OF YOUR POOL 4. Patio Stones a. Place concrete patio stones at the base of each upright of your pool. Patio stones 12” (30 cm) or larger will do. Round patio stones will also work. b. Temporarily lay out the bottom rails and bottom plates around the circle. Each bottom plate will show the location for a patio stone. Make a 14 mark in the ground at each base plate. (Image 14) c.
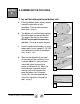
Section 2 A. ASSEMBLING THE POOL BASE 1. Lay out the bottom plates and bottom rails. a. Place the bottom plates equally spaced around the perimeter of your foundation. Place one base plate on each stone. (Image 1) b. The bottom rails and the bottom plates of the Aries pool are galvanized steel. This means they have a silver colour. DO NOT use the painted connectors and rails. These go on top of the pool. c. Insert the end of each bottom rail into a bottom plate.
A. CONT. ASSEMBLING THE POOL BASE Important Note: It is preferable to use very fine sand that is easily compacted. Be careful not to spill sand on the bottom rails. 2. Spread out brick sand. a. b. Spread a layer of fine brick sand (no pebbles) over the foundation area, 2" (5 cm) deep. Use a rake to make the brick sand flat and smooth. (Image 6) 6 Wet the sand and pack it down with a lawn roller or other type of compactor. Using a trowel, smooth the surface.
B. ASSEMBLING THE POOL WALL & LINER Do not attempt to install the pool wall in the wind, wait for a calm day. It takes at least 3 people to install the pool wall. Important Note: Bring the following items onto the pool foundation before you start uncoiling the pool wall: cardboard or plywood, some extra sand to make the cove and a ladder to climb out after the wall is assembled. 1. Set the pool wall in place. a. b. c.
B. CONT. ASSEMBLING THE POOL WALL & LINER 2. Join the ends of the pool wall. a. Line up the holes in the two ends of the pool wall.(Image 5) b. Now that you have installed the wall you can be faced with three scenarios. Important Note: Stick a screwdriver through two of the holes to help line up the ends of the wall. 5 1) The wall joints align perfectly, if so, move on to the next step. 2) Your wall appears to be too short. It is not.
B. CONT. ASSEMBLING THE POOL WALL & LINER d. Cover the seam and bolt heads on the inside/interior of the pool wall completely with 2” (50mm) duct tape. (Image 9) Important Note: The pool must be levelled within 1" (25 mm) across the diameter. A pool that is not levelled is dangerous and may collapse. 3. Make sure the pool wall is level. a. Use a length of string and a line-level to check across the top edge of the pool wall to see if it is level. Check the wall in several different directions.
B. CONT. ASSEMBLING THE POOL WALL 5. Make a cove a. Important Note: The cove is an important part of the pool structure. Take your time to make a complete, fullsize cove. b. c. • • • • If you are using sand, bank the sand against the wall to form a cove of 6” (15.24cm) high and 6” (15.24cm) wide at ground level. Water the sand to compact it and use a trowel to spread it evenly.
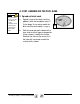
C. INSTALL THE POOL LINER Important Note: If possible, unfold the liner on the grass one to two hours before installation. Be careful not to leave the liner too long or you may damage the grass. 1. Set the liner in place a. Open the carton. Do not use anything sharp to open the carton. b. Unpack and unfold the liner and spread it out in the sun to warm it up. Inspect all the seams and surfaces for holes. 1 c. Remove your shoes to avoid damaging the base or tearing the liner. Important Hint: d.
CONT. C. INSTALL THE POOL LINER Important Note: Do not trim off the excess liner. (If the liner ever needs to be removed, trimming the liner will make re-installation very difficult.) Instead, roll up any excess liner and tape it in place near the top of the pool wall. e. After all the wrinkles in the liner are removed, trim any extra length of plastic coping so there is no overlap. (Image 4) f. Roll up any excess liner hanging below the plastic coping and tape it in place near the top of the pool wall.
D. INSTALLING THE TOP LEDGES, UPRIGHTS & LEDGE COVERS 1. Continue filling your pool a. Continue filling your pool with water. Do not put in more that 12” (30cm) of water until the top ledges and uprights are all attached. b. Keep working on the top ledges and uprights while the pool fills. Important Note: Use the ridges in the pool wall to make sure the upright column is straight up and down. 2. Install the uprights a.
D. INSTALLING THE TOP LEDGES, UPRIGHTS & LEDGE COVERS g. Make the pool settle into a perfect circle by pushing the top of the pool wall vigorously inward at each vertical (this will help make the bottom of the pool wall shift into a perfect circle). No Diving or Jumping. Observe all Safety Rules.
Parts List - ARIES Part Number Wilbar Description 12' 15' 18' 21' 24' Top Tracks (PAINTED) 36863 BTM RAIL PTD 6'0"R 53-15/16" (5/8" STL) 36864 BTM RAIL PTD 7'5"R 53-15/16" (5/8" STL) 36865 BTM RAIL PTD 9'0"R 53-13/16" (5/8" STL) 36866 BTM RAIL PTD 10'5"R 54-3/8" (5/8" STL) 36867 BTM RAIL PTD 12'0"R 54-1/16" (5/8" STL) 8 10 12 14 16 Uprights 37557 UR 2" STL ALI PEARL SUNRAY 47-5/8" 8 10 12 14 16 37558 UR 2" STL ALI PEARL SUNRAY 51-5/8" 8 10 12 14 16 NLR-1460061 BTM RAIL 6'0"R
Exploded view - ARIES 9 4 3 8 9 8 6 1 5 7 2 3 7 No Diving or Jumping. Observe all Safety Rules.