
Instructions / Assembly

No Diving or Jumping. Observe all Safety Rules.
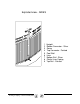
D. INSTALLING THE TOP LEDGES, UPRIGHTS
& LEDGE COVERS
a.
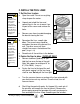
Continue filling your pool with water. Do not put in more that
12
”
(30cm) of water until the top ledges and uprights are all
attached.
b.
Keep working on the top ledges and uprights while the pool fills
.
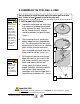
1. Continue filling your pool
17
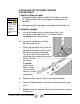
Important
Note:
Use the ridges
in the pool wall
to make sure
the upright
column is
straight up and
down.
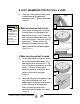
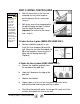
c.
Place a top connector (key 4) over the
top edge of the pool wall (key 5) with
the tab on the outside of the pool.
Line up the hole in the tab with the
screw hole near the top of the vertical
column. The tab
must be on
the
outside
of the vertical
column. Make
sure the vertical
column is straight
up and down.
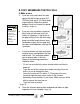
d.
Slide one end of a top rail (key 6) into the top connector.
e.
Fasten the top connector to the vertical column with one screw
(key 7).
f.
Repeat the last five steps for each of the vertical columns arou
nd
the pool wall.
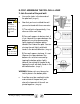
2. Install the uprights
a.
Line up the bottom of one vertical column (key 1) with
the tab on one base plate (key 2). The tab must be on
the
outside
of the vertical column.
b.
Line up the screw holes and fasten
with one screw (key 3).
2