
Instructions / Assembly

No Diving or Jumping. Observe all Safety Rules.
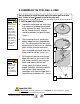
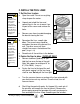
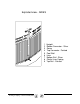
B. CONT. ASSEMBLING THE POOL WALL & LINER
a.
Line up the holes in the two ends of
the pool
wall.(
Image
5)
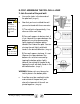
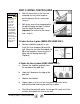
b.
Now that you have installed the wall
you can be faced with three scenarios.
1)
The wall joints align perfectly, if so,
move on to the next step.
2)
Your wall appears to be too short. It
is not. However the space between the
bottom rails must be decreased by
lightly tapping the bottom plates
towards the inside of the pool. You can
also tap the wall lightly with both
hands in the desired direction
. (Image 6)
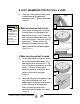
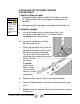
3)
Your wall appears too long. It is not.
However the space between the
bottom rails must be increased by
tapping the bottom plates lightly
towards the outside of the pool or by
tapping the wall with both hands in the
desired direction.
(Image 7)
WARNING:
Bottom rails must always be
held in place in the bottom plate.
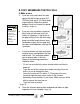
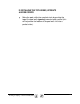
c.
A wall bar must be used both inside
and outside of the pool wall joint
where the two ends of the wall are
jointed together.
(Image 8)
2. Join the ends of the pool wall.
12
Important
Note:
Stick a
screwdriver
through two of
the holes to
help line up the
ends of the
wall.
5
6
7
Important
Hint:
Ensure that all
bolts and all the
holes are used.
5
8