
Instructions / Assembly


No Diving or Jumping. Observe all Safety Rules.
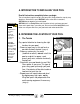
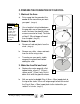
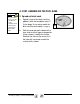
c.
Put a carpenter
’
s level on the wood
plank and swing the board in a circle
to find the high and low spots.
(Image 8)
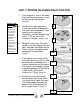
d.
Remove all the high spots with a
shovel, hoe or rake. Be prepared to
hire earth moving equipment if you
need to level a large area.
Remember, your pool
must
be level
within 1
”
(25
mm) across the
diameter of the pool.
(Image 9 & 10)
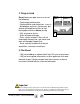
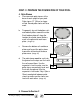
e.
Do not
fill in low areas. Filling will
create an unsafe foundation for your
pool. Small dips and hollows may be
filled in, but the soil
must
be hard
-
packed with a tamping tool.
(Image 11)
f.
Take material such as rock dust or
fine mortar that can conform a solid,
permanent base and deposit this
material around the rim of the basin.
The material used should be spread
around the perimeter of the pool to
a width of 24
”
(60cm) and a
thickness of 2
”
(5cm).
(Image 12)
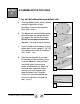
g.
Recheck the outer of the circle,
where the pool wall will be. Make
sure there are no high or low spots.
The bottom edge of the pool wall
must
rest flat on the ground and
have no gaps under it.
(Image 13)
7
9
10
Important
Note:
The outer 24
”
(60cm) of the
circle must be
perfectly flat.
The bottom
edge of the
pool
must
rest
flat on the
ground and
have no gaps
under it. Take
the time you
need to be
sure this area
is perfectly flat
and levelled.
11
12
13
CONT. C. PREPARE THE FOUNDATION OF YOUR POOL
8