
Instructions / Assembly
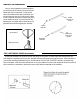
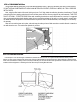

Take half of the wall rims and place them in a circle along the circumference of the pool area. Assemble the wall rims by using
the bottom cuffs to join them together as shown in the diagram. Do not be alarmed that the pieces do not lock together tightly,
there is some room for adjustments should you need it while installing the wall in steps five and six. Check the roundness of your
circle by measuring the diameter across in several locations. DO NOT SKIP THIS STEP! Otherwise, you might end up with a oval
shape, which will cause problems later on. Once you have established a true circle, stake the wall rims at every other rim with a
screwdriver or small stake (as shown in diagram B), to ensure that it stays in place during the remainder of the installation.
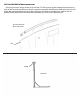
FOR 24' & 33' POOLS:
Measure from bottom
cuff to opposite
bottom cuff at
every other plate.
When true, stake
into position.
FOR 15’, 18’,20’, & 28’
POOLS: Measure from
bottom cuff to center of
opposite bottom
cuff at every other
bottom cuff. When
true, stake into
position.
* Adjust rims in or
out as necessary to
form a true circle.
STEP 3: BOTTOM RING ASSEMBLY
Bottom Cuff
Wall Rim
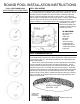
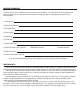
MATRIX PARTS BREAKDOWN
Top Cap 8”
6” Upright
Bottom Cuff
Lock Down Fastener
Top Rail 6”
Wall Rim
Wall Rim
Diagram A
Diagram B
Once you have completed the ground
preparation, you should open all cartons to the pool
and become familiar with all of its components. You
should also refer to the breakdown sheet that is
packed with your pool and make sure that you have
the correct number of each component necessary
to complete your pool. If you are missing any parts,
or you have received any damage parts, you should
notify the dealer where you purchased the pool
before beginning the assembly.
w
@
§_
Iilk
/
Yb
\
\
DD
/
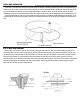
SIMPLICITY PARTS BREAKDOWN
Top Rail
(Goes on top
of wall)
Bottom Rail
(Goes on the
ground)
Top Rail
Connector
Bottom Rail
Connector
Bottom Rail
Bottom Rail
Connector
STEP 3: BOTTOM RAIL CONNECTOR ASSEMBLY
* Adjust Bottom Rails in
or out as necessary to
form a true circle.
Bottom rails and bottom rail connectors are the ones that go on the ground. You need to take them and place them in a
circle along the circumference of the pool area. Assemble the bottom rails with the bottom rail connectors. Check roundness of
your circle by measuring the diameter across in several locations. DO NOT SKIP THIS STEP! Otherwise, you might end up
with an oval shape , which will cause problems later on. Once you stablish a true circle, stake the bottom rails at every other rail
with a screwdriver or small stake to ensure that it stays in place during the remainder of the installation.
Measure from bottom rail connector to opposite
bottom rail connector at several connector to
ensure roundness.
Top Rail Profile
Bottom Rail Profile
Once you have completed the ground preparation,
you should open all the cartons to the pool to become
familiar with all of its components. You should also
refer to the breakdown sheet that is packed with your
pool and make sure that you have the correct number
of each component necessary to complete your pool. If
you are missing any parts, or you have recieved any
damage parts, you should notify the dealer where you
purchased the pool before beginning the assembly.