
Owners manual

BX3832
2011 Volkswagen Tiguan
Installation Instructions
405-0219 Page 6 of 8 7/25/11
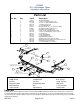
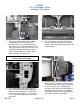
11. Using a 1-1/4” hole saw and a drill, cut
downward into the top of the bumper. This
hole is to allow nut plates to be placed in
later steps. Cut the hole on both sides of the
vehicle.
11
12
13
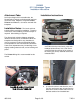
12. Place the baseplate into the channels we cut.
It should be near the top of the gray frame
rail and touching the back of the bumper’s
drop rail (white arrows). Then, use a drill
with a 13/32” drill bit with the baseplate as a
template, and drill the driver’s side top back
hole into the bumper. Use a 3/8”-16 x 1-1/4”
hex bolt with a 3/8” lock washer and a
1/4”-20 x 1” x 1” nut plate and secure the
farthest back hole on the drivers side (gray
arrow). Tighten with Loctite Red. Repeat
this on the passenger’s side making sure the
baseplate is level rst.
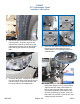
14B
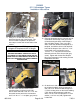
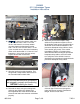
14. On the driver’s side, reattach the horn with
the existing hardware. On the passenger’s
side, use a 1/4” dril bit and drill through one
(1) of the existing holes on the frame webbing
(14A). Secure the passenger’s side horn
with a 1/4”-20 x 3/4” hex bolt with a 1/4” lock
washer a 1/4” hex nut (14B). Tighten with
Loctite Red.
13. Use the 13/32” drill bit and drill out the
remaining three (3) holes on each side.
Secure each hole with a 3/8”-16 x 1-1/4” hex
bolt (white arrows) with a 3/8” lock washer
and a 1/4”-20 x 1” x 1” nut plate (gray arrow).
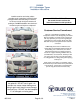
BE SURE TO USE LOCTITE
®
RED ON ALL BOLTS
BEFORE TIGHTENING. TIGHTEN ALL BOLTS
ACCORDING TO THE TORQUE CHART ON THE
FRONT PAGE OF THESE INSTRUCTIONS OR ON
PAGE 3 OF THE BASEPLATE TOWING GENERAL
INSTRUCTIONS.
When using power drills be aware of the
dangers of torque and drill bit length.
14A