
Owners manual

BX3616
2009-12 Subaru Forester
Installation Instructions
405-0010 Rev. E Page 6 of 8 3/13/12
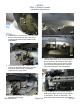
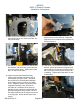
14
14. Use 3/8-16 x 1 1/4” hex bolts with 3/8” at and
lock washers and 3/8-16 hex nylon insert lock
nuts in the top two holes. Tighten with Loctite
Red. Do this on both sides.
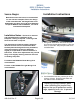
13
13. On the driver’s side, using a 13/32” drill bit
drill the sensor bracket hole out. Flatten the
alignment tab and reattach sensor with bolt as
directed in step 14.
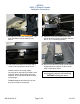
15. Use 3/8-16 x 2” hex bolt in the bottom hole
with 3/4” spacer tube between baseplate and
frame webbing, 3/8” at and lock washers and
3/8-16 hex nylon insert lock nut on back side
of webbing. Tighten with Loctite Red. Do this
on both sides.
15
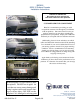
16. Attach the permanent baseplate safety
cables to the provided convenience link on
the baseplate (see grey arrow). The photo
above shows the recommended installation
of the cables to frame of vehicle (see white
arrow). Additional options may interfere with
suggested mounting; in this case secure
the cables to a solid piece of the frame as
described in the instructions included with the
permanent baseplate safety cables. Be sure
the safety cables do not rub against any hoses
or moving parts. Do this to both sides of the
vehicle.
16
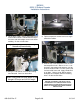
12
12. After the top hole is drilled out, using a at
chisel knock out the nut on the back side. Do
this on both sides.