
Owners manual

© 2002 Blue Ox Division, Automatic Equipment Mfg. Co. • One Mill Road, Industrial Park
Pender, Nebraska 68047 • Phone 402-385-3051 • Fax 402-385-3360 • www.aemfg.com
TM
Page 2 of 3 292-6022 10/30/08
11. Reinstall metal bumper, fascia and headlight assemblies. Be sure all electrical connections are
plugged in properly.
12. The dimensional variations between otherwise identical cars can be considerable. While the
location and size of the holes in the baseplate were designed to allow for easy installation, it may
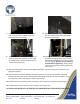
be necessary to fi le a hole slightly to allow a bolt to clear.
13. Install the tow bar and safety cables according to the instructions included in their packages.
14. Do not substitute other devices if the tow bar pin and clip are lost.
15. DEALER OR INSTALLER: BE CERTAIN THE USER RECEIVES THE INSTRUCTION SHEET.
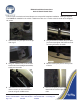
8. Remove four metric bolts from frame ends
with the 12MM socket, pull metal bumper
forward and set aside.
7. Remove three metric bolts from the bottom
side of fascia with the 10MM socket, pull
fascia forward and set aside.
10. Insert item 2 into frame ends to align with
drill holes and tighten items 3 and 4 while
assuring that baseplate is in a level position
with the vehicle. Be sure to use loctite on
all bolts before tightening. Some vehicle
models may require the spacer plates to be
used, item 11.
9. Hold baseplate to align with existing hole on
inside of frame end, just back of metric bolt
for metal bumper, and drill all holes with the
13/32" drill bit, both sides.
Ô