
Owners manual

2005-08 Pontiac Solstice G6 GT
Installation Instructions
BX3231
Page 6 of 9 292-2663 Rev. C 8/7/09
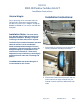
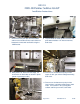
12. Using the utility knife, cut and remove the
small tab of air dam and reinstall both sides.
This will open area just below metal bumper
for baseplate install.
12
12
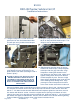
13.Using the utility knife, cut and remove the small
tab of air dam just below metal bumper. This
will open area for baseplate install.
13
13
BE SURE TO USE LOCTITE
®
RED ON ALL BOLTS
BEFORE TIGHTENING. TIGHTEN ALL BOLTS
ACCORDING TO THE TORQUE CHART ON THE
FRONT PAGE OF THESE INSTRUCTIONS OR ON
PAGE 3 OF THE BASEPLATE TOWING GENERAL
INSTRUCTIONS.
14
14
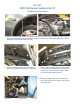
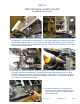
14. Cut opening on lower belly pan to gain access
to the bottom of frame rail opening for nut
plate insertion, both sides (Passenger’s side is
shown in photo).
15. Slide baseplate onto the frame rail and up
to bottom of metal bumper, clamp baseplate
to bumper with vise grip, both sides. Align
baseplate to existing bolt location for the
horn bracket on the driver’s side, replace and
tighten existing metric bolt for horn bracket
to hold baseplate in place. Be sure to align
lower holes of baseplate to the center of lower
frame webbing before drilling holes. Align
passenger’s side of baseplate to the frame
to the same location as the driver’s side and
15
15
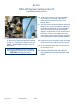
clamp to the bottom edge of metal bumper as shown in photo for driver’s side. Using the baseplate
as a template, drill the two lower holes and the top front hole with the 13/32” drill bit. Insert the
3/8-16 x 1” hex bolts into the two lower drilled holes of baseplate, tighten the 3/8-16 hex nut and
lock washer with the 9/16” socket. Insert the nut plate into the opening in the bottom of frame
(opening from step 14) to align with upper front drilled hole, tighten the 3/8-16 x 1 1/2” hex bolt and
lock washer into upper front drilled hole. Be sure and use loctite red on all bolts before tightening.
Tighten all bolts according to torque chart in the General Instruction sheet.