
Owners manual


BX2256
2012 Honda Civic (No Foglights)
Installation Instructions
405-0202 Rev. D Page 9 of 11 9/26/13
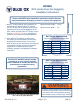
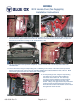
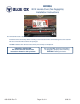
23. Align the air baffl e to its original position on the driver side. Mark the areas which will need to be notched in
air baffl e webbing only to allow space for the baseplate bolts.
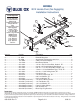
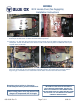
24. Using a utility knife, trim the necessary space as marked in step 23. Do not cut into the main body of the
air baffl e. Slide the air baffl e back in place on the driver side, and reinstall using the existing bolt.
23
23
24
24
25
25
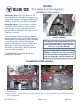
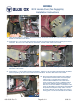
25. On the passenger side, align the windshield washer back to its original position and reinstall using the existing
bolts.
26. Reinstall the bumper and styrofoam inserting all push pins, bolts and screws.
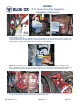
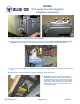
27. Optional: Position the breakaway bracket on
the bottom side of the bumper centered between
the electrical rod and the convenience link on the
driver side. Fasten with a 10-16 x 1” self drilling
screw (white arrow). Attach the breakaway to the
bracket with a 1/4-20 x 3/4” hex bolt and 1/4-20
hex nut (gray arrow).
27
27