
Owners manual

2008-10 Honda Odyssey
2009-12 Honda Pilot EXL
Installation Instructions
BX2251
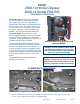
22A
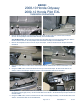
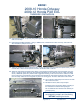
22. Using a reciprocating saw, cut the notches (22A). Be sure to use a backing plate (gray arrow) to prevent
cutting the radiator. The passenger side has a ridge, be sure to cut on both sides of it (22B).
22B
When using power drills be aware of the
dangers of torque and drill bit length.
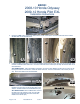
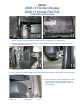
23B
23. On the driver side, bend the cut area down (23A). On the passenger side (23B), bend the outside pieces
down and the center section up.
23A
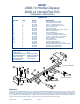
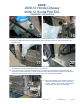
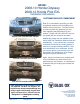
24. Slide the baseplate on the top of the frame and align the two front holes (white arrows) of the baseplate with
the existing holes in the frame for the bumper. Tighten the 8MM hex bolt, 8MM lock washer, and 3/8” at
washer into the existing holes for the metal bumper, using the 13MM socket. Use Loctite Red on all bolts.
Using the baseplate as a template, drill the holes in the top of the baseplate into the frame with the 13/32”
drill bit. Insert the 3/8” x 1” hex bolts into the outside two drilled holes (gray arrows) in the top of the frame
webbing, tighten the 3/8” lock washers and the hex nuts on the back side of the frame webbing. Insert 3/8” x
1 1/2” bolt and 3/8” lock washer with 3/8” nut plate into the back inside hole (black arrow).
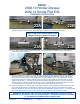
25. Using the baseplate as a template, drill the two holes in the side of the baseplate into the frame with an extra
long 13/32” drill bit in order to get behind the extensions (gray arrow). Do this to both sides of the vehicle.
Insert the nutplate into the end of the frame to align with the drilled holes, tighten the 3/8” x 1 1/2” hex bolt and
lock washer with the 9/16” socket. Do this to both sides of the vehicle. Use Loctite Red on bolts.
24
25
BE SURE TO USE LOCTITE
®
RED ON ALL BOLTS BEFORE TIGHTENING. TIGHTEN ALL BOLTS
ACCORDING TO THE TORQUE CHART ON THE FRONT PAGE OF THESE INSTRUCTIONS OR ON PAGE 3
OF THE BASEPLATE TOWING GENERAL INSTRUCTIONS.
Page 8 of 10 405-0096 Rev D 10/14/11