
Owners manual

© 2003-05 Blue Ox Division, Automatic Equipment Mfg. Co. • One Mill Road, Industrial Park
Pender, Nebraska 68047 • Phone 402-385-3051 • Fax 402-385-3360 • www.blueox.com
TM
Page 4 of 6 292-5704 7/22/08
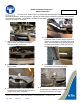
19. Align 3/8" nut plate to lower drilled hole for metal
bumper on the back side of radiator support,
tighten the 3/8" x 1 1/4" hex bolt, lock and at
washers, both sides. Be sure to use loctite
on all bolts before tightening. Tighten all
bolts according to Torque Chart in General
Instruction Sheet.
17. Align baseplate with upper bolt location for metal
bumper (left arrow) and clamp ends to frame
webbing. Be sure baseplate is centered on
the vehicle and holes on the ends of baseplate
should align with the slots of installed plate
supports. Using the baseplate as a template,
drill the two holes through webbing, into plate
support slots and lower hole with the 13/32" drill
bit, both sides. Insert 3/8 x 1 1/4" hex bolt into
top outside drilled hole of baseplate and plate
support, tighten the 3/8" hex nut, at and lock
washer, both sides. Be sure and use loctite on
all bolts before tightening. Tighten all bolts
according to torque chart in the General
Instruction sheet.
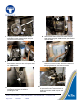
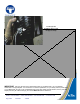
18. Reinstall top middle bolt location for the metal
bumper using the 8MM-1.25 x 30MM hex bolt,
lock and at washer, both sides (left arrow).
Install 3/8" x 1 1/2" hex bolt, hex nut, ats
and lock washers into lower drilled hole on
baseplate ends (right arrow). Be sure and
use loctite on all bolts before tightening.
Tighten all bolts according to torque chart
in the General Instruction sheet.
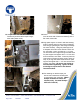
NOTE:
Horn brackets may need to be rotated out
of the way, on some models, to allow metal
bumper install over the top of baseplate.
Loosen the hex bolt with the 10MM socket.
20. Using a utility knife, cut and remove
the marked pieces from the back
side of fascia, both sides.