
Owners manual

© 2003-05 Blue Ox Division, Automatic Equipment Mfg. Co. • One Mill Road, Industrial Park
Pender, Nebraska 68047 • Phone 402-385-3051 • Fax 402-385-3360 • www.blueox.com
TM
Page 3 of 6 292-5704 7/22/08
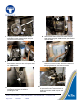
15. Align plate support on driver's side with existing
hole for washer reservoir and clamp to webbing
with vise grip (passenger's side to approximately
the same location). Using the plate support as
a template drill all four holes with the 13/32" drill
bit, both sides. Insert nut plate into 1 1/2" hole
cut into frame end to align with upper drilled holes
for plate support and tighten 3/8 x 1 1/2" hex bolt
and lock washer, both sides. Insert nut plate into
lower hole on frame end (black arrow in photo of
step 13) to align with lower drilled holes for plate
support and tighten 3/8 x 1 1/2" hex bolt and lock
washer, both sides. Be sure to use loctite on
all bolts before tightening. Tighten all bolts
according to torque chart in the General
Instruction sheet.
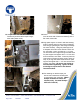
16. Cut webbing on metal bumper just
above lower outside bolt location with
a reciprocating saw, both side. (Metal
bumper is shown on vehicle for
reference only. Cut metal bumper
while off of vehicle.)
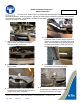
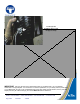
13. Using a 1 1/2" hole saw, drill a hole in the
frame end just below the bumper hanger,
both sides (white arrow).
14. Remove weld nut for lower outside bumper bolt,
from the back side of frame end webbing with a
at chisel, both sides.