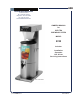
608 BLOOMFIELD INDUSTRIES 10 Sunnen Drive St. Louis, MO 63143 telephone: 314-678-6336 fax: 314-781-2714 www.wellsbloomfield.com OWNERS MANUAL for ICED TEA BREWING SYSTEM MODEL 8740 Includes: Installation Operation Use & Care Servicing Instructions Model 8740 Brewer p/n 2M-76467 Rev.
WARRANTY STATEMENT All electrical equipment manufactured by WELLS BLOOMFIELD, LLC is warranted against defects in materials and workmanship for a period of one year from the date of original installation or eighteen (18) months from the date of shipment from our factory, whichever comes first, and is for the benefit of the original purchaser, except that: a. airpots carry a 30 day parts warranty only. b. dispensers; i.e., tea and coffee carry a 90 days parts warranty only, excludes decanters.
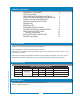
TABLE OF CONTENTS WARRANTY STATEMENT SPECIFICATIONS FEATURES & OPERATING CONTROLS PRECAUTIONS & GENERAL INFORMATION AGENCY LISTING INFORMATION INSTALLATION INSTRUCTIONS OPERATION BREWING TEA CLEANING INSTRUCTIONS TROUBLESHOOTING SUGGESTIONS SERVICING INSTRUCTIONS Deliming Instructions EXPLODED VIEW & PARTS LIST WIRING DIAGRAMS xi 1 2 3 3 4 6 8 9 10 11 15 16 19 INTRODUCTION Thank You for purchasing this Wells Bloomfield appliance.
IL1684 Fig.
PRECAUTIONS PRECAUTIONS AND AND GENERAL GENERAL INFORMATION INFORMATION WARNING WARNING: ELECTRIC SHOCK HAZARD All servicing requiring access to non-insulated components must be performed by qualified service personnel. Do not open any access panels which require the use of tools. Failure to heed this warning can result in electrical shock.
INSTALLATION READ THIS CAREFULLY BEFORE STARTING THE INSTALLATION CAUTION: Equipment Damage DO NOT plug in or energize this appliance until all Installation Instructions are read and followed. Damage to the Brewer will occur if these instructions are not followed. CAUTION: Unstable Equipment Hazard It is very important for safety and for proper operation that the brewer is level and stable when standing in its final operating position.
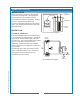
INSTALLATION (continued) REFER TO ELECTRICAL SPECIFICATIONS - Page 1 Check the nameplate to determine correct electrical service required for the Brewer to be installed. IMPORTANT: Before connecting to electricity, make sure automatic brewers are connected to the water supply. Model 8740 is equipped with a cord and plug. It requires a 115 - 125 volt 20 amp circuit (50/60 Hz, 2 wire plus ground, with NEMA 5-15R receptacle). PREPARATION The water tank must be filler prior to operation.
OPERATION IL1687 Fig. 4 Brewer Operation Diagram A. START-UP For initial start-up, or if the brewer has not been used for an extended period of time: • Be sure spray disk and brew gasket are properly installed in the brew head. • Be sure the water supply is properly connected and the water supply valve is turned ON. • Be sure the WATER TANK IS FILLED. IMPORTANT: Fill the water tank before energizing this unit: 1. Insert the brew chamber (empty) and place an empty dispenser in place under the brew chamber.
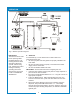
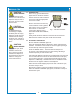
OPERATION (continued) WATER HEATER HI-LIMIT THERMOSTAT Water temperature is sensed by a thermobulb inserted into the water tank. This temperature signal is fed to the mechanical thermostat. The temperature setpoint is adjustable. Heating element is energized by the thermostat. THERMOBULB Excessive temperature will trip the hi-limit safety switch. The hi-limit will automatically reset when the brewer cools. HEATING ELEMENT THERMOSTAT WATER FLOW Fig.
BREWING TEA BURN HAZARD Exposed surfaces of the brewer, brew chamber and dispenser may be HOT to the touch, and can cause serious burns. CAUTION: BURN HAZARD To avoid splashing or overflowing hot liquids, ALWAYS place an empty dispenser under the brew chamber before starting the brew cycle. Failure to comply can cause serious burns. CAUTION: BURN HAZARD After a brew cycle, brew chamber contents are HOT. Remove the brew chamber and dispose of used tea leaves with care.
CLEANING INSTRUCTIONS PROCEDURE: Clean Tea Brewer CAUTION: PRECAUTIONS: Disconnect brewer from electric power. Allow brewer to cool. FREQUENCY: Daily TOOLS: Mild Detergent, Clean Soft Cloth or Sponge Bristle Brush, Bottle Brush BURN HAZARD Brewing and serving temperatures of tea are extremely hot. Hot tea will cause serious skin burns. CAUTION: SHOCK HAZARD 1. Disconnect brewer from electric power. Allow brewer to cool before cleaning. 2. Remove dispenser.
TROUBLESHOOTING SUGGESTIONS SYMPTOM POSSIBLE CAUSE SUGGESTED REMEDY Brewer unplugged or circuit breaker Check power supply cord tripped Check / reset circuit breaker Tea level too high or low Brew chamber overflows Sprays water from brew head No brew Poor coffee quality Press switch to ON Temperature setpoint too low Set for desired temperature Hi-Limit safety switch tripped Allow to cool hi-limit will self-reset Damaged internal component or wiring Examine wiring & connectors, controller, p
SERVICING INSTRUCTIONS ACCESS PLUGS Use a small flat-blade screwdriver or similar implement to pry the hole plug from the access hole in the top wrap. HOT WATER TEMPERATURE: Remove right 7/8” hole plug to access temperature control. WATER DELIVERED VOLUME: Remove left 2” hole plug to access water volume timer. ACCESS PANELS TOP WRAP: Remove top wrap to access hot water tank, thermostat, timer, switches and brew circuit tubing. Top wrap is held by two screws at the front and two screws at the rear.
SERVICING INSTRUCTIONS (continued) SHOCK HAZARD Live electrical circuits are exposed during this procedure. Use care to avoid uninsulated electrical connectors. NOTE: Optimum brewing temperature is 195ºF to 205ºF (90ºC to 96ºC). Thermostat should be adjusted to a maximum temperature of 200ºF (95ºC). IMPORTANT: A mechanical thermostat will maintain temperature within ±5ºF.
SERVICING INSTRUCTIONS (continued) SOLENOID TIMER ADJUSTMENT The amount of water dispensed automatically during a brew cycle is controlled by the SOLENOID TIMER. Place empty dispenser under brew chamber. Press the BREW switch. Measure total amount of water delivered. To adjust amount: Remove left button plug. Adjust timer; clockwise increases time. Run several cycles to check amount of water delivered. Reinstall button plug. IMPORTANT: Water pressure must be between 20 p.s.i and 90 p.s.i. flowing pressure.
SERVICING INSTRUCTIONS (continued) REPLACE SOLENOID Symptom: Automatic brewer will not flow water; or, automatic brewer drips continuously from brew head. Unplug power cord or turn circuit breaker OFF. Turn OFF and disconnect water supply from brewer inlet fitting. Remove rear access panel. Unscrew water inlet piping from solenoid. Remove solenoid from brewer. Note position of brew water and bypass water tubes on solenoid Remove tubes from solenoid. Disconnect wiring from solenoid.
SERVICING INSTRUCTIONS (continued) PROCEDURE: Delime the Water Tank CAUTION: PRECAUTIONS: Disconnect brewer from electric power. Allow brewer to cool. FREQUENCY: As required (Brewer slow to heat) TOOLS: Deliming Solution Protective Gloves, Goggles & Apron Mild Detergent, Clean Soft Cloth or Sponge Bristle Brush, Bottle Brush Large Sink (or other appropriate work area) 1. Unplug power cord. Turn off the water shut-off valve and disconnect the water supply line from the brewer inlet fitting. 2.
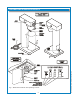
EXPLODED VIEW: 8740 TEA BREWER IL1692 16 608 p/n 2M-76467 8740 Tea Brewer Owners Manual Model 8740
PARTS LIST: 8740 TEA BREWER ITEM PART # 1 2 F4-72186 SPRAY DISK 3 2V-70102 VENT, TUBE SHORT 4 WS-8512-51 THERMOSTAT 5 2K-72241 CONNECTOR 6 2V-70398 VENT, TUBE LONG 7 2T-47499 THERMO, HI-LIMIT 8 2V-76439 TUBE, SPRAYHEAD 9 2K-70130 ELBOW, SPRAYER 10 APPLICATION PLATE, BASIN 11 2M-76441 LABEL, BASIN 12 2E-71259 SWITCH, STOP BREW 13 2E-72214 SWITCH, TANK HEATER 14 2E-70733 SWITCH, START BREW 15 2J-70644 LIGHT PILOT GREEN 250V 15 2J-72671 LIGHT, PILOT GREEN 16 2D-7
SERVICE KITS SCREEN WASHER INLET FITTING IL1693 CAP SERVICE KITS SOLENOID REPAIR KITS Solenoid, Complete, Dual Inlet Fitting Kit (includes cap, inlet fitting, washer and screen) Inlet Strainer 18 608 p/n 2M-76467 8740 Tea Brewer Owners Manual 2E-73282 WS-85218 WS-85219
608 p/n 2M-76467 8740 Tea Brewer Owners Manual WIRING DIAGRAM 19
608 p/n 2M-76467 8740 Tea Brewer Owners Manual NOTES
608 p/n 2M-76467 8740 Tea Brewer Owners Manual NOTES
10 Sunnen Drive, St. Louis, MO 63143 telephone: 314-678-6336 fax: 314-781-2714 www.wellsbloomfield.