
User Manual


CAUTION:
CHEMICAL BURN
HAZARD
Deliming chemicals are caustic.
Wear appropriate protective
gloves and goggles during
this procedure. Never siphon
deliming chemicals or solutions
by mouth.
This operation should only be
performed by qualied and
experienced service personnel.
IMPORTANT: DO NOT spill,
splash or pour water or deliming
solution into or over any internal
component other than the inside
of the water tank.
IMPORTANT: DO NOT allow
any internal components to
come into contact with the
deliming solution. Take care to
keep all internal components
dry.
NOTE: Repeat steps 4 thru 5
as required to remove all scale
and lime build-up.
NOTE: Normally, silicone
hoses do not need to be
delimed. Should deliming hoses
become necessary, Bloomeld
recommends replacing the
hoses.
PROCEDURE: Delime the Water Tank
PRECAUTIONS: Disconnect brewer from electric power.
Allow brewer to cool.
FREQUENCY: As required (Brewer slow to heat)
TOOLS: Deliming Solution
Protective Gloves, Goggles & Apron
Mild Detergent, Clean Soft Cloth or Sponge
Bristle Brush, Bottle Brush
Large Sink (or other appropriate work area)
1. Disconnect brewer from the electrical supply. Turn off the
water shut-off valve and disconnect the water supply line
from the brewer inlet tting.
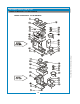
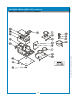
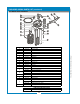
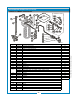
2. Remove the tank lid assembly as described on page 12.
3. Remove the water tank from the brewer body by lifting
straight up. Empty all water from the tank. Set the tank back
into the brewer.
4. Mix 2 quarts of deliming solution according to the
manufacturer’s directions. Carefully pour the deliming
solution into the water tank. Lower the lid assembly back
onto the tank. Allow to sit for 30 minutes, or as directed by
the manufacturer.
5. At end of soaking period, remove lid assembly from tank.
Thoroughly rinse internal components of lid assembly with
clear water. Using a stiff bristle brush, scrub the heating
element (and faucet water coil on automatic brewers) to
remove lime and calcium build-up. Rinse with clean water.
Store lid assembly in a safe location.
6. Remove the tank from the brewer and empty. Using a stiff
bristle brush, scrub the interior of the water tank to remove
lime and calcium build-up. Rinse with clean water.
7. Set the tank back into the brewer. Reassemble the tank lid
to the water tank. Make sure the gasket is properly in place,
and then reinstall the hold-down strap.
8. Reinstall wiring to heating element and thermostat. Reinstall
the hi-limit thermostat (if removed). For automatic brewers,
reassemble piping for the faucet. Verify that all internal
components are dry, and then reinstall the top panel.
9. Reconnect brewer to electrical supply and, for automatic
brewers, reconnect water supply.
10. Install the brew chamber without lter paper or grounds.
Run at least three full brew cycles and discard all water
generated.
11. Brewer is ready to use.
SERVICING INSTRUCTIONS (continued)
20
641 p/n 2M-75844 1012 1040 1072 Owmers Manual