SBF-3E and SBF-5E ELECTRIC BOILER FREE CONVECTION STEAMER INSTALLATION – OPERATION – MAINTENANCE BLODGETT OVEN COMPANY IMPORTANT NOTES FOR INSTALLATION AND OPERATION www.blodgett.
This is the safety alert symbol. It is used to alert you to potential personal injury hazards. Obey all safety messages that follow this symbol to avoid possible injury or death. WARNING: Improper installation, operation, adjustment, alteration, service or maintenance can cause property damage, injury or death. Read the installation, operating and maintenance instructions thoroughly before installing, operating or servicing this equipment. WARNING: Never spray water in electrical components.
TABLE OF CONTENTS DESCRIPTION PAGE 1.0 Service Connection ................................................................................................... 4 2.0 Introduction ............................................................................................................... 5 3.0 Installation .................................................................................................................. 6 4.0 Performance Check ...............................................................
1.0 SERVICE CONNECTION ELECTRICAL CONNECTION: Ø1 1/8" hole for electrical connection. Rating to be as specified on data plate. DRAIN: ½”NPT ELECTRICAL CHARACTERISTICS MODEL SBF-3E SBF-5E kW 208V 3 phase 1 phase AMPS PER LINE 240V 1 phase 3 phase 220V 1 phase 3 phase 380V 3 phase 415V 3 phase 480V 3 phase 600V 3 phase 9 43.3 25.0 40.9 23.6 37.5 21.7 13.7 12.5 10.8 8.7 6 28.9 N/A 27.3 N/A 25.0 N/A N/A N/A N/A N/A 15 72.1 41.6 68.2 39.4 62.5 36.0 22.8 20.9 18.0 14.
2.0 INTRODUCTION DESCRIPTION The model SBF-3E steamer comes equipped with a standard 9.0 kW heating block that can be reduced to 6 kW on single phase supplies. Model SBF-5E steamer comes equipped with a standard 15.0 kW heating block that can be reduced to 10 kW on single phase supplies. Your new steamer has been designed and manufactured to meet the toughest industry standards. The best possible workmanship and materials along with laboratory tests have been utilized in its design.
3.0 INSTALLATION UNPACKING Immediately after unpacking the steamer, check for possible shipping damage. If the steamer is found to be damaged after unpacking, save the packaging materials and contact the carrier within 15 days of delivery. File a claim regardless of extent of damage. We cannot assume responsibility for damage or loss incurred in transit. Prior to installation, verify that the electrical service agrees with the specifications on the machine data plate which is located on the left side panel.
3.0 INSTALLATION (Continued) PLUMBING CONNECTIONS No plumbing connections are required as steamer is filled manually. DRAIN CONNECTIONS No drain connection is required. WATER CONDITION For best results, Blodgett recommends that the water supply meet the following specification: Hardness: Less than 2 grains or 35 ppm. Total Dissolved Solids (TDS): Less than 60 ppm. PH Factor: 7.0 to 7.5 This degree of hardness can easily be obtained with the use of a properly maintained water softener.
4.0 PERFORMANCE CHECK WARNING: The steamer and its parts are hot. Use care when operating, cleaning or servicing the steamer. The cooking compartment contains live steam and hot water. Stay clear while opening the door. Once the steamer has been installed, thoroughly test the steamer before operation. 1. Check that door opens and closes for proper operation. 2. Inspect the door gasket to ensure there is no damage. 3.
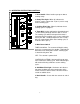
5.0 OPERATING INSTRUCTIONS CONTROLS 1. Door Handle - Move handle up to open door to cooking cavity. RE ADY C OO KIN G 2. Ready Pilot Light - When lit, indicates the steamer cavity is above 150° F (65° C) and is ready for the cooking cycle. 3. Cooking Pilot Light - When lit, indicates that a cooking cycle is in progress. TIM E D C O O KING O FF CO N STAN T STEAM AD D W ATER 4. Timer Dial- Set the cooking time (0 to 60 minutes) - steam cooking will begin after the door is closed.
5.0 OPERATING INSTRUCTIONS (Continued) COOKING CAUTION: Live steam and accumulated hot water in the compartment may be released when the door is opened. 1. Close drain valve. 2. Remove the deflector plate to expose the bottom of the cavity. 3. Pour water through the door up to the “WATER LEVEL” mark on the back wall of the cavity and then replace the deflector plate. 4. Close the door, select “TIMED COOKING” mode with the power switch and set the timer to one minute position.
5.0 OPERATING INSTRUCTIONS (Continued) SHUTDOWN CAUTION: When the unit is not in use, leave the cooking compartment doors ajar to prolong the life of the door gasket. 1. Drain the steamer after each day’s use. 2. Set the power switch to “OFF” CAUTION: Drain water is very hot and can cause severe personal injury. 3. Drain the steamer into a suitable receptacle capable of holding 3 gallons of boiling water. 4. Thoroughly clean the unit.
5. Inspect the drain opening to assure there are no obstructions. 6. Replace the pan supports and deflector in compartment and leave door ajar. WARNING: When this appliance is installed with casters and is connected to the supply service with flexible electrical conduit, a restraint to prevent damage to the electrical conduit should have been installed. If disconnection of the restraint is necessary, reconnect this restraint after the appliance has been returned to its originally installed position.
6.0 COOKING GUIDELINES 1. Frozen vegetables should always be cooked in perforated 12" x 20" x 2 ½ “ (1/1 65 mm) pans, 7 ½ lbs. (3.4 kg) maximum per pan. 2. Frozen entrees should be underlined with a perforated pan for best results. If they are defrosted first, the heating time will be decreased. 3. Fresh foods may also be cooked in this unit.
STEAM COOKING Your steamer efficiently cooks vegetables or other foods for immediate serving. Steam cooking should be carefully time controlled. Keep hot food holding time to a minimum to produce the most appetizing results. Prepare small batches, cook only enough to start serving, then cook additional amounts to meet demand. Separate frozen foods into smaller pieces to allow more efficient cooking.
7.0 PREVENTIVE MAINTENANCE A good preventive maintenance program begins with the daily cleaning procedure. Additional preventive maintenance operations are presented in this section. In establishments that employ full-time maintenance personnel, the tasks described can be assigned to them. For other installations, tasks requiring mechanical or electrical experience should be performed by an authorized service agency.
7.0 PREVENTIVE MAINTENANCE (Continued) CLEANING Weekly, or more often if necessary: 1. Clean exterior with a damp cloth and polish with a soft dry cloth. 2. Use a non-abrasive cleaner to remove discolorations. It is NOT RECOMMENDED to use cleaning agents that are corrosive. Use of cleaning agents that contain chloride, acids or salts which are corrosive may cause pitting and corrosion when used over a period of time; this will reduce the life of the appliance.
6. At the end of the 30 minute cook cycle, turn power switch “OFF” and drain the contents of the cavity. 7. Thoroughly flush the cavity with clean water and dry with a soft cloth. LEAVE COMPARTMENT DOOR OPEN WHEN NOT IN USE. The steamer is now ready for use. Turn off for overnight shutdown. 8.0 TROUBLESHOOTING GENERAL PROBLEM PROBABLE CAUSE Cooking indicator light a. Main power circuit breaker fails to light with tripped. Timer set.
8.0 TROUBLESHOOTING (Continued) COMPONENT TESTING 60-MINUTE TIMER Timer Contacts Defective timer contacts will result in failure of cooker compartment to operate. When this occurs, remove the side panel and proceed as follows: 1. Turn off power to the cooker at external circuit breaker. 2. Disconnect all three wires from timer terminals. 3. Connect an ohmmeter between terminals 1 and 3. 4. Rotate timer dial beyond the “0 - Minute” point (any setting) to obtain a reading of zero ohms on the ohmmeter.
8.0 TROUBLESHOOTING (Continued) 3. Set timer dial (any setting beyond “0 - Minute”). If operation is correct, the motor will turn the dial toward “0 - Minute”. If the motor fails to operate, it is defective and the entire timer must be replaced. 4. Shut off power to the cooker. Door Interlock Switch Malfunction of the cooker door interlock switch prevents timer indicator lights from turning on and steam generator from operating when the timer dial is set.
8.0 TROUBLESHOOTING (Continued) Wiring WARNING: Disconnect the power supply to the appliance before cleaning or servicing. Using an ohmmeter, wiring continuity between the connections shown on the wiring diagram is readily verified. This is best done in stages, removing only those wires required for each continuity check. As each lead is replaced, it should be checked for evidence of corrosion, and cleaned if necessary. All leads must be tightly attached so as to provide a good electrical connection.
8.0 TROUBLESHOOTING (Continued) STAINLESS STEEL To remove normal dirt, grease or product residue from stainless steel, use ordinary soap and water (with or without detergent) applied with a sponge or cloth. Dry thoroughly with a clean cloth. Never use vinegar or any corrosive cleaner. To remove grease and food splatters or condensed vapours that have baked on the equipment, apply cleanser to a damp cloth or sponge and rub cleanser on the metal in the direction of the polishing lines on the metal.
9.