RE SERIES ELECTRIC CONVECTION ROLLĆIN OVEN INSTALLATION - OPERATION - MAINTENANCE BLODGETT OVEN COMPANY www.blodgett.com 44 Lakeside Avenue, Burlington, Vermont 05401 USA Telephone: (802) 658Ć6600 Fax: (802)864Ć0183 PN 11362 Rev E (2/02) E 2002 - G.S.
IMPORTANT WARNING: IMPROPER INSTALLATION, ADJUSTMENT, ALTERATION, SERVICE OR MAINTENANCE CAN CAUSE PROPERTY DAMAGE, INJURY OR DEATH. READ THE INĆ STALLATION, OPERATING AND MAINTENANCE INĆ STRUCTIONS THOROUGHLY BEFORE INSTALLING OR SERVICING THIS EQUIPMENT FOR YOUR SAFETY Do not store or use gasoline or other flammable vapors or liquids in the vicinity of this or any other appliance. The information contained in this manual is important for the proper installation, use, and maintenance of this oven.
THE REPUTATION YOU CAN COUNT ON For over a century and a half, The Blodgett Oven Company has been building ovens and nothing but ovens. We've set the industry's quality standard for all kinds of ovens for every foodservice operation regardless of size, application or budget. In fact, no one offers more models, sizes, and oven applications than Blodgett; gas and electric, fullĆsize, halfĆsize, countertop and deck, conĆ vection, Cook'n Hold, CombiĆOvens and the industry's highest quality Pizza Oven line.
Model: Your Service Agency's Address: Serial Number: Your oven was installed by: Your oven's installation was checked by:
Table of Contents Introduction Oven Description . . . . . . . . . . . . . . . . . . . . . . . . . . . . . . . . . . . . . . . . . . . . . . . . . Oven Components . . . . . . . . . . . . . . . . . . . . . . . . . . . . . . . . . . . . . . . . . . . . . . . 2 3 Installation Oven Assembly . . . . . . . . . . . . . . . . . . . . . . . . . . . . . . . . . . . . . . . . . . . . . . . . . . Delivery and Inspection . . . . . . . . . . . . . . . . . . . . . . . . . . . . . . . . . . . . . . . .
Introduction Oven Description Cooking in a convection oven differs from cooking in a conventional deck or range oven since heated air is constantly recirculated over the product by a fan in an enclosed chamber. The moving air conĆ tinually strips away the layer of cool air surroundĆ ing the product, quickly allowing the heat to peneĆ trate. The result is a high quality product, cooked at a lower temperature in a shorter amount of time.
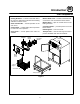
Introduction Oven Components Heating Elements - located on the back wall of the oven, the elements provide heat to the baking chamber on electric ovens. Blower Wheel Cover - located on the back interiĆ or wall of the oven. Protects the blower wheel. Blower Wheel - spins to circulate hot air in the baking chamber. Chain & Turnbuckle - controls operation of the oven doors. Convection Motor - provides power to turn the blower wheel.
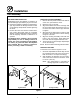
Installation Oven Assembly DELIVERY AND INSPECTION LEGS AND DOCKING ASSEMBLY 1. Remove the trim panel located at the bottom of the oven, just below the doors. 2. Place the oven on its back. 3. Align the threaded stud in the front legs with the nut located inside each bottom front corĆ ner of the oven frame. Turn the legs clockwise to tighten. 4. Align the two leg plate holes in each leg with the holes in the oven bottom. Secure the leg using two 1/2" bolts. 5.
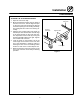
Installation Oven Assembly ALIGNING THE DOCKING MECHANISM 1. Open the oven doors fully. 2. Move and latch the transport cart into place at the front of the oven. The two alignment pins on the front of the cart should line up with the channeled openings in the docking assembly. The locking bar also locks to the docking asĆ sembly. 3. Align the inner vertical edge of the tracks on the transport cart with the same vertical edge of the tracks located on the oven liner floor.
Installation Utility Connections - Standards and Codes U.S. and Canadian installations THE INSTALLATION INSTRUCTIONS CONĆ TAINED HEREIN ARE FOR THE USE OF QUALIĆ FIED INSTALLATION AND SERVICE PERSONNEL ONLY. INSTALLATION OR SERVICE BY OTHER THAN QUALIFIED PERSONNEL MAY RESULT IN DAMAGE TO THE OVEN AND/OR INJURY TO THE OPERATOR.
Installation Electrical Connection Before making any electrical connections to this unit, check the rating plate located on the oven control panel. Make sure the oven is being conĆ nected to the proper electrical supply. The supply conduit is connected to the junction box located at the right rear corner of the oven.
Operation Safety Information THE INFORMATION CONTAINED IN THIS SECĆ TION IS PROVIDED FOR THE USE OF QUALIFIED OPERATING PERSONNEL. QUALIFIED OPERATĆ ING PERSONNEL ARE THOSE WHO HAVE CAREFULLY READ THE INFORMATION CONĆ TAINED IN THIS MANUAL, ARE FAMILIAR WITH THE FUNCTIONS OF THE OVEN AND/OR HAVE HAD PREVIOUS EXPERIENCE WITH THE OPĆ ERATION OF THE EQUIPMENT DESCRIBED. ADĆ HERENCE TO THE PROCEDURES RECOMĆ MENDED HEREIN WILL ASSURE THE ACHIEVEMENT OF OPTIMUM PERFORMANCE AND LONG, TROUBLEĆFREE SERVICE.
Operation Oven Controls 1 2 3 4 5 1 2 3 4 5 6 Figure 4 COMPONENT DESCRIPTION CONTROL OPERATION There are two rows of switches and controls on the the left hand side of the panel. The top set of conĆ trols operate the upper motor and heating eleĆ ments. The bottom set of controls operate the lowĆ er motor and heating elements. NOTE: The upper section is wired separately from the lower section. They may be operated independently or simultaneously. 1.
Operation General Guidelines for Operating Personnel COOK TIMES AND TEMPERATURES For almost all products, temperatures must be lower than those called for in deck or range oven recipes. Generally, reducing temperatures by 50_F (10_C) is about right, however some recipes and types of pans may require a greater decrease in temperature. Check the product in about half the time it would take to bake in a conventional oven.
Operation Suggested Times and Temperatures Product Temperature Time # Shelves Meats Hamburger Patties (5 per lb) Steamship Round (80 lb. quartered) Standing Rib Choice (20 lbs, trimmed, rare) Banquet Shell Steaks (10 oz. meat) Swiss Steak after Braising Baked Stuffed Pork Chop Boned Veal Roast (15 lbs.) Lamb Chops (small loin) Bacon (on racks in 18" x 26" pans) 400_F (205_C) 275_F (135_C) 235_F (115_C) 450_F (235_C) 275_F (135_C) 375_F (190_C) 300_F (150_C) 400_F (205_C) 400_F (205_C) 8Ć10 mins.
Maintenance Cleaning and Preventative Maintenance CLEANING THE OVEN PREVENTATIVE MAINTENANCE Painted and stainless steel ovens may be kept clean and in good condition with a light oil. The best preventative maintenance measures are, the proper installation of the equipment and a proĆ gram for routinely cleaning the ovens. 1. Saturate a cloth, and wipe the oven when it is cold. 2. Dry the oven with a clean cloth.
Maintenance Troubleshooting Guide POSSIBLE CAUSE(S) SUGGESTED REMEDY SYMPTOM: Oven will not fire. S Oven not plugged in. S Control set below ambient temperature. S Doors are open. S Plug in electrical supply cord. S Set to desired cook temperature. S Close doors. SYMPTOM: Oven does not come to ready. S The oven has not reached preheat temperature. S Wait for oven to reach preheat temperature. S Internal problem with main temperature control. S * SYMPTOM: Convection fan does not run.
CUSTOMER INSERT WIRING DIAGRAM HERE
IMPORTANT: This is your spanner key. Please save for future use.