
Specifications


Operation
19
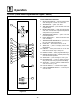
CH-Pro3 (Solid State Programmable Digital Control)
MANUAL OPERATION
NOTE: Press the arrow keys to change the cook
time and temperature at any point during-
manual operation.
Cook Only:
1. Turn the SELECTOR SWITCH (1) to the de -
sired position.
2. Press t he TIME A RROW KEYS (3) to enter the
cook time.
3. PresstheTEMPERATUREARROWKEYS(7)
to enter the cook temperature.
4. The READY INDICA TO R (4) lights when the
oven is at the set temperature. Load product
into the oven.
5. Press the START KEY (13). The TIME DISPLAY
(2) counts do wn. The manual key LED flashes.
6. When the cook time expires the LEDs and
both displays flash and an audible alarm
sounds. Press the STOP KEY (15) to silence
the alarm.
7. Remove the product.
Cook with Hold:
1. Turn the SELECTOR SWITCH (1) to the de -
sired position.
2. Press t he TIME A RROW KEYS (3) to enter the
cook time.
3. PresstheTEMPERATUREARROWKEYS(7)
to enter the cook temperature.
4. Press and hold the HOLD KEY (8) then re-
lease.UsetheTEMPERATUREARROWKEYS
(7)t oentertheholdtemperature.Theholdkey
LEDlights.Presstheholdkey againtoexitthe
hold mode.
5. The READY INDICA TO R (4) lights when the
oven is at the set temperature. Load product
into the oven.
6. Press the START KEY (13). The TIME DISPLAY
(2) counts do wn. The manual key LED flashes.
7. When the cook time expires both displays
flash and an audible alarm sounds forseveral
seconds then self cancels. The hold key LED
flashes. The time display begins to count up
while the oven cools to the hold temperature.
When the oven reaches the hold temperature
the timedisplayresetsto 00:00then beginsto
count up the hold time. The fan cycles w ith
heat demand in the hold mode.
8. Press the STOP KEY (15) to stop the timer.
9. Remove the product.
10. Pushthe HOLDKEY (8)to turn off holdmode.
Cook with Pulse:
1. Turn the SELECTOR SWITCH (1) to the de -
sired position.
2. Press t he TIME A RROW KEYS (3) to enter the
cook time.
3. PresstheTEMPERATUREARROWKEYS(7)
to enter the cook temperature.
4. Press the FAN KEY (10) for five seconds. The
TEMPERATURE DISPLAY (5) goes blank. The
fan key LED flashes. Use the TIME ARROW
KEYS (3) to enter the pulse time.
NOTE: Pulsetimeis aportionofthecooktime
and does not increase the previously
entered cook time.
5. PresstheFANKEY(10)again.TheTE M PERA-
TURE D I SPLAY (5) lights.
6. The READY INDICATO R (4) i n the temperature
displ ay lights when the oven is at the set tem-
perature. Load product into the oven.
7. Press the START KEY (13). The manual k ey
LED flashes. The TIME DISPLAY (2) counts
down the cook time. The fan cycles on for 30
seconds then off for 30 seconds until the set
pulse time has expired.
8. When the pulse time expires both displays
flash and an audible alarm sounds. Press the
STOP KEY (15) to silence the alarm.
9. Remove the product.
Oven Cool Down:
1. Turn the SELECTOR Switch (1) to COOL
DOWN.
NOTE: The doors may be opened to speed the
co oling process.
Oven Shut Down:
1. Turn the SELECTOR SWIT CH (1) to OVEN OFF.