
MARK V XCEL CONVECTION OVEN Operating Instructions


Operation
17
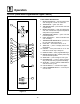
Solid State Digital Control with Humidaire
5. Push START/STOP KEY (7). The timer begins
to count down the cook time. The oven will be
inpulsemodeforthesetpulsetime.Oncethe
set time has expired, the unit will automatically
switch to cook mode and continue counting
down.
6. When the cook timer reaches 00:00 the buzz-
er sounds and the display reads DONE.
7. Push the START/STOP KEY (7) to turn t he
buzzer off.
8. Remove the product.
Oven Cool Down:
1. Turn the SELECTOR Switch (1) to COOL
DOWN.
NOTE: The doors may be opened to speed the
co oling proc ess.
Oven Shut Down:
1. Turn the SELECTO R SWITCH (1) to OVEN OFF.
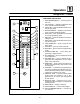
The Humidaire Function:
Moisture may be injected into the oven cavity at
any time during the cook cycle.
1. Press the HUMIDAIRE STA RT SWITCH (13).
Water injects into the oven cavity for 30 sec-
onds. After the water stops injecting, t he mo-
tor automatically turns off for 30 seconds. This
enables the moisture to saturate the product.
Once the humidaire cycle is complete, t he
oven resumes normal operation.
NOTE: The oven must be above 230
_
F
(110
_
C) for humidaire to operate.
The amount of w a ter injected during the Humid-
aire cycle may be adjusted as follows:
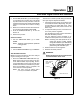
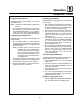
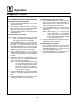
1. Check the pressure gauge on the back of the
oven while the water is dispensing. The pres-
sure should be no higher than 3 psi. If less
moisture is desired, the pressure can be set
below 3 psi.
2. To adjust the water pressure, loosen the lock-
nut on the pressure regulator.
Turn the adjusting screw counter clockwise to
decrease the water pressure.
Turn the a djusting screw clockwise to in -
crease the water pressure if it is below 3 psi.
NOTE: Increa sing the water pressure will in-
crease the amount of water injected
during the humidaire cycle. Decreasing
th e pressu re will decrea se the wate r in-
jec te d during the hu midaire cyc le .
3. Reset the locknut on the regulator.
4. Recheck the water pressure.
WARNING!!
Setting the pressure above 3 psi will lead
to excessive water in the oven.
Water Pressure
Adjustment
Screw
Locknut
Rear view of oven
Figure 12