
Specifications


Operation
29
IQ Control
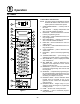
OVEN OPERATION
Oven Startup:
1. Toggle the POWER SWITCH (1) to ON. Both disĆ
plays read IN IT for approximately three secĆ
onds. The oven preheats to the lowest proĆ
grammed first stage temperature. The LEDS
(15) for all products with the same first stage
temperature light.
While the unit preheats the TOP DISPLAY (2)
gives the actual temperature. The BOTTOM
DISPLAY (5) reads Lo if the oven is more than
10_ below setpoint. When the oven reaches
10_ of the preheat temperature an alarm
sounds and the bottom display reads LoAd.
Single Product Cooking Procedure:
NOTE: If the LED next to the desired product key
is lit skip step 1.
NOTE: Press and hold the selected product key for
three seconds to cancel the cook cycle.
1. Press the desired PRODUCT KEY (16). The
oven preheats to the first stage temperature for
the selected product. When the oven reaches
10_ of the preheat temperature an alarm
sounds and the bottom display reads LoAd.
2. Load the product into the oven. Press the seĆ
lected PRODUCT KEY (16) to start the cook
cycle. The LED (15) next to the selected prodĆ
uct key flashes. The top display reads ----.
The bottom display counts down the cook
time in minutes:seconds.
NOTE: If the selected product has a cook time
of greater than 59:59 the top display
reads Hr-- for the total number of
hours. The bottom display counts down
the cook time in minutes:seconds.
NOTE: If the selected product is a single stage
recipe the LEDS for all single stage
products with the same cook temperaĆ
ture and fan speed will light. If the seĆ
lected product is a multiple stage recĆ
ipe no other product LEDS will light.
3. When the cook time expires an alarm sounds
and the top display reads donE. The bottom
display flashes 00:00.
4. Press the selected product key to silence the
alarm. Remove the product.
Multiple Batch Cooking Procedure:
This procedure is for single stage recipes with the
same cook temperature and fan speed only.
NOTE: If the led next to the first desired product
key is lit skip step 1.
NOTE: Press and hold the selected product key for
three seconds to cancel the cook cycle.
1. Press the first desired PRODUCT KEY (16).
The LEDS for all recipes with the same cook
temperature and fan speed will light.
The oven preheats to the cook temperature for
the selected product. When the oven reaches
10_ of the preheat temperature an alarm
sounds and the bottom display reads LoAd.
2. Load the first product into the oven. Press the
selected PRODUCT KEY (16) to start the cook
cycle. The LED (15) next to the selected prodĆ
uct key flashes. The top display reads ----.
The bottom display counts down the cook
time in minutes:seconds.
3. Load the second product. Press the appropriĆ
ate PRODUCT KEY (16).
NOTE: Only products with lighted LEDS may
be selected.
4. The LED for the product with the least time reĆ
maining flashes faster than the led for the othĆ
er product. The TOP DISPLAY (2) reads
----. The BOTTOM DISPLAY (5) counts
down the cook time for the product with the
least time remaining.
NOTE: To view the remaining cook time for
the other products, press and hold the
SCAN KEY (14). The displays cycle
through the selected products and
their remaining cook times. Only the
LED for the product with the cook time
displayed flashes.
5. When a cook time expires an alarm sounds.
The top display reads donE. The bottom disĆ
play flashes 00:00, The led for the finished
product lights. All other LEDS are dark.
6. Press the PRODUCT KEY (16) for the finished
product to silence the alarm. Remove the
product. Close the oven door. The TOP DISĆ
PLAY (2) reads ----. The BOTTOM DISĆ
PLAY (5) counts down the cook time for the
other product.