
User manual

Operation
19
Optional Cook & Hold
19
20
21
1
2
16
3
4
7
5
6
8
9 10
11 12
13 14
15
17
18
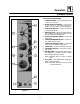
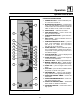
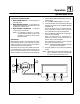
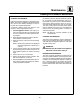
Figure 8
CONTROLS IDENTIFICATION
1. POWER ON LIGHT --- when lit indicates pow-
er to the unit is turned on.
2. MODE SEL ECTOR SWITCH --- c on t r o l s p ow e r
to the oven and sel ecti on of steam, ho t air and
combi modes. The convecti on fan runs with the
switch in steam, hot air, combi or cool down.
3. TIME DISPLAY --- indicates cook time.
4. TIME ARROW KEYS --- press to enter cook
time from 00:00 to 99:59.
5. TEMPERATURE DISPLAY --- g i v e s c o o k t e m -
perature.
6. HEAT LIGHT --- w hen lit indicates hot air or
steam is in operation.
7. TEMPERATURE ARROW KEYS --- p r e s s t o
enter cook temperature from 120---212_F
( 4 8 --- 1 0 0 _ C) for steam and 140---500_F
( 6 0 --- 2 6 0 _ C) for h ot air/combi.
8. STAGE ONE LED --- when lit indicates opera-
tion or programming of stage one for the cur-
rent product. Cook cycles may contain one or
two different sta ges.
9. ACTUAL TEMP KEY --- press to display actual
oven/steamer temperature
10. STAGE TWO KEY --- press to enter stage two
cook time and temperature.
11. PRODUCT KEYS --- three programmabl e keys.
12. MAN UAL PRODUC T KEY --- default product
key used for manual and programmed cooking.
13. START KEY --- press to begin a timer count
down.
14. STOP KEY --- press to silence audible alarms
and pause or cancel cook cycles.
15. PROGRAM KEY --- press to enter program-
ming mode and save programmed settings.
16. STEAM ON DEMAND TIMER --- u s e d t o s e t
steam time
17. STEAM ON DEMAND SWITCH --- u s e d t o i n i -
tiate steam injection cycle
18. STEAM ON DEMAND LAMP --- i l l u m i n a t e d
when steam on demand is activated.
19. FAN SPEED SWITCH --- used to select low or
high speed.