
Specifications


Installation
13
Door Adjustments
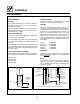
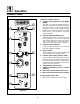
COS -6, COS-101 AND COS-101S
The door latch may be adjusted in two directions,
in and out, and up and down, using the following
procedure:
1. Adjust up and down by loosening the two bolts
hol ding the latch to the face of the unit (A).
2. Make adjustments so that the leading face of
thelatchiscenteredintheopeningofthehan-
dle assembly.
3. Tighten the bolts so that there is no further
movement.
4. Adjust in and out by loosening the bolt on top
of the latch (B).
5. The adjustment face is stepped so that move-
ment is limi ted with the bolt tightened properly.
6. The adjustment iscorrect when the doorcloses
firml y and no steam leaks from the gasket.
The hinges can also be adjusted as follows:
1. Be certain the latch is adjusted properly.
2. Adjust hinges so that the door back and the
unit face are parallel (C).
3. The adjustment is correct when no steam
leaks t hrough the gasket.
A
B
C
Oven
Door
Figure 11
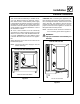
COS -20 AND COS-201
The hinges may be adjusted as follows:
1. Adjust the top hinge plate by loosening the
three mountingbolts onthe top right cornerof
the oven.
2. Adjust the bottom hinge pin by loosening the
mountingboltlocatedunderthebottomhinge
plate on the low er right corner of the oven.
3. Adjust the hinges s o that the door back and
the unit face are parallel (C).
4. Tighten the bolts so that there is no further
movement.
5. The adjustment iscorrect when the doorcloses
firml y and no steam leaks from the gasket.
Thecatchcanalsobeadjustedasfollows:
1. Adjust the door catch by loosening the four
mounting screw s located on the inside sur-
face of the oven door.
2. The adjustment is correct when no steam
leaks from the gasket.
Door
Oven
C
C
Oven
Door
Figure 12